Zusammenarbeit
KUNST
SCHÖNHEIT & WELLNESS
HANDWERK
KULTUR & GESCHICHTE
UNTERHALTUNG
UMFELD
ESSEN & GETRÄNKE
REVERSE ENGINEERING
WISSENSCHAFTEN
SPORT
TECHNOLOGIE
WEARABLES
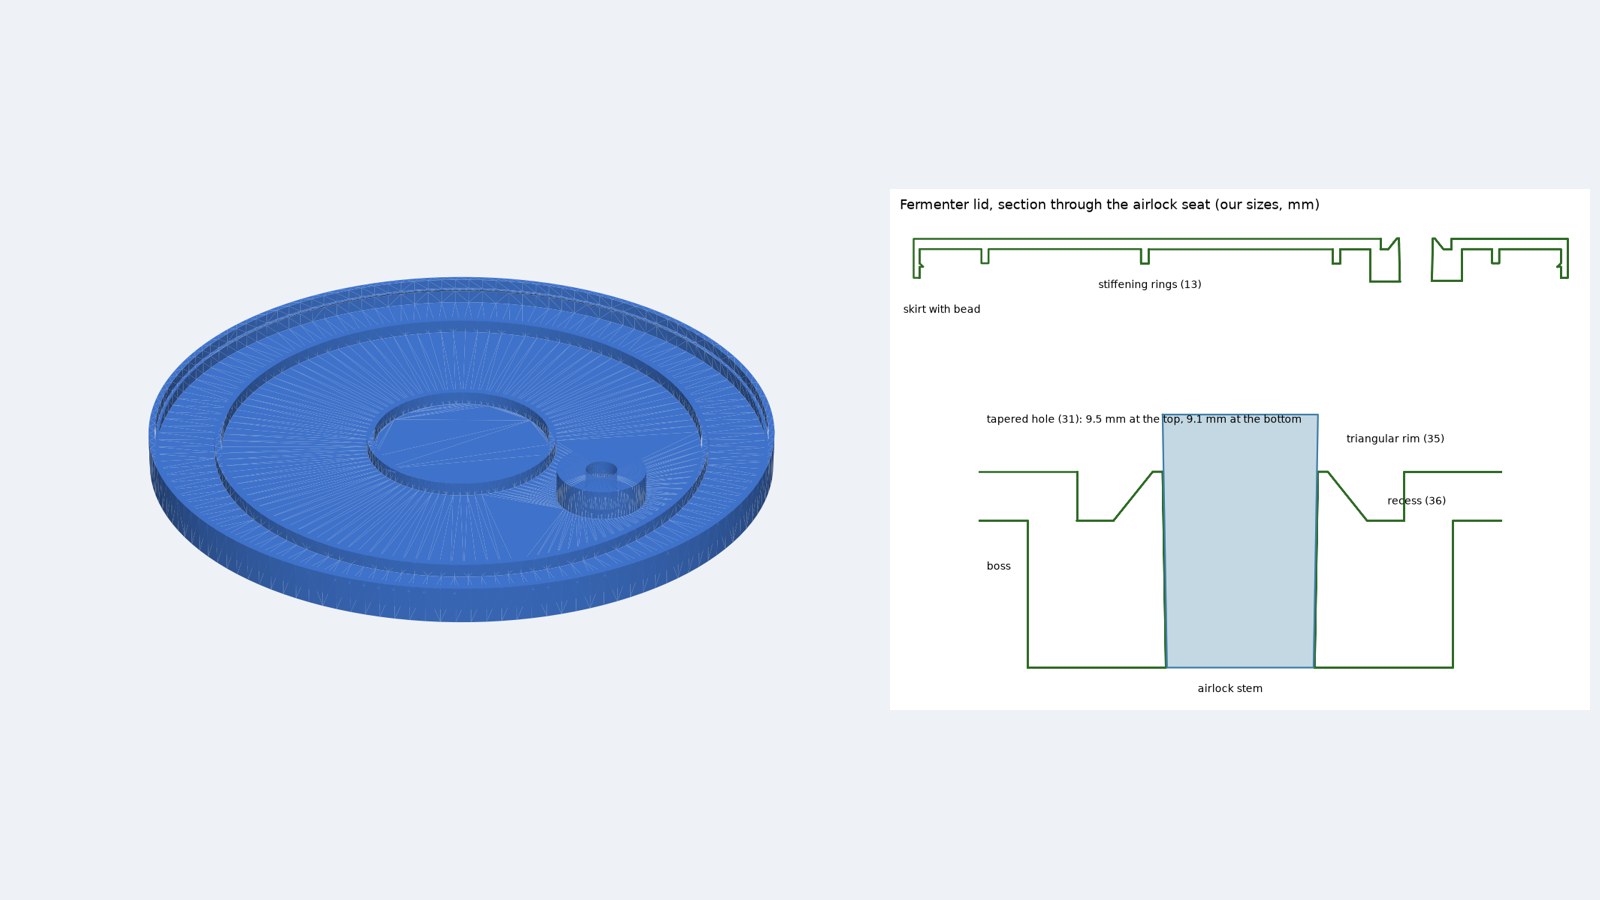
Fermenter Lid with Airlock Seat, 3D Printed in PETG
3DBonanza

Erstellt von

3DBonanza

18. November 2026US
3
0
0
0
0

Fermenter Lid with Airlock Seat, 3D Printed in PETG

A snap-on lid that turns a small food-grade pail into a fermenter. It follows L. P. Beadle's 1980 US patent 4,218,964: an off-centre tapered hole that matches the airlock stem's taper, a triangular rim set in a groove so it flexes round the stem, stiffening rings, and a snap-fit edge. You measure your pail's rim and make the file for it. All sizes are ours, and we have not printed or tested it yet.
Anfänger
About 10 hours, mostly printing

Anweisungen

1

Lid size, stem depth and gas force

Jupyter-Notebook wird geladen …
2

Read US 4,218,964

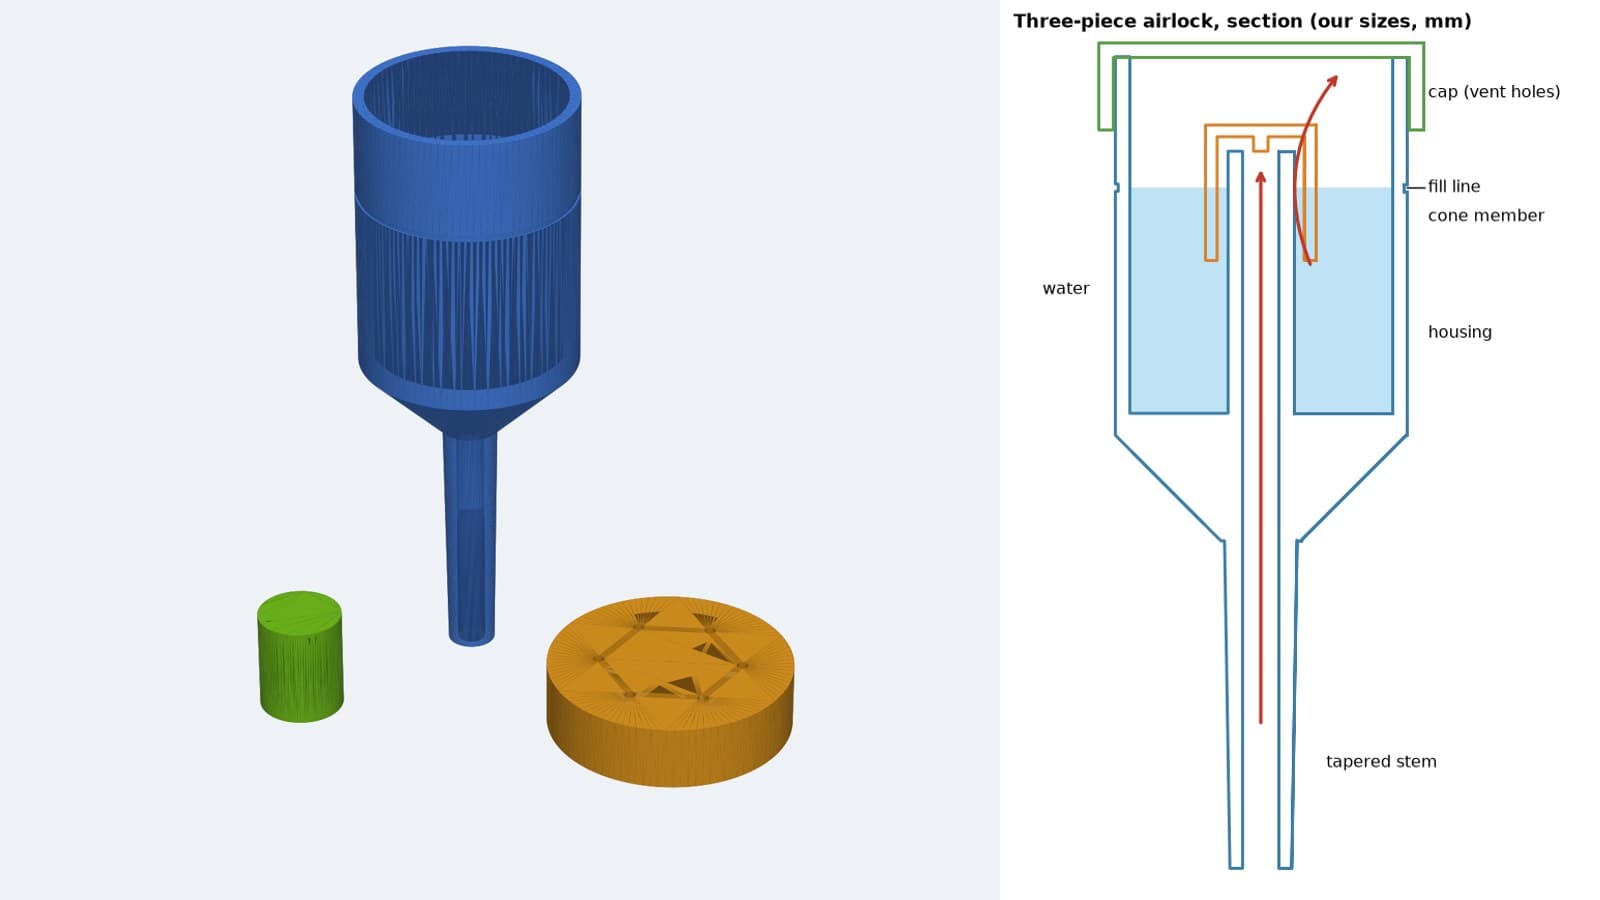
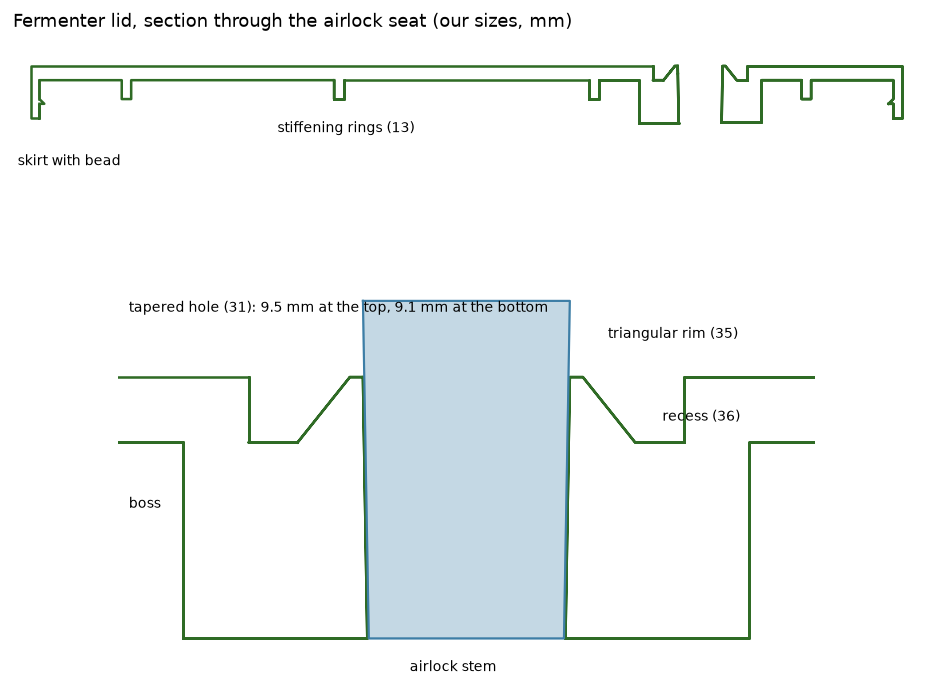
"The stem support structure 30 includes a tapered hole the depth and slope of which are adapted to conform to the taper of stem 26 and to provide a resilient, gripping action ... annular rim portion 35 is defined by depressed circular groove 36 which provides the annular rim 35 with a type of hinge action." He put the hole off centre so the lid would not crack. The picture is our section.
Schritt 2 - Image 1
3

Measure the pail

Use a food-grade plastic pail with a rim lip all round. Measure the lip's outside diameter, and from the pail's top edge to the underside of the lip.

Benötigte Werkzeuge:

Digitaler Messschieber 6 ZollDigitaler Messschieber 6 Zoll
GäreimerGäreimer
4

Make the lid for your pail

Run it in FreeCAD with your two measurements: OUT=. LIP_D= LIP_H= freecadcmd build_all.py
build_all.pypython
"""Batch 2428 -- snap-on fermenter lid with an airlock seat, after L. P. Beadle, US 4,218,964 (1980): an off-centre aperture with a
downward-inward taper matching the airlock stem's taper (hole 31), an annular rim of triangular section (35) set off by a depressed
groove (36) that gives a hinge action, reinforcing ridges (13), and a snap-fit peripheral edge. ALL SIZES ARE OURS.
Ours differs from his claim in one point: our rim stands in a recess and its top is level with the lid's top face (his rises above
it), so the lid prints flat on its top face. Parameters: the pail's rim, measured by the maker (LIP_D, LIP_H).
Run: OUT=<dir> [LIP_D=180] [LIP_H=4] freecadcmd build_all.py   (mm; z 0 = lid top face, lid body below it)"""
import math, os
import FreeCAD as App, Part, MeshPart
OUT = os.environ["OUT"]
V = App.Vector
LIP_D = float(os.environ.get("LIP_D", "180"))    # outside diameter of the pail's rim lip
LIP_H = float(os.environ.get("LIP_H", "4"))      # from the pail's top edge to the underside of its lip
def zcyl(r, z0, z1, x=0, y=0):
    return Part.makeCylinder(r, z1 - z0, V(x, y, z0), V(0, 0, 1))
def zcone(r0, r1, z0, z1, x=0, y=0):
    return Part.makeCone(r0, r1, z1 - z0, V(x, y, z0), V(0, 0, 1))
def ring(r_in, r_out, z0, z1, x=0, y=0):
    return zcyl(r_out, z0, z1, x, y).cut(zcyl(r_in, z0 - 1, z1 + 1, x, y))
def save(sh, name):
    bb = sh.BoundBox
    print(name, "valid", sh.isValid(), "solids", len(sh.Solids), "bbox", [round(v, 1) for v in (bb.XLength, bb.YLength, bb.ZLength)],
          "volume_cm3", round(sh.Volume / 1000, 1))
    MeshPart.meshFromShape(Shape=sh, LinearDeflection=0.05, AngularDeflection=0.15).write(os.path.join(OUT, name + ".stl"))

PLATE = 3.0
CLEAR, SKIRT_W = 0.4, 1.8
SKIRT_IN = LIP_D / 2 + CLEAR                     # skirt inner radius
R_OUT = SKIRT_IN + SKIRT_W
SKIRT_H = LIP_H + 4.0                            # skirt reaches 4 mm below the lip
BEAD = 1.0                                       # bead stands 1 mm in from the skirt, catching under the lip
SEAT_R_POS = 0.55 * LIP_D / 2                    # off-centre, as Beadle's Fig. 1
SX = SEAT_R_POS
# tapered hole: our airlock stem is 10.0 mm at the top and 8.5 mm at the tip over 45 mm (0.0167 mm per mm on the diameter)
BOSS_D, BOSS_H = 26.0, 9.0                       # boss under the plate holding the seat
HOLE_TOP, HOLE_LEN = 9.5, PLATE + BOSS_H         # 9.5 mm at the top face
HOLE_BOT = HOLE_TOP - HOLE_LEN * 1.5 / 45
POCKET_R, POCKET_D = 10.0, 3.0                   # recess (his groove 36) the rim stands in
RIM_BASE = 3.0                                   # triangular rim (his 35): base 3 mm wide on the recess floor, apex level with the top face

lid = zcyl(R_OUT, -PLATE, 0)
lid = lid.fuse(ring(SKIRT_IN, R_OUT, -PLATE - SKIRT_H, -PLATE + 0.01))
# bead on the skirt's inside at the lip's underside, 45-degree chamfer below it so it prints with the lid upside down
zb = -PLATE - LIP_H
bead = zcone(SKIRT_IN, SKIRT_IN - BEAD, zb - BEAD, zb).fuse(zcyl(SKIRT_IN - BEAD, zb - BEAD - 0.01, zb)).cut(zcyl(SKIRT_IN - BEAD, zb - 3, zb + 1))
bead = Part.makeCylinder(SKIRT_IN + 0.01, BEAD, V(0, 0, zb - BEAD)).cut(Part.makeCone(SKIRT_IN - BEAD, SKIRT_IN, BEAD, V(0, 0, zb - BEAD)))
lid = lid.fuse(bead)
# reinforcing ridges (his 13): two rings under the plate
for r in (0.3 * LIP_D / 2, 0.8 * LIP_D / 2):
    lid = lid.fuse(ring(r - 1.0, r + 1.0, -PLATE - 4.0, -PLATE + 0.01))
# seat boss under the plate
lid = lid.fuse(zcyl(BOSS_D / 2, -PLATE - BOSS_H, -PLATE + 0.01, SX, 0))
# recess around the seat, from the top face down
lid = lid.cut(zcyl(POCKET_R, -POCKET_D, 1, SX, 0))
# triangular rim inside the recess: inner face = the hole, outer face sloping down to the recess floor
rim_outer_top = HOLE_TOP / 2 + 0.6
rim = Part.makeCone(HOLE_TOP / 2 + RIM_BASE, rim_outer_top, POCKET_D, V(SX, 0, -POCKET_D))
lid = lid.fuse(rim)
# the tapered hole: 9.5 at the top face, narrowing downward (his "downwardly and inwardly directed ... tapered surface")
lid = lid.cut(Part.makeCone(HOLE_TOP / 2, HOLE_BOT / 2, HOLE_LEN, V(SX, 0, 0), V(0, 0, -1)))
lid = lid.removeSplitter()
save(lid, "fermenter-lid")

# checks
print("lid outside diameter", round(2 * R_OUT, 1), "mm (fits a bed of at least", round(2 * R_OUT + 10), "mm)")
print("hole", HOLE_TOP, "->", round(HOLE_BOT, 2), "mm over", HOLE_LEN, "mm")
for depth in (20, 25, 30, 35):
    d = 8.5 + 1.5 * depth / 45
    print(f"stem pushed {depth} mm below the top face: stem {d:.2f} mm where the hole is {HOLE_TOP:.2f}")
print("bead overlap under the lip", BEAD, "mm; skirt clearance", CLEAR, "mm")

Benötigte Werkzeuge:

Desktop-ComputerDesktop-Computer
CAD-SoftwareCAD-Software
5

Print the lid

Print it top face down on the bed, no supports: the skirt and stiffening rings grow upwards. PETG sold for food contact, a stainless steel nozzle (brass nozzles can contain lead), 0.2 mm layers, at least 4 walls. The file here is for a 180 mm lip.
DesigndateiSTLCC0 - Free

Materialien für diesen Schritt:

PETG-FilamentPETG-Filament125 g

Benötigte Werkzeuge:

FDM-3D-DruckerFDM-3D-Drucker
Düsensatz für 3-D-DruckerDüsensatz für 3-D-Drucker
6

Fit the airlock

Push the airlock's stem down into the hole by hand until it wedges, about 30 mm for our airlock. Do not force it further.

Benötigte Werkzeuge:

GärspundGärspund
7

Leak test

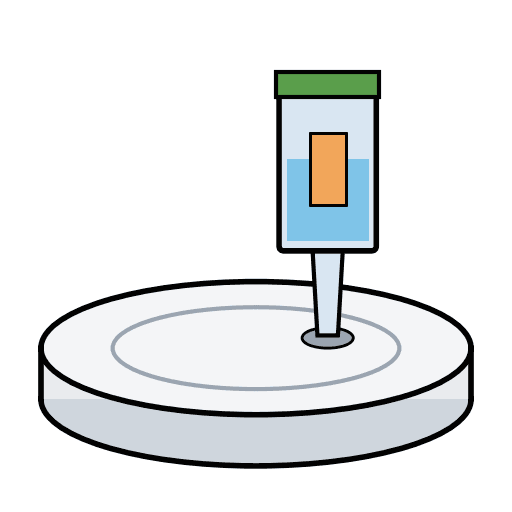
Fill the airlock to its line with water. Snap the lid on the empty pail. Press the middle of the lid gently: gas must bubble through the airlock, with no hiss at the rim or stem.

Benötigte Werkzeuge:

GäreimerGäreimer
GärspundGärspund
WasserWasser
8

Sanitise

Wipe or soak the lid in no-rinse sanitiser mixed as its label says. Do not boil it: PETG softens at about 80 °C.

Benötigte Werkzeuge:
DesinfektionsmittelDesinfektionsmittel
WasserWasser
9

Close the fermenter

Start the bead under the lip at one side and press the lid down all round until it snaps on.

Benötigte Werkzeuge:

GäreimerGäreimer
10

Troubleshooting

Lid problems and fixes.

Flow

Loading...
11

History and honest limits

**Leigh P. Beadle**, US 4,218,964, filed 21 May 1979, issued 26 August 1980, assigned to Specialty Products International Ltd. His lids were moulded in flexible plastic, and he noted that drilling a plain hole in the middle of a lid led to cracks and to gas escaping round the stem. He gives no sizes. Ours: every size, PETG, the bead and the fit to a measured pail. One change: his rim rises above the lid's top; ours stands in a recess with its top level with the lid, so the lid prints flat. PETG is stiffer than his plastic, so the grip comes more from the matched taper than from the rim. Checked in CAD; not yet printed or brewed with by us.

Materialien

1

Benötigte Werkzeuge

9

Designdateien

1

Dieser Bauplan stellt her

CC0 Gemeinfrei

Dieser Blueprint ist unter CC0 veröffentlicht. Sie dürfen dieses Werk für jeden Zweck frei kopieren, ändern, verbreiten und verwenden, ohne um Erlaubnis zu fragen.

Unterstützen Sie den Maker, indem Sie Produkte über seinen Blueprint kaufen, wo er eine Maker-Provision von Anbietern festgelegt, verdient. Oder erstellen Sie eine neue Iteration dieses Blueprints und verbinden Sie ihn in Ihrem eigenen Blueprint, um Einnahmen zu teilen.

Diskussion

(0)

Anmelden um an der Diskussion teilzunehmen

Kommentare werden geladen...