
Zusammenarbeit
KUNST
SCHÖNHEIT & WELLNESS
HANDWERK
KULTUR & GESCHICHTE
UNTERHALTUNG
UMFELD
ESSEN & GETRÄNKE
REVERSE ENGINEERING
WISSENSCHAFTEN
SPORT
TECHNOLOGIE
WEARABLES
Cart Collar: a Straw-Stuffed Forewale and Body, Laced and Covered (Hasluck, Harness Making, 1904)
Tex

Erstellt von

Tex

13. November 2026FO
3
0
0
0
0

Cart Collar: a Straw-Stuffed Forewale and Body, Laced and Covered (Hasluck, Harness Making, 1904)

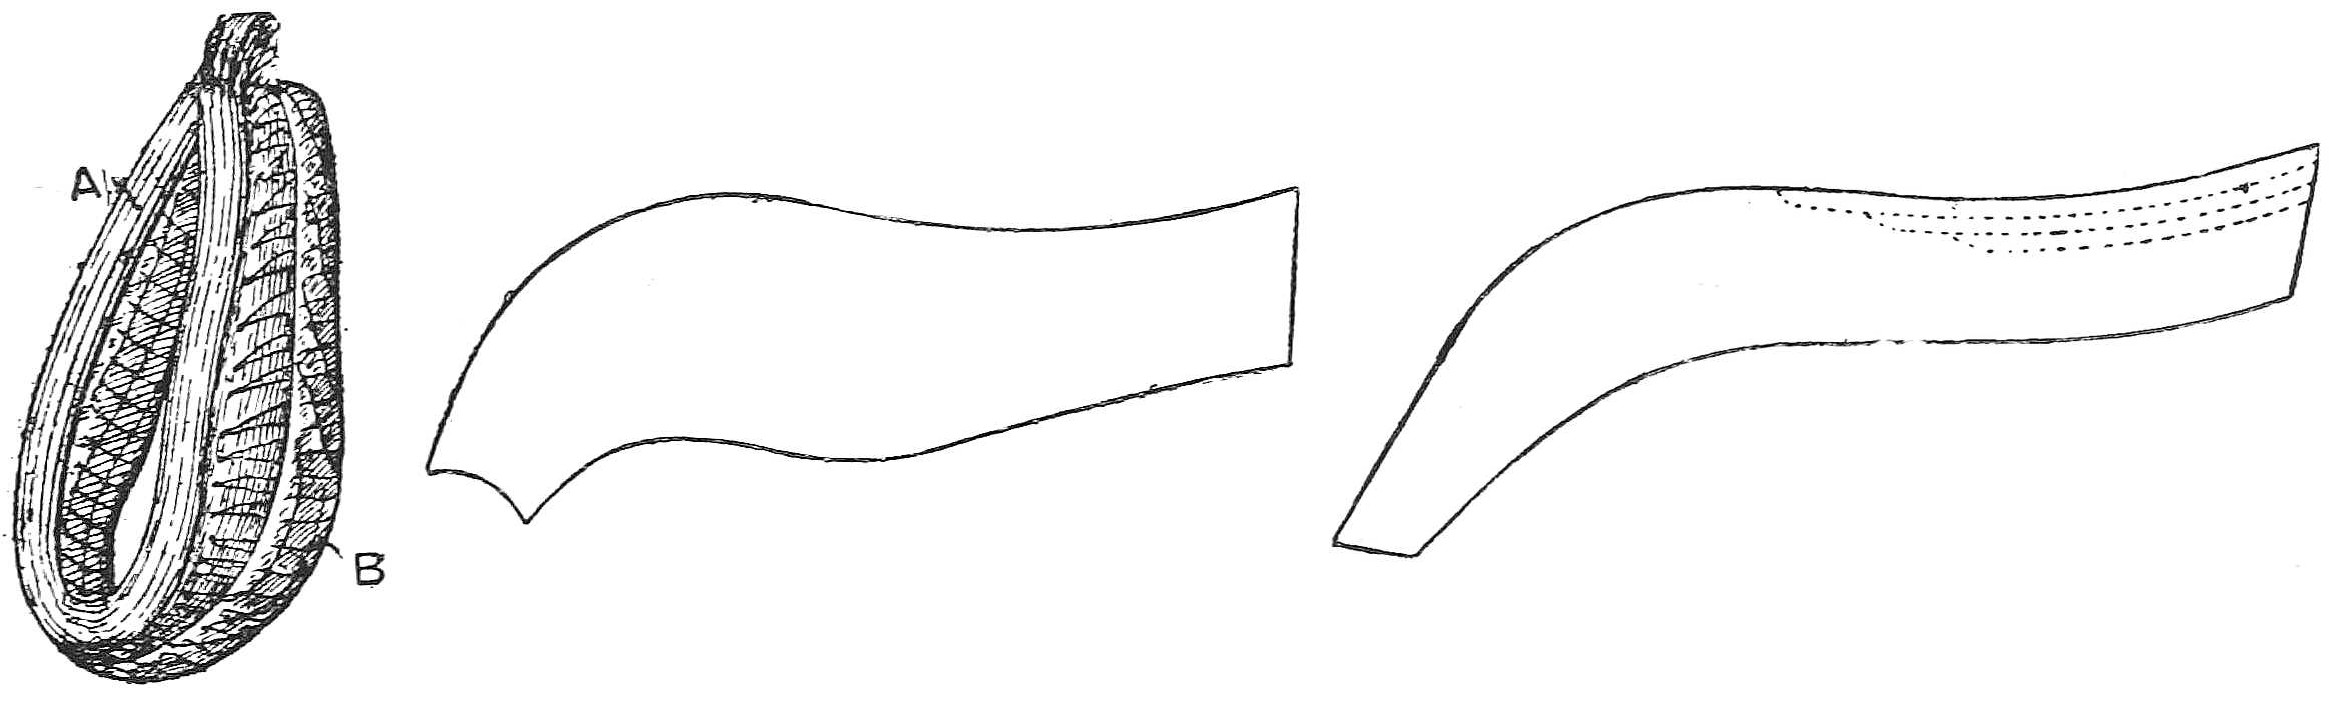
The collar of a working cart horse, from Paul N. Hasluck's Harness Making (1904). A leather tube, the forewale, is stitched slack and rammed with wisps of rye straw until "as hard as a piece of wood", bent round the knee into shape; then the body is built against it from a lined pocket of straw and flock, laced tight and beaten to shape, and covered with leather side-pieces. All sizes are his. It follows the cart bridle; the cart saddle comes next.
Erfahren
About 3 days

Anweisungen

1

How long to cut the forewale

Jupyter-Notebook wird geladen …
2

Read Harness Making, ch. VI

"Great attention must be given to shaping, for a well-shaped body is very important from the point of view of both utility and appearance; it should be graceful and rounded at the bottom and somewhat flat at the draught, gradually growing narrow towards the top."
3

Cut and fold the forewale

Cut the forewale 7½ in wide and as long as the notebook gives; the bellies of gear hides will do. Damp it thoroughly and stretch it on a flat board, holding one edge and pulling the other with the pincers. Fold it over 2¾ in all along, set the compass to 2¼ in and mark from the turned side, leaving ¼ in outside the mark for the lining and about 2 in on the other side for the body and side-pieces. Tack along the mark here and there.

Materialien für diesen Schritt:

GeschirrlederGeschirrleder1 Stück

Benötigte Werkzeuge:

LedermesserLedermesser
KiefernbrettKiefernbrett
KneifzangeKneifzange
StechzirkelStechzirkel
4

Stitch the forewale

Make a ten-strand thread, waxing it before and after twisting, long enough to stitch the whole length. Stitch with strong needles about three stitches to the inch, leaving the stitches slack, especially for about a foot each side of the centre, so the forewale bends easier and the stitches tighten in stuffing. If the grain is uneven, put a slack piece of calico inside and catch both its sides in the stitching.

Materialien für diesen Schritt:

LederfadenLederfaden1 Stück
BaumwolltuchBaumwolltuch1 Stück

Benötigte Werkzeuge:

Zwei SattlernadelnZwei Sattlernadeln
AhleAhle
5

Stuff the forewale with straw

Pull rye straw straight across the knee, cut the ears off and cut it to about 9 in. Mark the centre of the forewale. With it on the block, your left foot on it 2½ in from the centre, put about half a dozen straws, given a half twist, in the nick of the collar rod and drive them in to the foot; beat wisp and leather with the mallet. Put the next wisp in from the other end, and go on alternately, beating after each wisp so it does not drive the others back. Keep turning the forewale round the knee, one side to the right and the other to the left, so both sides are shaped alike, until all is "as hard as a piece of wood".

Materialien für diesen Schritt:

RoggenstrohRoggenstroh1 Stück

Benötigte Werkzeuge:

LedermesserLedermesser
KummetstopfeisenKummetstopfeisen
Holzhammer (Klüpfel)Holzhammer (Klüpfel)
HartholzblockHartholzblock
6

Close the top of the forewale

Near the top shape it inwards a little, fill it until quite firm, lay it flat on the block and beat it into shape with the round mallet, holding one end down with the knees. Damp it, turn it back a little at the top on both sides, and stitch both points firmly together with waxed twine, collar needle and hand iron, cutting a little off if needed to bring it to the right length.

Materialien für diesen Schritt:

LederfadenLederfaden1 Stück

Benötigte Werkzeuge:

Holzhammer (Klüpfel)Holzhammer (Klüpfel)
HartholzblockHartholzblock
KummetnadelKummetnadel
HandeisenHandeisen
7

Make the lining

Cut the lining of linen or woollen check to his Fig. 96 in the size required. Cut a leather throat-piece about 2 in wide at the base, widening in a sweep to 3½ in. Stitch the narrowest end of the lining, about 4½ in deep, to the sweep of the throat-piece, turning in a little of the cloth. Tack the throat-piece to the exact centre of the collar by the stitches, add a tack where the forewale begins to run straight up, leaving the lining slack, and another within 5 in of the top on both sides, pulling the lining tight to there and turning the edges in. Whip the lining in all round through the leather rim with half a four-cord black-wax thread.

Materialien für diesen Schritt:

LeinenstoffLeinenstoff1 Stück
GeschirrlederGeschirrleder1 Stück
LederfadenLederfaden1 Stück

Benötigte Werkzeuge:

LedermesserLedermesser

SchereSchere
AhleAhle
Zwei SattlernadelnZwei Sattlernadeln
8

Stuff the throat

Make a beeswax thread of four or five strands 3½ yd long and another of six or seven strands 1½ yd long. Sit with your right leg through the lining, throat up. Put the middle of a big handful of straw in the centre of the throat-piece, between it and the forewale, and stitch from the centre of the throat over the straw to the wide margin of leather, twice at the centre, then about 1½ in apart for about 6 in up one side. Do the other side exactly alike. Drive wisps on the stuffing stick to the centre from both sides until the bottom is firm and hard. Lay it on the block, lining up, beat the throat outwards with the round mallet, and buckle the throat strap round it and the forewale as tight as possible.

Materialien für diesen Schritt:

BienenwachsBienenwachs1 Stück
LederfadenLederfaden1 Stück
RoggenstrohRoggenstroh1 Stück

Benötigte Werkzeuge:

KummetnadelKummetnadel
HandeisenHandeisen
KummetstopfeisenKummetstopfeisen
Holzhammer (Klüpfel)Holzhammer (Klüpfel)
HartholzblockHartholzblock
Eisenschnalle mit DornEisenschnalle mit Dorn
9

Build the body

Cut a wisp big enough to fill the body and long enough to run its full length, square at one end, and wrap hemp five or six times round it for about 6 in. With both knees through the collar, lay a piece of drummed flock the size of the lining on it, to within an inch of the edge, level everywhere, and a handful of straw over the flock opposite the draught. Put the long wisp inside, ramming it toward the throat, pull the lining over the straw and pin the top with the seat-awl.

Materialien für diesen Schritt:

RoggenstrohRoggenstroh1 Stück
HanfschnurHanfschnur1 Stück
WollflockenWollflocken1 Stück

Benötigte Werkzeuge:

LedermesserLedermesser
AhleAhle
10

Lace and beat it to shape

Turn the collar and lace the lining to the leather from bottom to top, as tight as possible, "as in lacing a boot". Beat the straw down between the lacing with the mallet handle, then tighten the lacing again. If it is not firm enough, ram wisps toward the throat from between the stitches up to the draught, and harden it above the draught with wisps from the top, shaping by tightening or slackening the lacing. At the very top leave it rather full, with extra flock to ease the neck. Make the other side with the same flock and straw, the same shape and size; level any lumps in the flock with the seat-awl.

Materialien für diesen Schritt:

WollflockenWollflocken1 Stück
RoggenstrohRoggenstroh1 Stück

Benötigte Werkzeuge:

KummetnadelKummetnadel
Holzhammer (Klüpfel)Holzhammer (Klüpfel)
AhleAhle
11

Close the top and cap the points

Cut the straw at the top slanting upward a little toward the back, pull the two linings together with long stitches, then stitch the two sides together and cut the spare lining. Trim the forewale points to a neat point, "neither long nor sharp". Make a cap of damped soft leather over the points, with a welt in the front, and stitch it with a lace drawn tight into the hollow between body and forewale. Leave the point of the forewale very prominent to hold the hame strap.

Materialien für diesen Schritt:

Lederriemen zum SchnürenLederriemen zum Schnüren1 Stück
GeschirrlederGeschirrleder1 Stück

Benötigte Werkzeuge:

LedermesserLedermesser
KummetnadelKummetnadel
12

Fit the side straps

Cut two straps 1½ in x 18 in; race and blacken the edges, point them for the buckle and punch four holes in each, a hole in each corner at the other end and one in the centre 2½ in from that end. Lace one on each side, down to the forewale, 5 in from the top, through the hollow between forewale and body.

Materialien für diesen Schritt:

GeschirrlederGeschirrleder1 Stück
LederfarbeLederfarbe1 Stück
Lederriemen zum SchnürenLederriemen zum Schnüren1 Stück

Benötigte Werkzeuge:

LedermesserLedermesser
Sattler-ZiehzirkelSattler-Ziehzirkel
LederlocheisenLederlocheisen
KummetnadelKummetnadel
13

Make the side-pieces

Cut a brown-paper pattern to the made body, to his Fig. 97, a little wider and pointed at the top to shed rain; cut one side at a time, best part under the draught, and line the top for about 1 ft on each side with firm leather. Stitch three rows about 1 in apart, nine per inch; rub and blacken, and crease two rows round the outer side. Join the two sides at the top end to end and cover the joint with a creased, pricked 1¼ in strip stitched over its centre.

Materialien für diesen Schritt:

GeschirrlederGeschirrleder1 Stück
LederfadenLederfaden1 Stück
LederfarbeLederfarbe1 Stück

Benötigte Werkzeuge:

LedermesserLedermesser
Pricking-EisenPricking-Eisen
AhleAhle
Zwei SattlernadelnZwei Sattlernadeln
FalzbeinFalzbein
14

Lace the side-pieces on

Damp the side-pieces well, beat the water out, and fix them at the top centre with the seat-awl; pull them together top to bottom so they overlap about 3 in at the bottom, shaved thin there. Lace them in from the throat-piece with a damped, greased lace, stitches 2 to 2½ in apart and catching the lining each time; then run a second lace close along the forewale all round, stitches about 1½ in apart.

Materialien für diesen Schritt:

Lederriemen zum SchnürenLederriemen zum Schnüren1 Stück

Benötigte Werkzeuge:

AhleAhle
KummetnadelKummetnadel
15

Troubleshooting

Cart collar troubleshooting.

Flow

Loading...
16

History and honest limits

From **Harness Making**, edited by Paul N. Hasluck, Cassell and Company, 1904, chapter VI, "Cart Collars" (Project Gutenberg #70169). All sizes are his. Not made here: his pipe collar (an iron inside the forewale), the basil top lining used "in some localities", and the under-draught pads and caned side-pieces he thinks unnecessary. The hames that fit round the collar are not made in this chapter.

Materialien

10

Benötigte Werkzeuge

17

Dieser Bauplan stellt her

CC0 Gemeinfrei

Dieser Blueprint ist unter CC0 veröffentlicht. Sie dürfen dieses Werk für jeden Zweck frei kopieren, ändern, verbreiten und verwenden, ohne um Erlaubnis zu fragen.

Unterstützen Sie den Maker, indem Sie Produkte über seinen Blueprint kaufen, wo er eine Maker-Provision von Anbietern festgelegt, verdient. Oder erstellen Sie eine neue Iteration dieses Blueprints und verbinden Sie ihn in Ihrem eigenen Blueprint, um Einnahmen zu teilen.

Diskussion

(0)

Anmelden um an der Diskussion teilzunehmen

Kommentare werden geladen...