Zusammenarbeit
KUNST
SCHÖNHEIT & WELLNESS
HANDWERK
KULTUR & GESCHICHTE
UNTERHALTUNG
UMFELD
ESSEN & GETRÄNKE
REVERSE ENGINEERING
WISSENSCHAFTEN
SPORT
TECHNOLOGIE
WEARABLES
Surface Dash-Wheel Churn: A Fast Fan Skims the Cream Over a Partition on a Parallel-Rule Frame
Buttercup

Erstellt von

Buttercup

9. November 2026IE
3
0
0
0
0

Surface Dash-Wheel Churn: A Fast Fan Skims the Cream Over a Partition on a Parallel-Rule Frame

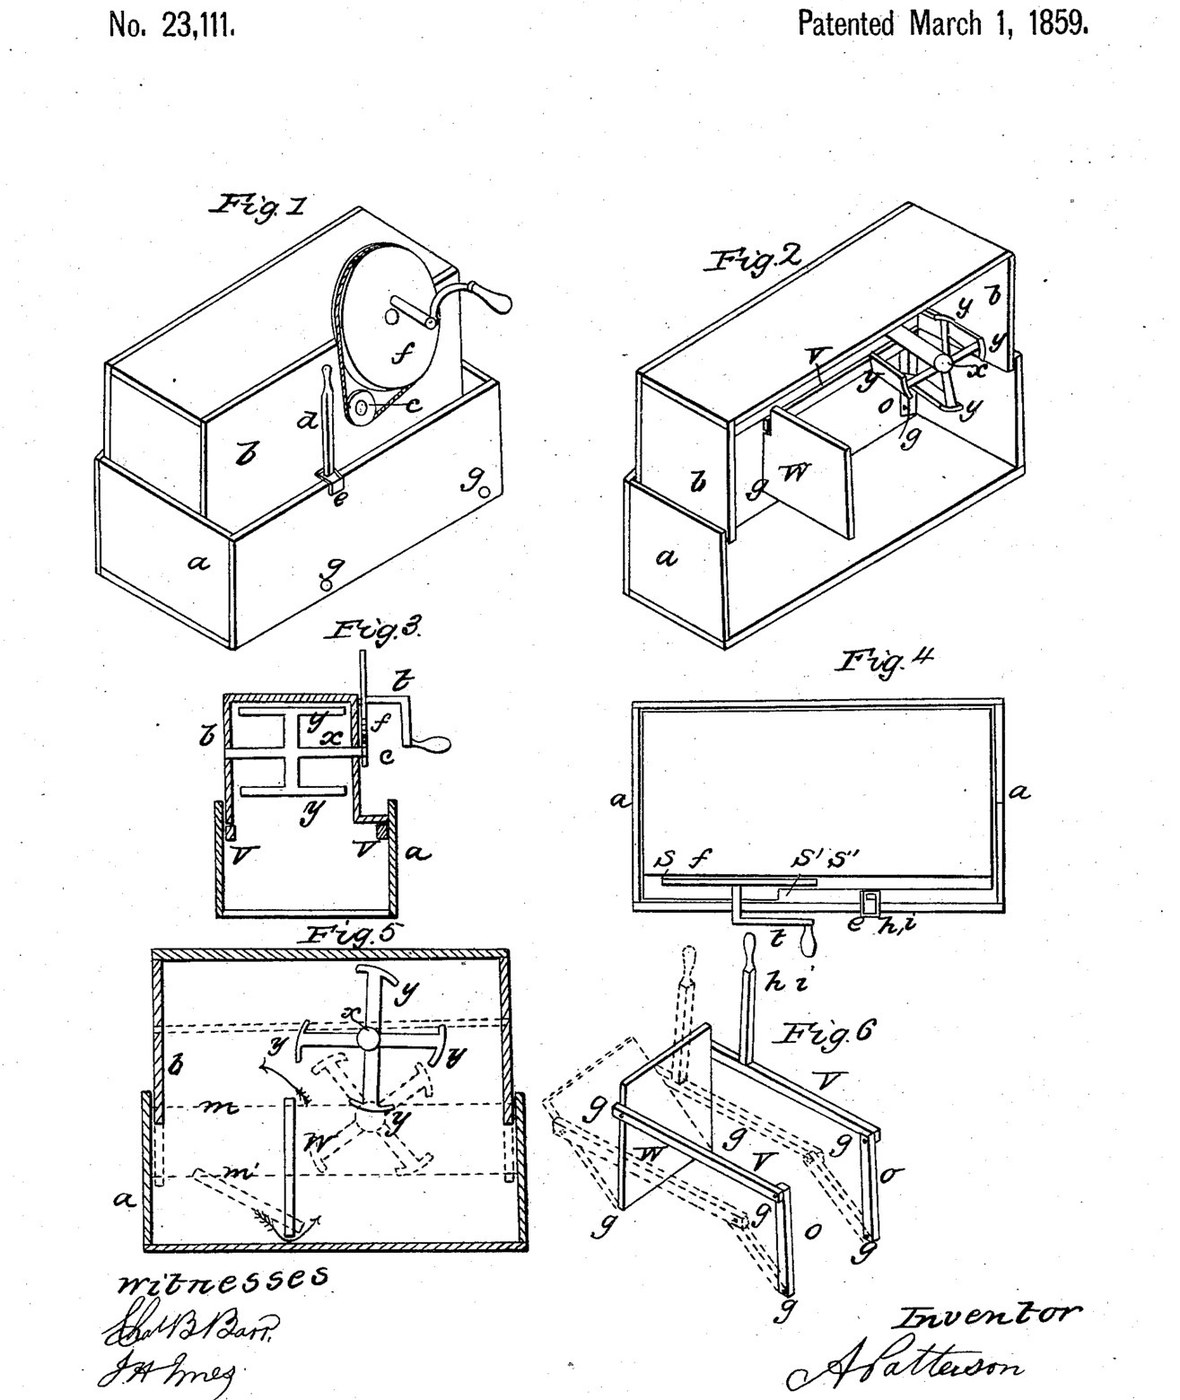
Andrew Patterson of Birmingham, Pennsylvania, received US 23,111, dated 1 March 1859, for a churn whose fan wheel only strikes the surface of the cream. Turned fast through a pulley, it throws the cream over a partition; the cream sinks and comes back under it. The wheel's chamber is also the churn's lid and rests on a jointed frame that works like a parallel rule, so a handle sets the fan to dip about 1/8 in. into whatever quantity of cream is in the box. This rung builds it in pine with a belt-driven printed fan.
Fortgeschritten
About 8 hours, plus printing

Anweisungen

1

Setting the rest for the cream you have

Jupyter-Notebook wird geladen …
2

A dasher that adjusts to the tub, before it

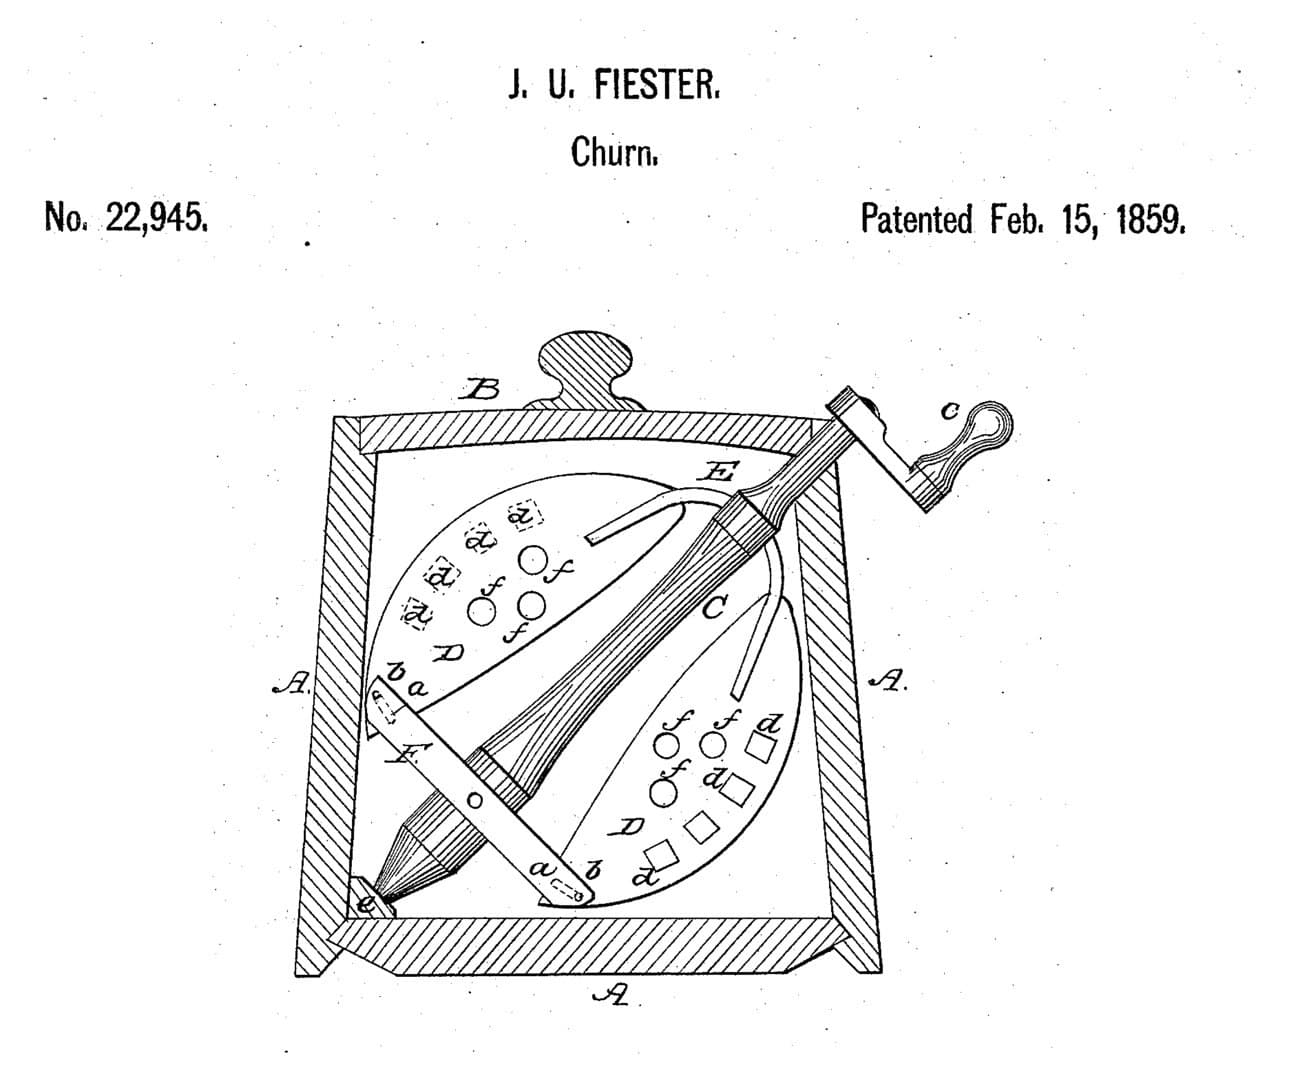
Fiester's blades spread to fit his tub. Patterson moves his whole fan up and down to the cream's surface.
3

Read US 23,111

"... the rest o, o, w, v, v, is raised or lowered until when b is placed on it the buckets or fans will dip about one-eighth of an inch into the cream and the crank is turned rapidly in such manner that the wheel shall impel the milk or cream which it strikes in the direction of w".
4

Print the hub

The fan's hub with eight square sockets for the arms. PETG, 0.2 mm layers, 40 % infill, 4 walls; wash before first use.
DesigndateiSTLCC0 - Free
5

Print the bucket y

A curved bucket for an arm pair's ends. Print four. PETG, 0.2 mm layers, 40 % infill, 4 walls; wash before first use.
DesigndateiSTLCC0 - Free
6

Box a

From 18 mm pine make an oblong box open at the top, 600 x 300 mm and 320 mm deep inside: floor 636 x 336 mm, sides 636 x 320 mm, ends 300 x 320 mm, glued and screwed.

Materialien für diesen Schritt:

KiefernbrettKiefernbrett2 Stück
HolzleimHolzleim1 Stück
HolzschraubenHolzschrauben30 Stück

Benötigte Werkzeuge:

HandsägeHandsäge
AkkubohrschrauberAkkubohrschrauber
BohrersatzBohrersatz
SchraubzwingenSchraubzwingen
SchleifpapierSchleifpapier
Schraubendreher-SatzSchraubendreher-Satz
Bandmaß (Rollmeter)Bandmaß (Rollmeter)
7

The parallel rest v v o o w

Cut two hardwood uprights o 30 x 13 x 190 mm and pin each to a side of the box with an 8 mm bolt 22 mm above the inside floor, 100 mm from the right end. Cut a pine division board w 228 x 170 mm and pin its foot to two hardwood blocks on the floor 200 mm from the left end, so it stands 16 mm clear of the floor. Cut two hardwood bars v 20 x 20 x 340 mm and pin them to the uprights' tops and w's top corners, 300 mm apart, with 160 mm between each foot and top pivot, so the bars stay level as the frame leans. Screw a hardwood handle h i 30 x 12 mm to the left end of one bar, long enough to stand 100 mm above the rim, and bend a flat-bar frame e over the rim to hold it with a pin through holes drilled every 20 mm in the handle.

Materialien für diesen Schritt:

HartholzbrettHartholzbrett1 Stück
KiefernbrettKiefernbrett1 Stück
MaschinenschraubenMaschinenschrauben8 Stück
Sicherungsmutter mit KunststoffeinsatzSicherungsmutter mit Kunststoffeinsatz8 Stück

UnterlegscheibeUnterlegscheibe16 Stück
Baustahl-FlachstahlBaustahl-Flachstahl1 Stück
HolzschraubenHolzschrauben6 Stück

Benötigte Werkzeuge:

HandsägeHandsäge
AkkubohrschrauberAkkubohrschrauber
BohrersatzBohrersatz
Bügelsäge (Metallsäge)Bügelsäge (Metallsäge)
SchraubstockSchraubstock
Feilen (Handfeile)Feilen (Handfeile)
RollgabelschlüsselRollgabelschlüssel
8

Chamber b and the fan

From pine make chamber b open below: two sides 360 x 270 mm, two ends 234 x 270 mm and a top 360 x 270 mm, 270 mm wide outside so it sits on the bars inside a. Drill both sides 12.5 mm for the fan shaft 40 mm up from b's lower edge and 230 mm from its left end, and one side again 170 mm above that for the crank shaft. Cut the 12 mm stainless rod to 285 mm for the fan. Push eight hardwood arms 18 x 18 x 69 mm into the hub's sockets, screw a bucket across each pair of arm ends, slide the hub onto the shaft inside b and fix it with an M4 screw across.

Materialien für diesen Schritt:

KiefernbrettKiefernbrett2 Stück
HolzleimHolzleim1 Stück
HolzschraubenHolzschrauben20 Stück
EdelstahlstabEdelstahlstab1 Stück
HartholzbrettHartholzbrett1 Stück
PETG-FilamentPETG-Filament1 Stück
MaschinenschraubenMaschinenschrauben9 Stück
Sicherungsmutter mit KunststoffeinsatzSicherungsmutter mit Kunststoffeinsatz9 Stück

Benötigte Werkzeuge:

FDM-3D-DruckerFDM-3D-Drucker
HandsägeHandsäge
AkkubohrschrauberAkkubohrschrauber
BohrersatzBohrersatz
Bügelsäge (Metallsäge)Bügelsäge (Metallsäge)
Feilen (Handfeile)Feilen (Handfeile)
Schraubendreher-SatzSchraubendreher-Satz
9

Pulleys f and c, crank t

Cut a pulley f 240 mm across and a pulley c 60 mm across from 12 mm plywood, each with a 3 mm flange glued on the outer face, and file a groove round each rim for the cord. Fix c on the fan shaft outside b. Run a 12 mm stainless stub shaft through b's side 170 mm above, fix f on it and a hardwood crank arm 24 x 10 x 112 mm with a 24 mm dowel handle 80 mm long beyond it, out over the side of a. Tie a loop of 6 mm cotton cord round both pulleys.

Materialien für diesen Schritt:

SperrholzplatteSperrholzplatte1 Stück
HolzleimHolzleim1 Stück
EdelstahlstabEdelstahlstab1 Stück
HartholzbrettHartholzbrett1 Stück
HartholzdübelHartholzdübel1 Stück
BaumwollseilBaumwollseil1 m
MaschinenschraubenMaschinenschrauben2 Stück
Sicherungsmutter mit KunststoffeinsatzSicherungsmutter mit Kunststoffeinsatz2 Stück

Benötigte Werkzeuge:

StichsägeStichsäge
Feilen (Handfeile)Feilen (Handfeile)
AkkubohrschrauberAkkubohrschrauber
BohrersatzBohrersatz
Bügelsäge (Metallsäge)Bügelsäge (Metallsäge)
Schraubendreher-SatzSchraubendreher-Satz
10

The build in 3D

FreeCAD model of this build, the near side of both boxes cut away: box a, the uprights, division board and bars of the parallel rest leaning 50 degrees, chamber b on the bars, the fan with its buckets, pulleys f and c, the crank, and handle h i in its frame e. The cord is not drawn.
DesigndateiBLENDCC0 - Free
11

Churn

Pour in about 14 litres of heavy cream at about 15 °C, checked with the thermometer. Set chamber b on the bars and move the handle until the buckets just dip into the cream, about 3 mm, then pin it in frame e (the notebook gives the lean for other quantities). Turn the crank fast and time it: the fan throws cream over the division board and it returns under it. When the butter comes, lift b off, pour off the buttermilk, wash the butter in cold water until it runs clear, work in a pinch of salt and weigh it.

Materialien für diesen Schritt:

SchlagsahneSchlagsahne14 l
Grobes MeersalzGrobes Meersalz1 Stück
WasserWasser1 Stück

Benötigte Werkzeuge:

Einsteck-FühlerthermometerEinsteck-Fühlerthermometer
StoppuhrStoppuhr
Digitale KüchenwaageDigitale Küchenwaage
Große Rührschüssel aus EdelstahlGroße Rührschüssel aus Edelstahl
12

Troubleshooting

Surface dash-wheel churn troubleshooting.

Flow

Loading...
13

History and honest limits

**Andrew Patterson** of Birmingham, Allegheny County, Pennsylvania, US 23,111, 1 March 1859, "Churn". He held that a fast fan at the surface does more than a submerged wheel, which has to lift the whole cream, and that it also gathers the butter on the far side of the partition. He claimed box a with chamber b serving as its lid and as the frame for the dash wheel and crank. His only figure is the 1/8 in. dip; every size and material here is ours.

Materialien

16

Benötigte Werkzeuge

17

Designdateien

3

CC0 Gemeinfrei

Dieser Blueprint ist unter CC0 veröffentlicht. Sie dürfen dieses Werk für jeden Zweck frei kopieren, ändern, verbreiten und verwenden, ohne um Erlaubnis zu fragen.

Unterstützen Sie den Maker, indem Sie Produkte über seinen Blueprint kaufen, wo er eine Maker-Provision von Anbietern festgelegt, verdient. Oder erstellen Sie eine neue Iteration dieses Blueprints und verbinden Sie ihn in Ihrem eigenen Blueprint, um Einnahmen zu teilen.

Diskussion

(0)

Anmelden um an der Diskussion teilzunehmen

Kommentare werden geladen...