
Zusammenarbeit
KUNST
SCHÖNHEIT & WELLNESS
HANDWERK
KULTUR & GESCHICHTE
UNTERHALTUNG
UMFELD
ESSEN & GETRÄNKE
REVERSE ENGINEERING
WISSENSCHAFTEN
SPORT
TECHNOLOGIE
WEARABLES
Wishbone-Mast Ice Yacht: 16 ft Backbone, Twin-Pole Mast and Double Lateen Booms (Boy Mechanic, 1919)
Woody

Erstellt von

Woody

13. November 2026NO
1
0
0
0
0

Wishbone-Mast Ice Yacht: 16 ft Backbone, Twin-Pole Mast and Double Lateen Booms (Boy Mechanic, 1919)

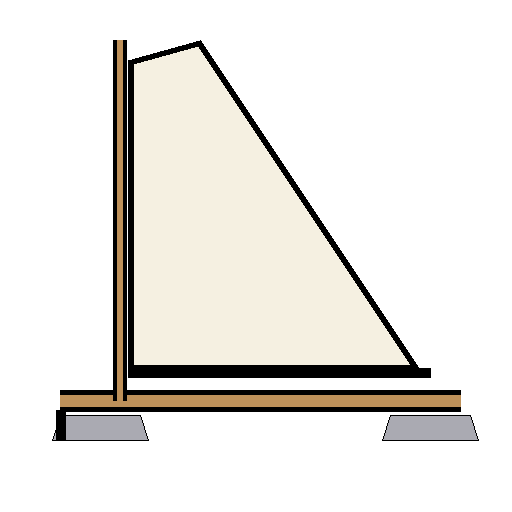
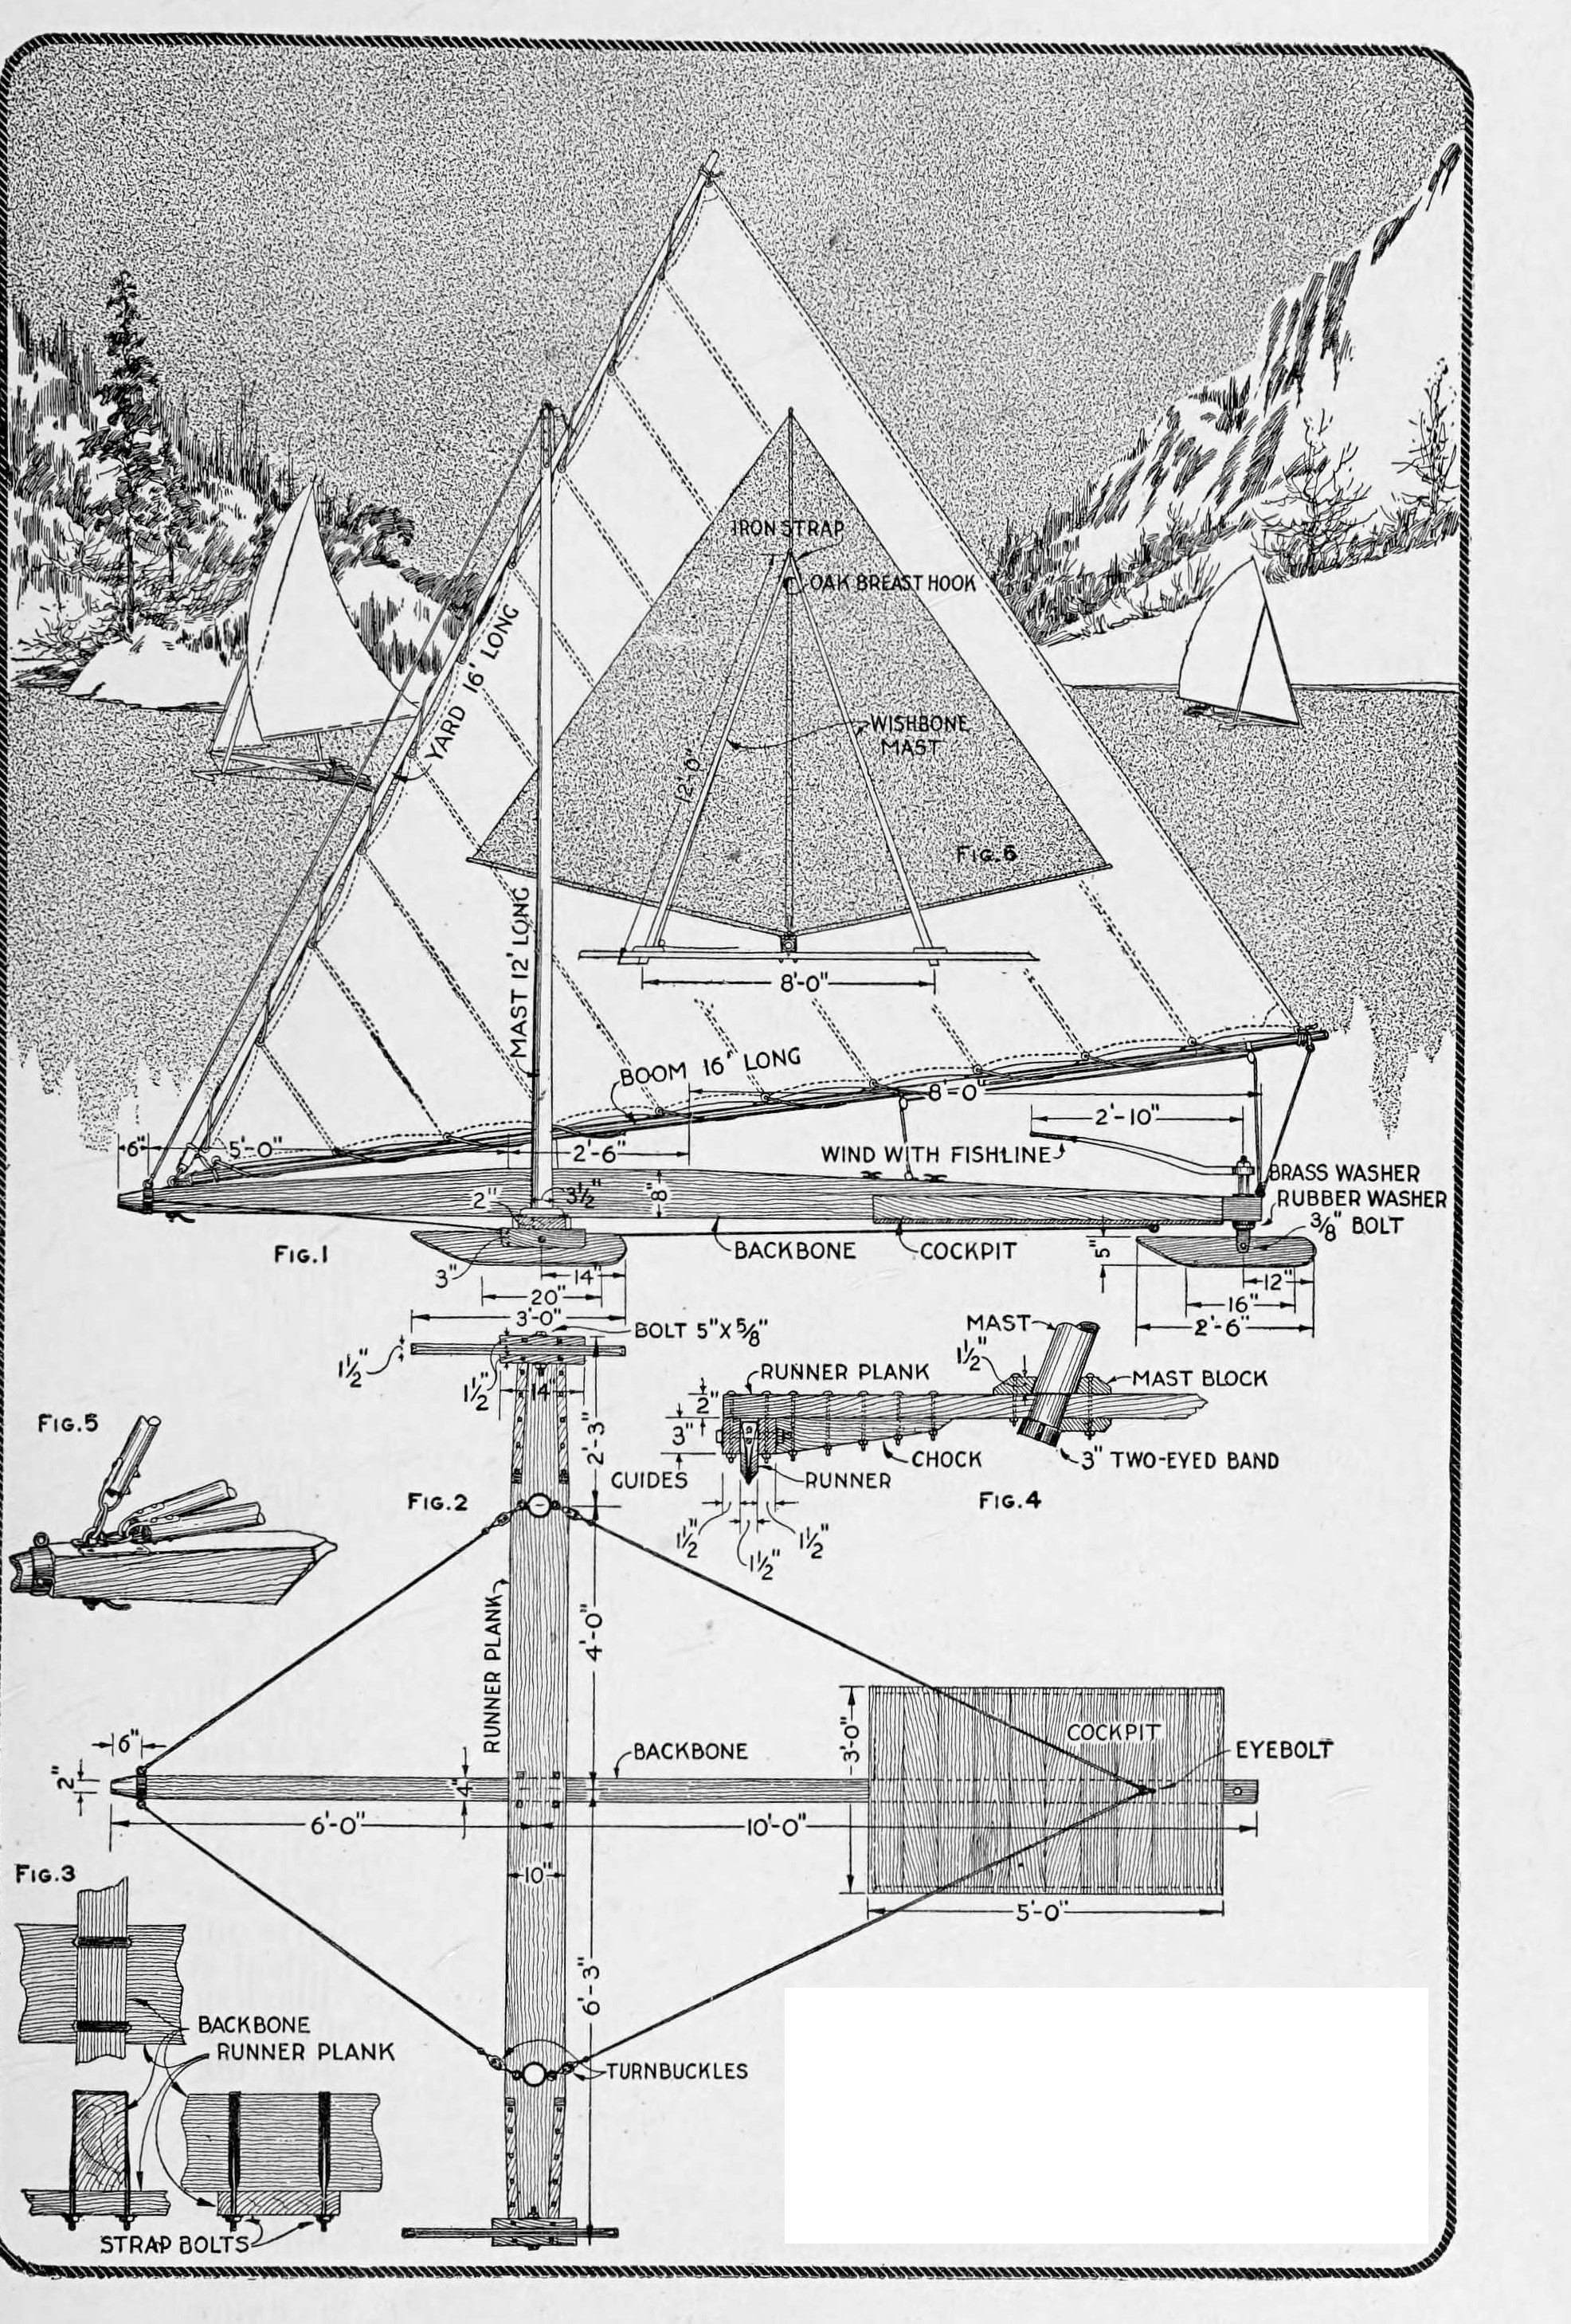
John F. Pjerrou's ice yacht from The Boy Mechanic, Book 3 (1919), for one or two passengers: a 16 ft spruce backbone on a 12 ft 6 in runner plank, oak runners shod with half-round iron, a mast of two 12 ft poles joined at the head, and two lateen sails on a yard and two 16 ft booms that spread into a V when running before the wind. It takes down for storage.
Erfahren
Several weeks

Anweisungen

1

Main sizes and the mast's height

Jupyter-Notebook wird geladen …
2

Read The Boy Mechanic, Book 3

"The dimensions given are for a small yacht, and care must be taken, in adapting the design, to maintain proper proportions for stability and safety."
3

Make the backbone and runner plank

Use only the best straight-grained spruce or white pine. Backbone: 4 in thick, 16 ft long and 8 in high at the centre, with a ridge 8 in high and 2 ft 6 in long; taper it from the middle, 5 ft 6 in from the forward end, to 4 in at each end, and fit a three-eye metal ring at the bow (Figs. 1, 5). Runner plank: 2 in thick, 10 in wide, 12 ft 6 in long, tapered to 8 in at the ends. Set the backbone on the plank at right angles, 6 ft from the bow, and clamp them with two strap bolts, washers and nuts (Figs. 2, 3).

Materialien für diesen Schritt:

KiefernholzKiefernholz2 Stück
MetallringMetallring1 Stück
U-BügelU-Bügel2 Stück
UnterlegscheibeUnterlegscheibe4 Stück
SechskantmutterSechskantmutter4 Stück

Benötigte Werkzeuge:

HandsägeHandsäge
HandhobelHandhobel
ZugmesserZugmesser
Bohrwinde mit BohrerBohrwinde mit Bohrer
RollgabelschlüsselRollgabelschlüssel
Bandmaß (Rollmeter)Bandmaß (Rollmeter)
BleistiftBleistift
4

Fit the guides and forward runners

Bolt guides of straight-grained oak, 1-1/2 by 3 by 14 in, to the plank ends with 5/16 in carriage bolts, and bolt oak chocks at each tapered edge (Fig. 4). Make the forward runners of oak, 1-1/2 by 5 by 36 in, shaped at the ends as drawn, and shoe them with half-round strap iron held by screws with carefully countersunk heads. Pivot them on 5/8 in bolts (5 in long in Fig. 1), nuts to the inner side, with washers and jam nuts, or rivet the bolt ends slightly so the nuts cannot work loose.

Materialien für diesen Schritt:

WeißeichenbrettWeißeichenbrett3 Stück
SchlossschraubeSchlossschraube8 Stück
HalbrundeisenHalbrundeisen2 Stück
HolzschraubenHolzschrauben1 Stück
UnterlegscheibeUnterlegscheibe4 Stück
SechskantmutterSechskantmutter4 Stück

Benötigte Werkzeuge:

HandsägeHandsäge
HandhobelHandhobel
Bohrwinde mit BohrerBohrwinde mit Bohrer
HandbohrerHandbohrer
Kegelsenker-SatzKegelsenker-Satz
Bügelsäge (Metallsäge)Bügelsäge (Metallsäge)
RollgabelschlüsselRollgabelschlüssel
5

Make the stern runner and steering

Make the stern runner of oak, 1-1/2 by 5 by 30 in, shod like the others. Pivot it on a 3/8 in bolt in a hanger of heavy iron strip bent into a U and riveted to a vertical shaft. Put a heavy rubber washer, protected by a metal one, on the shaft; thread its upper end for a washer and nut, slip a section of pipe over the shaft, and clamp the steering handle (2 ft 10 in in Fig. 1) on a squared part of the shaft. The hanger may be forged, or made by a blacksmith.

Materialien für diesen Schritt:

WeißeichenbrettWeißeichenbrett1 Stück
HalbrundeisenHalbrundeisen1 Stück
Baustahl-FlachstahlBaustahl-Flachstahl1 Stück
Rundstahl aus BaustahlRundstahl aus Baustahl1 Stück
EisennietenEisennieten2 Stück
SchlossschraubeSchlossschraube1 Stück
GummischeibeGummischeibe1 Stück
UnterlegscheibeUnterlegscheibe2 Stück
SechskantmutterSechskantmutter2 Stück
Verzinktes StahlrohrVerzinktes Stahlrohr1 Stück

Benötigte Werkzeuge:

EsseEsse
AmbossAmboss
HammerHammer
SchraubstockSchraubstock
Bügelsäge (Metallsäge)Bügelsäge (Metallsäge)
HandbohrerHandbohrer
Feilen (Handfeile)Feilen (Handfeile)
RollgabelschlüsselRollgabelschlüssel
6

Build the cockpit

Fix a cockpit 5 ft long and 3 ft wide, with 4 in coaming, to the lower side of the backbone toward the stern; fasten its floor to the backbone with lag screws and fasten the coaming securely. Square corners are easiest; rounded ends with steamed, bent coaming are better. Larger craft may carry it on ribs.

Materialien für diesen Schritt:

KiefernbrettKiefernbrett4 Stück
Sechskant-Holzschraube (Schlüsselschraube)Sechskant-Holzschraube (Schlüsselschraube)6 Stück
HolzschraubenHolzschrauben1 Stück

Benötigte Werkzeuge:

HandsägeHandsäge
Bohrwinde mit BohrerBohrwinde mit Bohrer
RollgabelschlüsselRollgabelschlüssel
Bandmaß (Rollmeter)Bandmaß (Rollmeter)
7

Square up and stay the frame

Line up runners, plank and backbone at right angles so the craft tracks true. Hold them with four 1/4 in wire-rope stays with turnbuckles, from eyes on the bow band and on the bands at the plank ends to an eyebolt below the cockpit (Fig. 2). Loop each rope end and clamp the eye with steel clamps made for the purpose (wire-rope clips); metal thimbles in the loops make a better finish.

Materialien für diesen Schritt:

DrahtseilDrahtseil1 Stück
SpannschlossSpannschloss4 Stück
FingerhutFingerhut8 Stück
DrahtseilklemmeDrahtseilklemme8 Stück
RingschraubeRingschraube1 Stück

Benötigte Werkzeuge:

Bügelsäge (Metallsäge)Bügelsäge (Metallsäge)
RollgabelschlüsselRollgabelschlüssel
Bandmaß (Rollmeter)Bandmaß (Rollmeter)
8

Make the wishbone mast

Shape two poles of hickory or ash, 3-1/2 in thick at the base and 2 in at the top (12 ft in Fig. 6). Join them carefully at the masthead, bolt them together into an oak breast hook, and reinforce the joint with an iron strap with an eye at its upper end for the forward stay. Step the lower ends in sockets in the runner plank, about 8 ft apart, reinforced with oak mast blocks, and fit their projecting ends with 3 in two-eyed bands for the stays (Figs. 4, 6).

Materialien für diesen Schritt:

HolzstangeHolzstange2 Stück
WeißeichenbrettWeißeichenbrett1 Stück
Baustahl-FlachstahlBaustahl-Flachstahl1 Stück
SchlossschraubeSchlossschraube2 Stück
SechskantmutterSechskantmutter2 Stück

Benötigte Werkzeuge:

ZugmesserZugmesser
HandhobelHandhobel
HandsägeHandsäge
Bohrwinde mit BohrerBohrwinde mit Bohrer
StechbeitelStechbeitel
EsseEsse
AmbossAmboss
HammerHammer
9

Make the yard and booms

Make the yard and two booms of hickory or ash, each 16 ft long, 2-3/4 in at the middle tapering to 1-1/2 in at the ends, with metal rings on the ends against splitting. Bolt loops to their forward ends to engage an eyebolt and ring on the backbone at the bow; set the eyebolt in a slotted plate of 3/16 in sheet iron, fastened by a lever nut (Fig. 5).

Materialien für diesen Schritt:

HolzstangeHolzstange3 Stück
MetallringMetallring6 Stück
RingschraubeRingschraube1 Stück
BaustahlblechBaustahlblech1 Stück
Baustahl-FlachstahlBaustahl-Flachstahl1 Stück
SchlossschraubeSchlossschraube3 Stück
SechskantmutterSechskantmutter3 Stück

Benötigte Werkzeuge:

ZugmesserZugmesser
HandhobelHandhobel
Bügelsäge (Metallsäge)Bügelsäge (Metallsäge)
HandbohrerHandbohrer
Feilen (Handfeile)Feilen (Handfeile)
SchraubstockSchraubstock
10

Sew the sails

Make two lateen sails of 8-oz unbleached cotton duck: lap the breadths about 1 in and stitch along the edge (or fold 1 in and double-stitch), the seams parallel to the leech. Reinforce each corner with a triangular patch of duck and bind the edges with 1/4 in tarred rope, using a sailor's palm, a diamond-pointed needle and sail twine, well waxed (the wax is ours: beeswax). Along the yard and boom edges punch holes, set two 3/4 in brass grommet rings in each, one each side, and overcast them with buttonhole stitch. Sew in reef points of 1/8 in cotton rope, whipped at the ends.

Materialien für diesen Schritt:

SegeltuchSegeltuch1 Stück
SegelgarnSegelgarn1 Stück
BienenwachsBienenwachs1 Stück
Geteertes TauGeteertes Tau1 Stück
Messingöse (Segelöse)Messingöse (Segelöse)40 Stück
BaumwollseilBaumwollseil1 Stück

Benötigte Werkzeuge:
Segelmacherhandschuh (Segelhandleder)Segelmacherhandschuh (Segelhandleder)
SegelnadelSegelnadel
LocherLocher
SchereSchere
Bandmaß (Rollmeter)Bandmaß (Rollmeter)
11

Set up and rig

Fit the forward ring and strap bolts, the runners and steering, then step the mast, clamp the masthead and fit the bands; set the bottom stays and the masthead stay with the turnbuckles. Lace the sails to yard and booms and fix the forward ends at the bow. Run a 3/8 in halyard from the yard through a pulley at the masthead and a second on the runner plank to cleats by the cockpit, and haul up so the sails set. Lash the main sheets to the boom ends, through pulleys at the stern of the backbone and on the booms about 1 ft and 5 ft from their ends, then to cleats at the cockpit; the second boom needs a duplicate set. Taking down is the reverse.

Materialien für diesen Schritt:

SeilSeil1 Stück
RolleRolle6 Stück
KlampeKlampe4 Stück
HolzschraubenHolzschrauben1 Stück

Benötigte Werkzeuge:

RollgabelschlüsselRollgabelschlüssel
HandbohrerHandbohrer
12

Finish

Smooth the masts, yard and booms, sandpaper them lightly and give them several coats of spar varnish; paint the other woodwork. He gives the metal fittings two coats of red lead "or other good paint for use on metals exposed to the weather": red lead is a lead poison, so use the other paint.

Materialien für diesen Schritt:

SchleifpapierSchleifpapier1 Stück
BootslackBootslack1 Stück
ÖlfarbeÖlfarbe1 Stück

Benötigte Werkzeuge:

Breiter PinselBreiter Pinsel
13

Sailing and troubleshooting

Ice yacht sailing.

Flow

Loading...
14

History and honest limits

From "A Wishbone-Mast Ice Yacht" by John F. Pjerrou, in **The Boy Mechanic, Book 3**, Popular Mechanics, 1919 (Project Gutenberg 71856; checked on the archive.org scan boymechanic0003unse, pp. 17-20). He gives no sail outline sizes. The tools, the metric figures and the choice of the non-lead paint he allows are ours.

Materialien

35

Benötigte Werkzeuge

21

Dieser Bauplan stellt her

Verwandte Blueprints

Diese Blueprints teilen Wissen — Techniken, Materialien oder Prinzipien
CC0 Gemeinfrei

Dieser Blueprint ist unter CC0 veröffentlicht. Sie dürfen dieses Werk für jeden Zweck frei kopieren, ändern, verbreiten und verwenden, ohne um Erlaubnis zu fragen.

Unterstützen Sie den Maker, indem Sie Produkte über seinen Blueprint kaufen, wo er eine Maker-Provision von Anbietern festgelegt, verdient. Oder erstellen Sie eine neue Iteration dieses Blueprints und verbinden Sie ihn in Ihrem eigenen Blueprint, um Einnahmen zu teilen.

Diskussion

(0)

Anmelden um an der Diskussion teilzunehmen

Kommentare werden geladen...