
KUNST
SCHÖNHEIT & WELLNESS
HANDWERK
KULTUR & GESCHICHTE
UNTERHALTUNG
UMFELD
ESSEN & GETRÄNKE
REVERSE ENGINEERING
WISSENSCHAFTEN
SPORT
TECHNOLOGIE
WEARABLES
Push Button: Normally Open Momentary Switch with a Cushioned Contact (De Reamer, GE 1939)
Ed

Erstellt von

Ed

28. Oktober 2026FI
2
0
0
0
0

Push Button: Normally Open Momentary Switch with a Cushioned Contact (De Reamer, GE 1939)

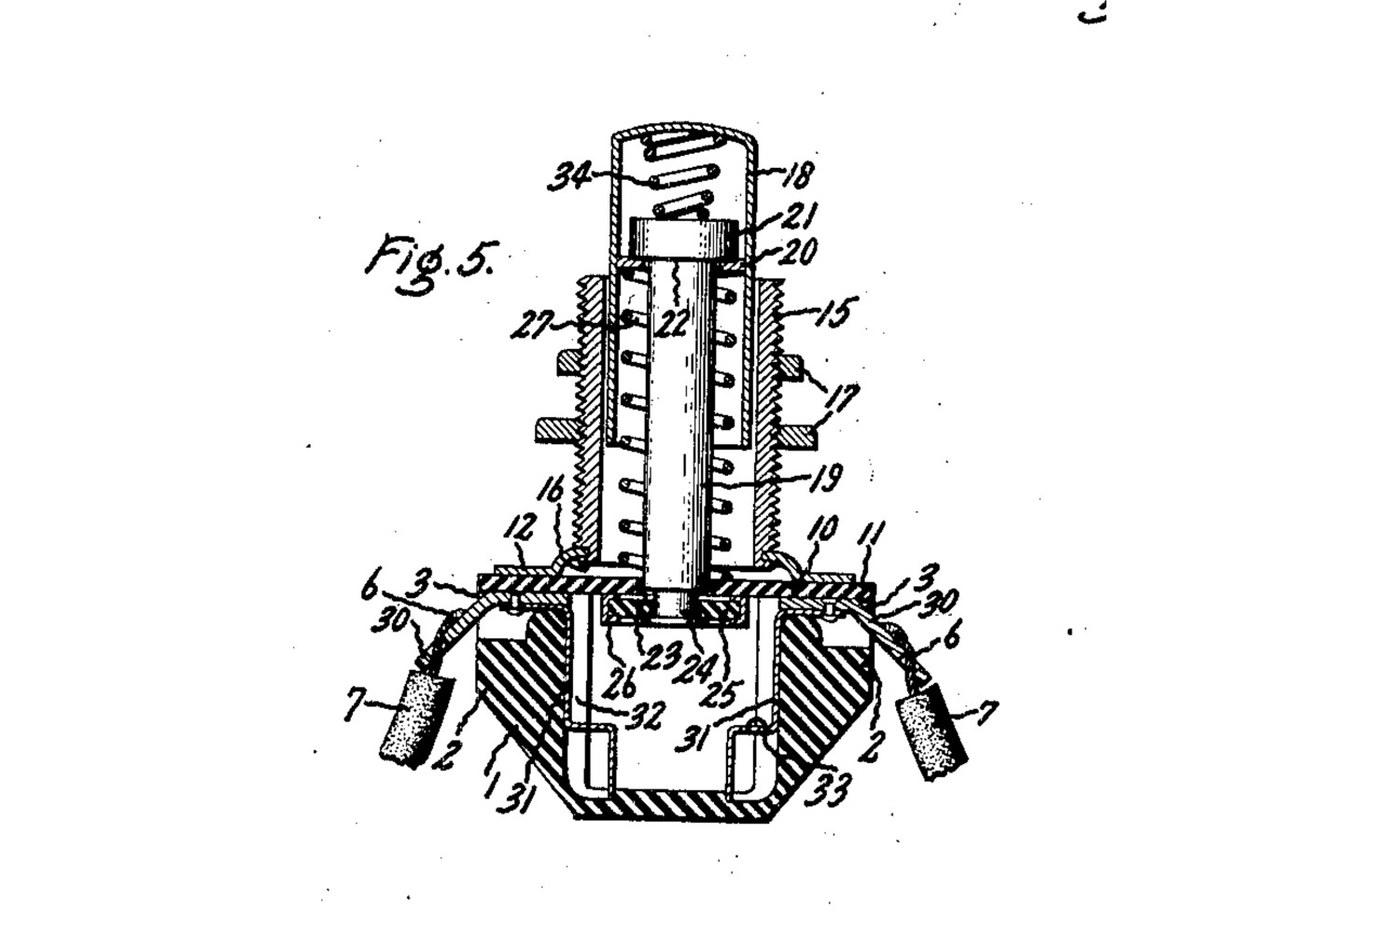
A panel push button that closes a circuit only while you press it. A spring holds the button out, and a metal rim on the end of its rod sits clear of two contacts. Press it and the rim bridges both contacts. A second spring inside the button lets the rod give, so the contacts never take more than that spring's force. Source: Frank C. De Reamer, US 2,166,803 (General Electric, 1939), Fig. 5. Unknown: the insulating material, the metals and every size. De Reamer gives none of them, so they are linked to unknown heads. The tools are ours. Picture: the patent's Fig. 5.
Erfahren
2 days

Anweisungen

1

Mould the housing

Mould a cup-shaped housing of insulating material, with a boss on each of two opposite sides, a recess in the top of each boss, a groove inside below each boss, and a bead round the top. Unknown: the material, the sizes and the moulding.

Materialien für diesen Schritt:

Unbekannter IsolierstoffUnbekannter Isolierstoff1 as required

Benötigte Werkzeuge:

FormpresswerkzeugFormpresswerkzeug
Unbekannte MaßeUnbekannte Maße
2

Make the terminals and contacts

Bend two angled metal strips. The upper end of each sits in a boss recess, and the lower end is a solder lug. Fix each upper end to a contact that fits the groove inside the housing, stepped at its bottom end. Unknown: the metal.

Materialien für diesen Schritt:

Unbekanntes MetallUnbekanntes Metall1 as required

Benötigte Werkzeuge:

BlechschereBlechschere
FlachzangeFlachzange
Unbekannte MaßeUnbekannte Maße
3

Make the sleeve, plate and cover

Turn a threaded sleeve and cut its thread. Spin its lower end over onto a metal plate with tangs. Cut a cover of insulating sheet with ears that reach over the bosses and a hole in the middle to guide the rod.

Materialien für diesen Schritt:

Unbekanntes MetallUnbekanntes Metall1 as required
Unbekannter IsolierstoffUnbekannter Isolierstoff1 as required

Benötigte Werkzeuge:

MetalldrehmaschineMetalldrehmaschine
Drechselwerkzeug-Set (HSS)Drechselwerkzeug-Set (HSS)
SchneideisenhalterSchneideisenhalter
BlechschereBlechschere
MessschieberMessschieber
Unbekannte MaßeUnbekannte Maße
4

Make the push button

Make a drawn metal tube closed at the top, and a rod with a head. Put a small coil spring in the top of the tube, then the rod's head. Wedge a washer into the tube under the head. Leave clearance so the rod can swivel a little. Turn the rod's lower end down to a smaller diameter. Unknown: the metal.

Materialien für diesen Schritt:

Unbekanntes MetallUnbekanntes Metall1 as required
DruckfedernsortimentDruckfedernsortiment1 spring

Benötigte Werkzeuge:

MetalldrehmaschineMetalldrehmaschine
Drechselwerkzeug-Set (HSS)Drechselwerkzeug-Set (HSS)
MessschieberMessschieber
Unbekannte MaßeUnbekannte Maße
5

Assemble

Set the terminals in their recesses and the contacts in their grooves. Slide the button into the sleeve, with a coil spring round the rod between the cover and the wedged washer. Pass the rod's end through the cover's hole. Put on it a loose insulating washer with a metal rim round its edge. Hammer the rod's end over into a flange. Lay the cover on the housing, so its ears clamp the terminals, and bend the plate's tangs over the bead.

Materialien für diesen Schritt:

Unbekannter IsolierstoffUnbekannter Isolierstoff1 as required
Unbekanntes MetallUnbekanntes Metall1 as required
DruckfedernsortimentDruckfedernsortiment1 spring

Benötigte Werkzeuge:

SchraubstockSchraubstock
Schlosserhammer mit KugelfinneSchlosserhammer mit Kugelfinne
FlachzangeFlachzange
SchutzbrilleSchutzbrille
6

Mount and wire it

Put the sleeve through a hole in the panel and clamp the panel between two nuts on the thread. Solder the bared wire ends to the two lugs.

Materialien für diesen Schritt:

SechskantmutterSechskantmutter2 pcs
LötdrahtLötdraht1 as required

Benötigte Werkzeuge:

LötkolbenLötkolben
FlachzangeFlachzange
7

Check it

At rest, the rim sits against the underside of the cover and the circuit is open. Pressed, the rim meets the stepped ends of both contacts and closes it. The checking is ours: the meter reads open, then closed while pressed.

Benötigte Werkzeuge:

MultimeterMultimeter

Materialien

5

Benötigte Werkzeuge

13

Dieser Bauplan stellt her

CC0 Gemeinfrei

Dieser Blueprint ist unter CC0 veröffentlicht. Sie dürfen dieses Werk für jeden Zweck frei kopieren, ändern, verbreiten und verwenden, ohne um Erlaubnis zu fragen.

Unterstützen Sie den Maker, indem Sie Produkte über seinen Blueprint kaufen, wo er eine Maker-Provision von Anbietern festgelegt, verdient. Oder erstellen Sie eine neue Iteration dieses Blueprints und verbinden Sie ihn in Ihrem eigenen Blueprint, um Einnahmen zu teilen.

Diskussion

(0)

Anmelden um an der Diskussion teilzunehmen

Kommentare werden geladen...