ARTE
BELLEZA Y BIENESTAR
ARTESANÍA
CULTURA E HISTORIA
ENTRETENIMIENTO
MEDIO AMBIENTE
COMIDA Y BEBIDAS
INGENIERÍA INVERSA
CIENCIAS
DEPORTES
TECNOLOGÍA
TECNOLOGÍA VESTIBLE
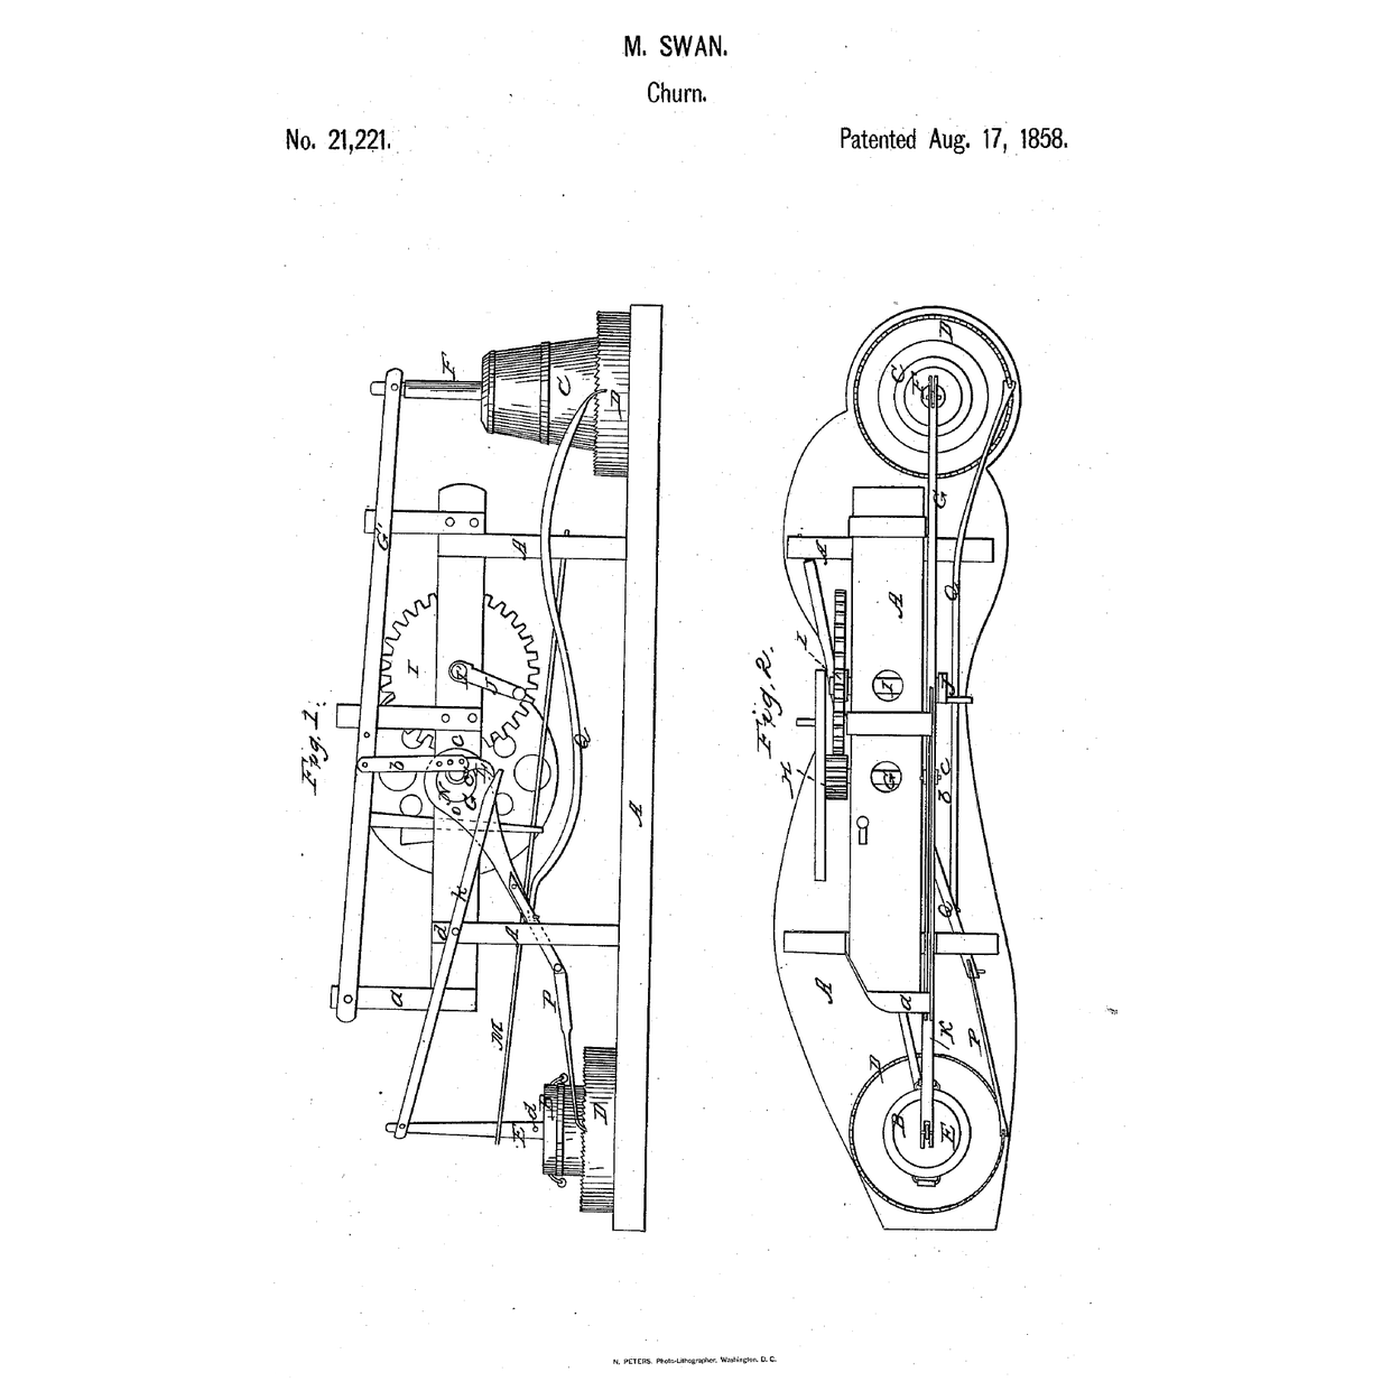


Churn-and-Washtub Mechanism: One Crank Works a Dasher and a Plunger and Turns Both Tubs
Moses Swan of Potter Hill, New York, received US 21,221, dated 17 August 1858, for one mechanism that works a churn and a washtub together: a crank and spur gears turn a shaft whose eccentric lifts the churn's dasher by a lever, whose cam lifts the washtub's plunger against a flat spring, and whose second eccentric drives pawls that turn both tubs a little at each stroke, so one person does both jobs.
This rung builds the base and posts in pine and prints the tubs, ratchet rims and gearing at tabletop scale.
Avanzado
About 9 hours, plus printing
Instrucciones
1
1
One crank, three motions
One crank, three motions
Cargando el cuaderno de Jupyter…
2
2
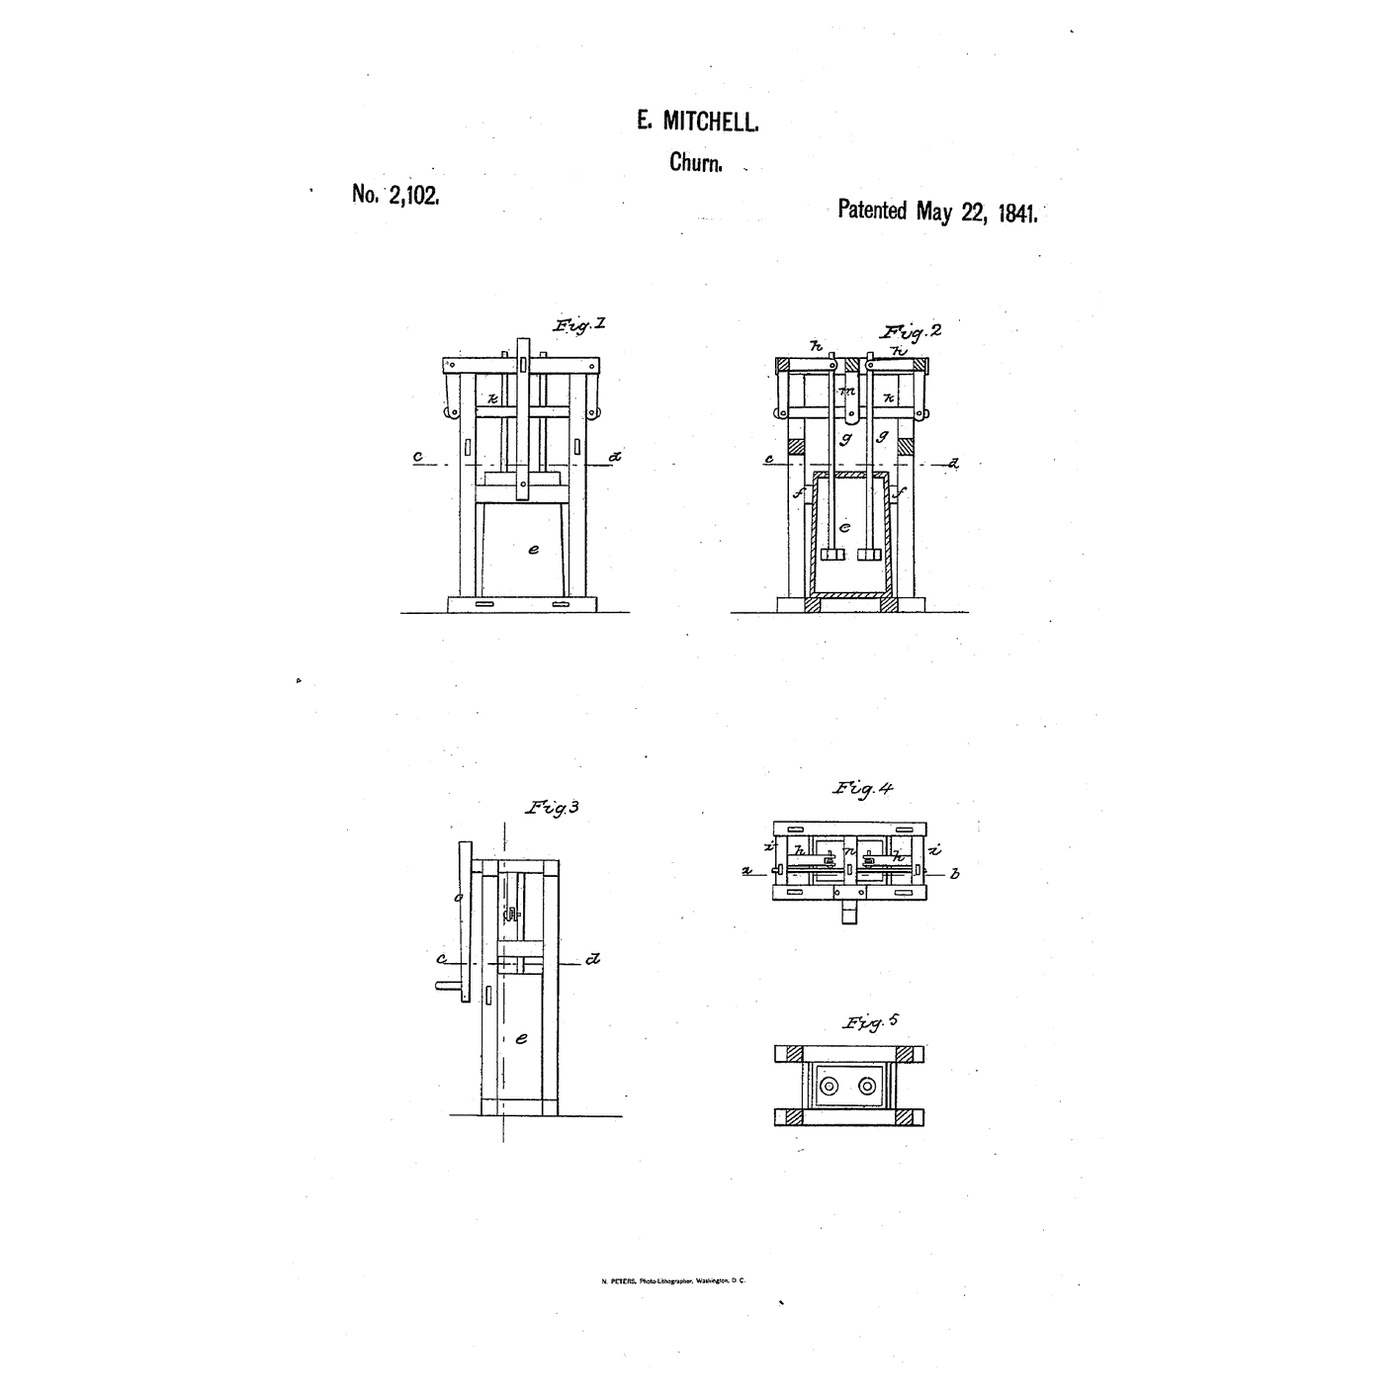
Lever-worked dashers, before it
Lever-worked dashers, before it
There a lever was swung by hand; Swan's is worked by an eccentric, which also works a washtub beside it.
3
3
Read US 21,221
Read US 21,221
"It is advantageous to rotate the tubs, for by so doing if churning is being performed, the whole body of the cream will be more perfectly subjected to the action of the dasher, and if washing is being performed, the plunger will be brought in contact with every portion of the clothes."
4
4
Print the parts
Print the parts
Print two ratchet rims, the churn tub, the washtub, pinion H, wheel I, the eccentric c, the cam L, the eccentric N, the strap O, two pawls, the link b, the dash, the dasher head, the plunger and the crank. The rims need a 220 mm print bed. Print in PETG at 0.2 mm layers, 30 % infill, 4 walls; wash before first use.
Materiales para este paso:
 Filamento PETG1 pieza
Herramientas necesarias:
 Impresora 3D de filamento (FDM)
5
5
Print the ratchet rim
Print the ratchet rim
The ratchet rim, printed as step 4 describes.
6
6
Print the churn tub
Print the churn tub
The churn tub, printed as step 4 describes.
7
7
Print the washtub
Print the washtub
The washtub, printed as step 4 describes.
8
8
Print the pinion H
Print the pinion H
The pinion H, printed as step 4 describes.
9
9
Print the wheel I
Print the wheel I
The wheel I, printed as step 4 describes.
10
10
Print the eccentric c
Print the eccentric c
The eccentric c, printed as step 4 describes.
11
11
Print the cam L
Print the cam L
The cam L, printed as step 4 describes.
12
12
Print the eccentric N
Print the eccentric N
The eccentric N, printed as step 4 describes.
13
13
Print the strap O
Print the strap O
The strap O, printed as step 4 describes.
14
14
Print the pawl
15
15
Print the link b
Print the link b
The link b, printed as step 4 describes.
16
16
Print the dash
17
17
Print the dasher head
Print the dasher head
The dasher head, printed as step 4 describes.
18
18
Print the plunger
Print the plunger
The plunger, printed as step 4 describes.
19
19
Print the crank
Print the crank
The crank, printed as step 4 describes.
20
20
Base and posts
Base and posts
Cut a pine base 560 by 240 mm. Glue and screw two posts 40 by 18 mm and 180 mm tall in its middle, 100 mm apart inside, with a block 30 mm thick on the front post's inner face; drill 10.5 mm holes through both posts 102 mm above the base for shaft G, and through the front post and its block 150 mm up for shaft I'. Stand an 18 mm square standard a 254 mm tall 55 mm left of the middle, a post d 122 mm tall behind it, and a post 232 mm tall at the back left for the spring. Screw an M6 screw up through the base 170 mm each side of the middle as the rims' pins.
Materiales para este paso:
 Tabla de pino1 pieza
 Cola de carpintero1 pieza
 Tornillos para madera1 pieza
 Tornillos de máquina1 pieza
Herramientas necesarias:
 Serrucho
 Taladro inalámbrico
 Papel de lija
 Juego de destornilladores
 Cinta métrica
21
21
Shafts, gears and tubs
Shafts, gears and tubs
Drop a ratchet rim on each pin and stand the washtub on the left rim, the churn tub on the right. Cut 10 mm dowels 202 mm for shaft G and 148 mm for shaft I'. Thread G through the posts with pinion H, the eccentric c behind it, the cam L further back and the eccentric N on its front end; thread I' through the front post with wheel I on its inner end meshing H and the crank on its front end. Fix each with an M3 screw drilled through the dowel.
Materiales para este paso:
 Espigas de madera dura1 piezaTornillos de máquina1 pieza
Herramientas necesarias:
SerruchoTaladro inalámbricoJuego de destornilladores22
22
Dasher, plunger and pawls
Dasher, plunger and pawls
Pivot an 18 mm square pine lever G1, 243 mm long, on the standard a with an M6 screw, the link b from the eccentric's pin to its middle hole, and pin the dasher's head into its fork over the churn: a 10 mm dowel 155 mm long with the dash on its foot. Pivot the lever K on post d, its short end under the cam, and hang the plunger beside its long end on a 10 mm dowel 153 mm long, with an M3 screw through the dowel's top as the pin d. Screw a spring steel strip to the back left post, reaching over the pin. Hang the strap O on the eccentric N and pin both pawls to its foot with one M6 screw, resting on the rims' teeth at their front points.
Materiales para este paso:
Tabla de pino1 piezaEspigas de madera dura1 piezaTornillos de máquina1 pieza Tuerca autoblocante con inserto de nailon1 pieza
 Arandela plana1 pieza
 Fleje de acero para muelles1 pieza
Herramientas necesarias:
SerruchoTaladro inalámbricoJuego de destornilladores23
23
The build in 3D
The build in 3D
FreeCAD model of this build: the pine base and posts, the washtub and churn tub on their ratchet rims, the crank and spur gears, shaft G with its eccentric, cam and second eccentric, the lever G1 and dasher, the lever K, plunger and flat spring, and the strap and pawls on the rims.
24
24
Churn, or wash
Churn, or wash
Pour 1.2 litres of heavy cream at about 15 °C, checked with the thermometer, into the churn tub, and warm soapy water and a cloth into the washtub. Turn the crank steadily and time it with the stopwatch: the dasher and plunger rise and fall and both tubs creep round. When the butter comes, lift the dasher out, pour off the buttermilk, wash the butter in cold water until it runs clear, work in a pinch of salt and weigh it.
Materiales para este paso:
 Crema de leche espesa1.2 l
 Sal marina gruesa1 pieza
 Agua1 pieza
 Pastilla de jabón1 pieza
Herramientas necesarias:
 Termómetro de sonda permanente
 Cronómetro
 Báscula digital de cocina
 Bol grande de acero inoxidable
25
25
Troubleshooting
Troubleshooting
Churn-and-washtub troubleshooting.
Flow
Loading...
26
26
History and honest limits
History and honest limits
**Moses Swan** of Potter Hill, Rensselaer County, New York, US 21,221, 17 August 1858, "Operating Churns, &c." He combined the two tubs so that neither two systems of gearing nor two persons are needed, and claimed the arrangement of mechanism that gives the plunger and dasher their up and down motion and both tubs their rotary motion. Our crown ratchets, sizes, pine frame and printed tubs are ours. FDM prints hold food in their layer lines, so wash well and replace when worn.
Materiales
13- 1 piezaMarcador de posición
- 1 piezaMarcador de posición
- 1 piezaMarcador de posición
- 1 piezaMarcador de posición
- 3 piezasMarcador de posición
- 1 piezaMarcador de posición
- Marcador de posición
- 1 piezaMarcador de posición
- 1 piezaMarcador de posición
- Marcador de posición
- 1 piezaMarcador de posición
- 1 piezaMarcador de posición
- 1 piezaMarcador de posición
Herramientas requeridas
10- Marcador de posición
- Marcador de posición
- 1 vendor sell this, none ship to you yetMarcador de posición
- Marcador de posición
- Marcador de posición
- 1 vendor sell this, none ship to you yetMarcador de posición
- Marcador de posición
- Marcador de posición
- Marcador de posición
- Marcador de posición
Archivos de diseño
16Este plano hace

Blueprints relacionados
Estos blueprints comparten conocimiento — técnicas, materiales o principios



CC0 Dominio público
Este Blueprint se publica bajo CC0. Eres libre de copiar, modificar, distribuir y usar este trabajo para cualquier propósito, sin pedir permiso.
Apoya al Maker comprando productos a través de su Blueprint, donde gana una Comisión del Maker establecida por los vendedores, o crea una nueva iteración de este Blueprint e inclúyela como conexión en tu propio Blueprint para compartir ingresos.