ARTE
BELLEZA Y BIENESTAR
ARTESANÍA
CULTURA E HISTORIA
ENTRETENIMIENTO
MEDIO AMBIENTE
COMIDA Y BEBIDAS
INGENIERÍA INVERSA
CIENCIAS
DEPORTES
TECNOLOGÍA
TECNOLOGÍA VESTIBLE
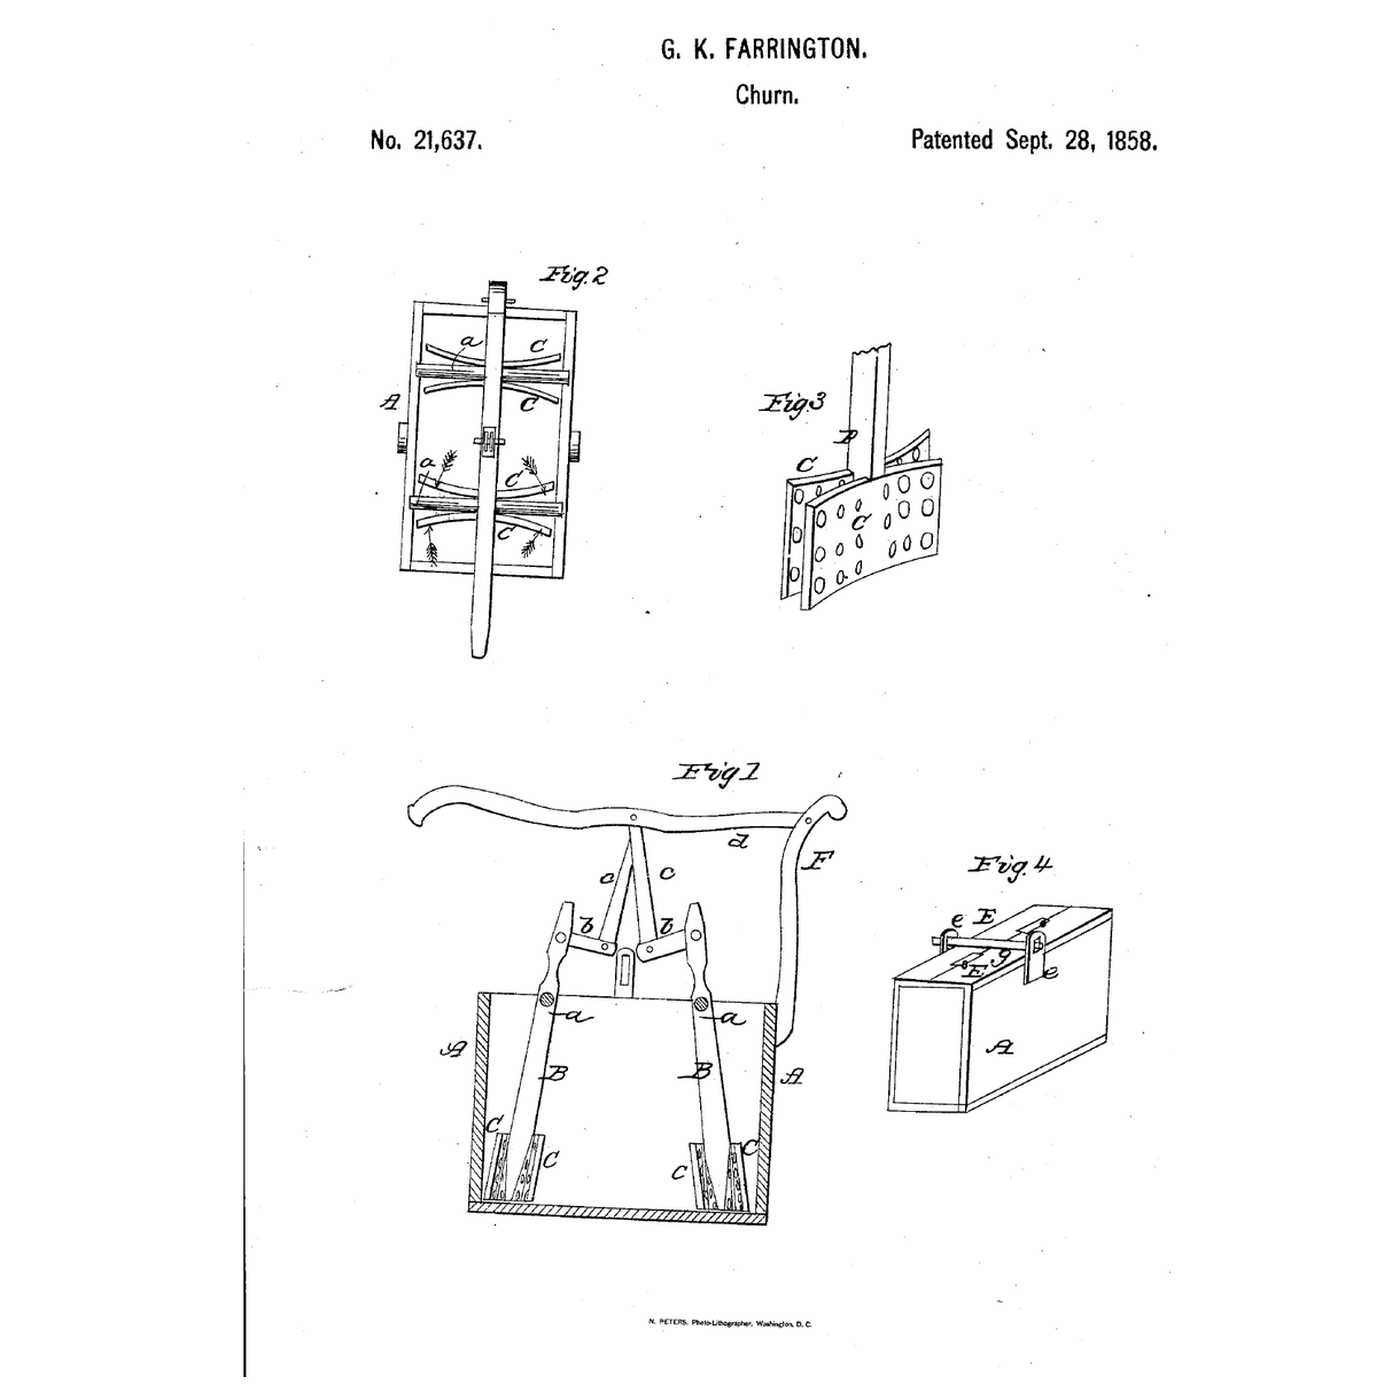


Concavo-Convex Swing-Dasher Churn: One Lever Swings Two Curved, Pierced Double Dashers
George K. Farrington of Xenia, Ohio, received US 21,637, dated 28 September 1858, for a churn of two swinging bearers, each carrying a double dasher of two curved plates fixed back to back and pierced straight through, worked to and fro by one lever, so the cream crosses the box and breaks on the holes' sharp edges.
This rung prints the bearers, dashers and fittings at tabletop scale, in a storage container.
Intermedio
About 4 hours, plus printing
Instrucciones
1
1
The dashers' curve and swing
The dashers' curve and swing
Cargando el cuaderno de Jupyter…
2
2
Lever-worked double dashers, before it
Lever-worked double dashers, before it
Those dashers rose and fell; Farrington's swing to and fro, through curved plates pierced straight through.
3
3
Read US 21,637
Read US 21,637
"The cream is thus made to move backward and forward in the box and must in passing from one side to the other (a greater portion of it) pass through the holes in the dashers in a zigzag manner, breaking constantly on the sharp edges of the holes in the dasher which set at angles to each other…"
4
4
Print the parts
Print the parts
Print two bearers, two dashers standing, two top pieces, two side pieces and two bars. The top pieces need a 220 mm print bed. Print in PETG at 0.2 mm layers, 30 % infill, 4 walls; wash before first use.
Materiales para este paso:
 Filamento PETG1 pieza
Herramientas necesarias:
 Impresora 3D de filamento (FDM)
5
5
Print the bearer
Print the bearer
The bearer, printed as step 4 describes.
6
6
Print the dasher
Print the dasher
The dasher, printed as step 4 describes.
7
7
Print the top piece
Print the top piece
The top piece, printed as step 4 describes.
8
8
Print the side piece
Print the side piece
The side piece, printed as step 4 describes.
9
9
Print the bars
10
10
Bearers and dashers
Bearers and dashers
Use a container about 280 by 190 mm inside and 170 mm deep. Drill 10.5 mm holes through both long sides, 70 mm each side of the middle and 140 mm above the floor. Screw a dasher onto each bearer's foot with two M3 screws, the arms pointing inward, and hang each bearer on a 10 mm dowel 212 mm long through the container's sides.
Materiales para este paso:
 Recipiente de almacenaje de grado alimentario1 pieza
 Espigas de madera dura1 pieza
 Tornillos de máquina1 pieza
Herramientas necesarias:
 Taladro inalámbrico
 Serrucho
 Papel de lija
 Juego de destornilladores
11
11
Top, lever and bars
Top, lever and bars
Bolt a side piece to each end of the container with two M4 screws. Lay the top pieces across the rim, the bearers through their slots, and push a 10 mm dowel 310 mm long through the side pieces over them as the bar g. Cut a pine upright 18 by 30 mm and 272 mm tall and bolt it to one end; pin a pine lever 18 mm square and 364 mm long to its top with an M6 screw. Join the lever's middle to each bearer's arm with a bar, M6 screws and lock nuts at every joint.
Materiales para este paso:
 Tabla de pino1 piezaEspigas de madera dura1 piezaTornillos de máquina1 pieza
 Tuerca autoblocante con inserto de nailon1 pieza
 Arandela plana1 pieza
Herramientas necesarias:
SerruchoTaladro inalámbricoJuego de destornilladores12
12
The build in 3D
The build in 3D
FreeCAD model of this build: the container with its near wall left off, the two bearers on their shafts with the double curved dashers at their feet, the top pieces and bar, the upright and lever, and the bars from the lever's middle to the bearers' arms.
13
13
Churn
Churn
Pour in 2 litres of heavy cream at about 15 °C, checked with the thermometer, and set the top on. Work the lever up and down steadily and time it with the stopwatch: the dashers swing to and fro and the cream crosses through their holes. When the butter comes, lift the top and bearers out, pour off the buttermilk, wash the butter in cold water until it runs clear, work in a pinch of salt and weigh it.
Materiales para este paso:
 Crema de leche espesa2 l
 Sal marina gruesa1 pieza
 Agua1 pieza
Herramientas necesarias:
 Termómetro de sonda permanente
 Cronómetro
 Báscula digital de cocina
 Bol grande de acero inoxidable
14
14
Troubleshooting
Troubleshooting
Swing-dasher churn troubleshooting.
Flow
Loading...
15
15
History and honest limits
History and honest limits
**George K. Farrington** of Xenia, Greene County, Ohio, US 21,637, 28 September 1858, assigned to D. B. Tiffany of Xenia. His connecting bars were pinned to the lever's middle so they could follow the bearers' swing, and the top bore on the shafts and kept them in place. He claimed the double concavo-convex dashers, made and worked as described. Our container, sizes and printed parts are ours. FDM prints hold food in their layer lines, so wash well and replace when worn.
Materiales
10- 1 piezaMarcador de posición
- Marcador de posición
- 1 piezaMarcador de posición
- 2 piezasMarcador de posición
- 1 piezaMarcador de posición
- Marcador de posición
- 1 piezaMarcador de posición
- Marcador de posición
- 1 piezaMarcador de posición
- 1 piezaMarcador de posición
Herramientas requeridas
9- Marcador de posición
- 1 vendor sell this, none ship to you yetMarcador de posición
- Marcador de posición
- Marcador de posición
- Marcador de posición
- Marcador de posición
- Marcador de posición
- Marcador de posición
- Marcador de posición
Archivos de diseño
6Este plano hace

Blueprints relacionados
Estos blueprints comparten conocimiento — técnicas, materiales o principios



CC0 Dominio público
Este Blueprint se publica bajo CC0. Eres libre de copiar, modificar, distribuir y usar este trabajo para cualquier propósito, sin pedir permiso.
Apoya al Maker comprando productos a través de su Blueprint, donde gana una Comisión del Maker establecida por los vendedores, o crea una nueva iteración de este Blueprint e inclúyela como conexión en tu propio Blueprint para compartir ingresos.