Colaboración
ARTE
BELLEZA Y BIENESTAR
ARTESANÍA
CULTURA E HISTORIA
ENTRETENIMIENTO
MEDIO AMBIENTE
COMIDA Y BEBIDAS
INGENIERÍA INVERSA
CIENCIAS
DEPORTES
TECNOLOGÍA
TECNOLOGÍA VESTIBLE
Centrifugal-Dasher Churn: Curved Wings on a Hollow Shaft Throw the Cream at the Wall, a Fixed Disk Turns It Back
Buttercup

Creado por

Buttercup

11. noviembre 2026IE
1
0
0
0
0

Centrifugal-Dasher Churn: Curved Wings on a Hollow Shaft Throw the Cream at the Wall, a Fixed Disk Turns It Back

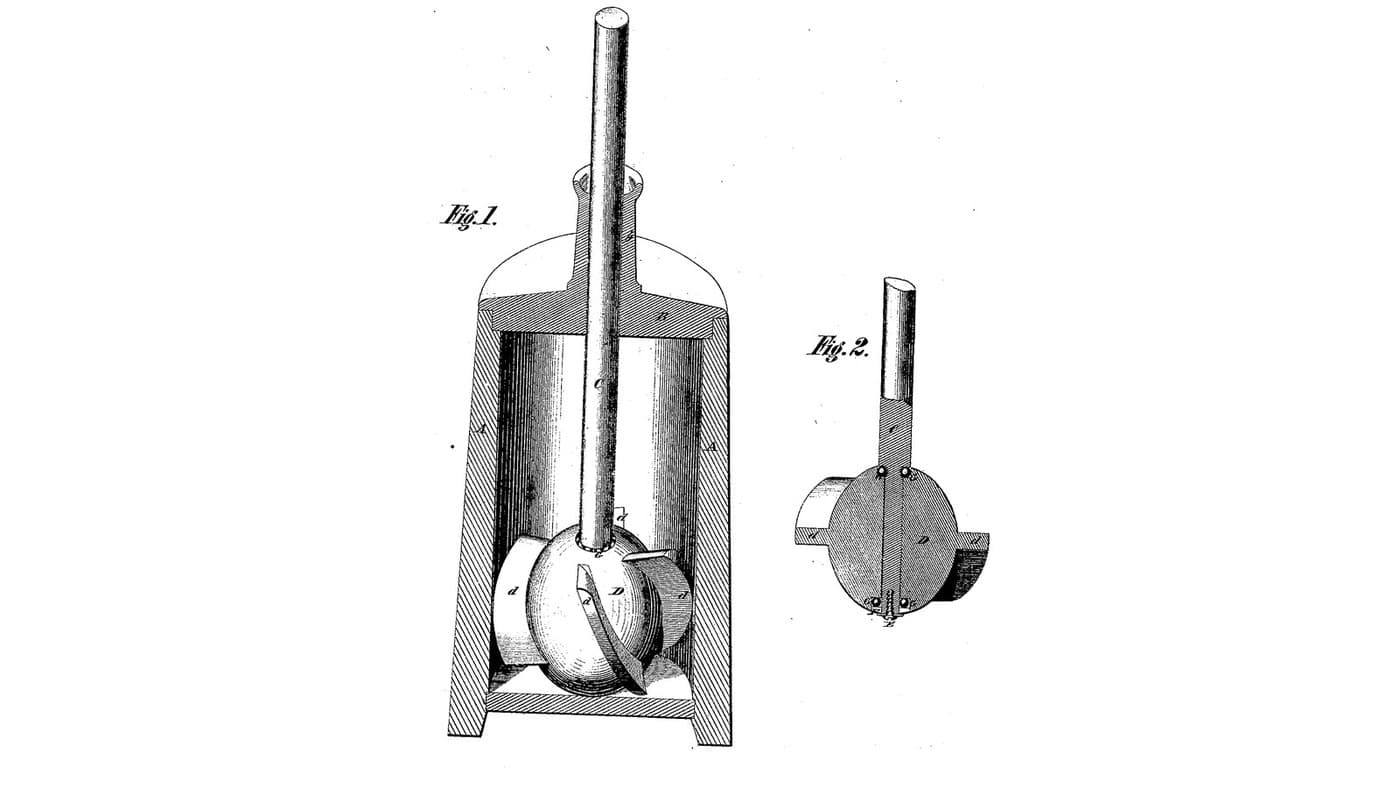
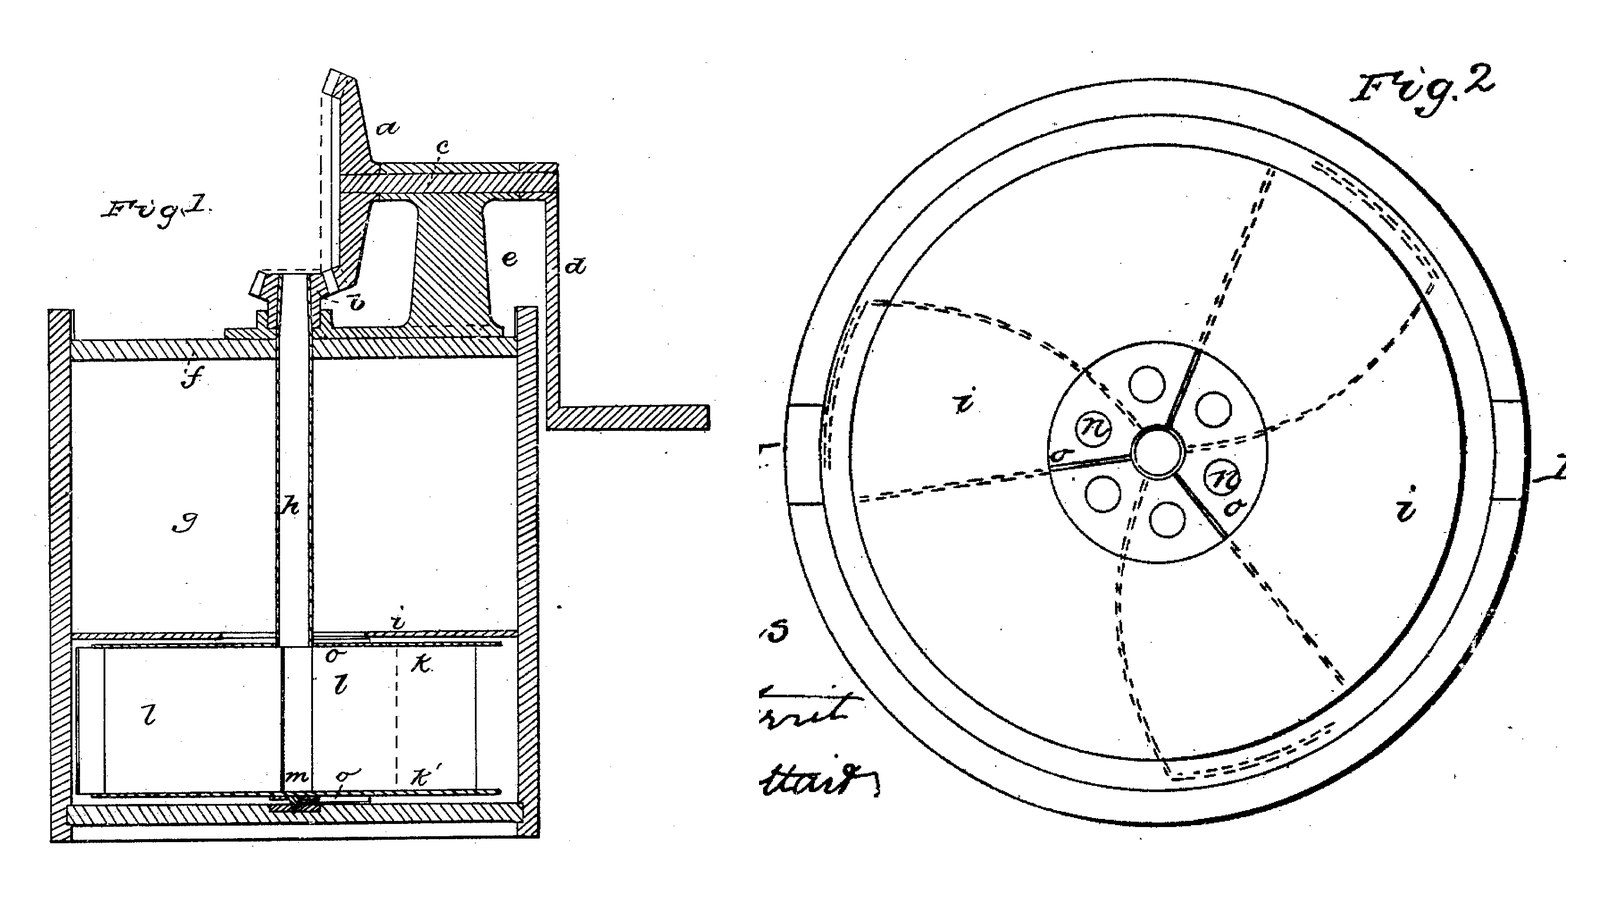
John W. Kellberg of Pittsburgh received US 30,409, dated 16 October 1860, for a churn whose dasher is two plates joined by three curved wings on a hollow shaft. A crank and bevel gearing on the lid spin it fast: the wings throw the cream out against the wall with friction, air is drawn down the hollow shaft through the cream, and a fixed disk above stops the cream and sends what comes over it back to the middle. He wrote that his churn finished in four to six minutes. The patent gives no sizes; every size here is ours.
Intermedio
About 2 days

Instrucciones

1

How high the dasher throws the cream

Cargando el cuaderno de Jupyter…
2

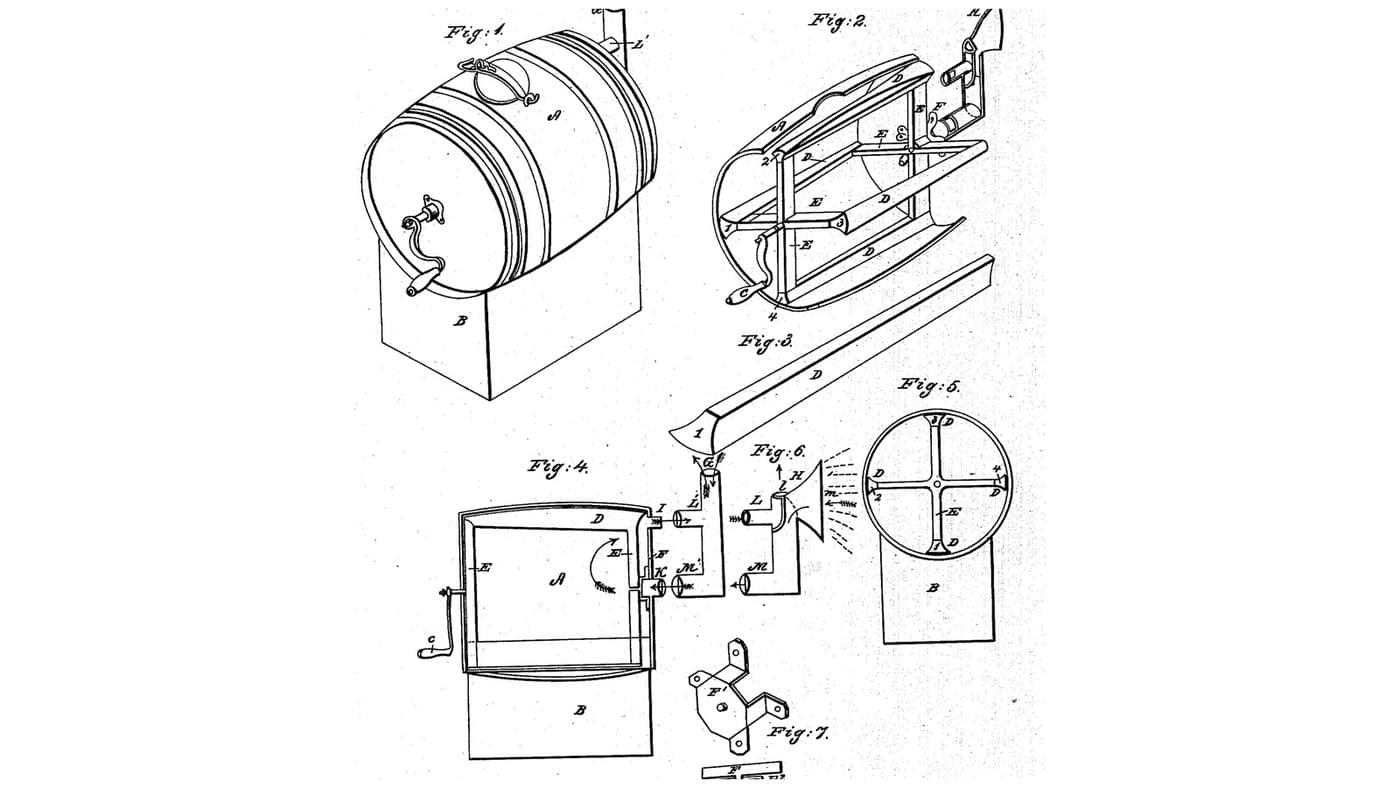
Air piped to the middle of the cream, a year before

Rohrer pipes air to the middle of a barrel churn. Kellberg draws it down the dasher's own hollow shaft.
3

Read US 30,409

"When the shaft h is made to revolve quickly the curved wings cause the cream to be thrown from the center to the circumference of the churn with so much force as to create a large amount of friction when it is being pressed between the wing or dasher extensions and the sides of the churn, and at the same time a strong current of air is carried through the body of the cream, and any cream that is forced out over the disk i, flows back into the center to be worked over."
4

Print the step m

The step the dasher turns on: 60 mm across, 10 high, with a 10.6 mm hole 9 deep. It sits loose on the bucket's floor. PETG, 0.2 mm layers, 30 % infill, 4 walls.
Archivo de DisenoSTLCC0 - Free
5

Dasher: plates k and k', wings l, ribs o and tube h

Cut two 10 mm HDPE plates 256 mm across. Bore the top plate k 20.2 mm at the centre and six 20 mm openings n on a circle 80 mm across. Press a 10 mm stainless rod 20 mm long into the centre of the bottom plate k' so 10 mm stands below it as the pin m. Cut three stainless sheet wings 1.5 mm thick and 105 mm high, with three 15 mm tabs on each long edge; bend the tabs, curve each wing from 30 mm out at the hub to 122 mm out over 70 degrees and on for 30 degrees more nearly along the edge, and screw the tabs to both plates so the wings stand 105 mm between them. Screw three hardwood ribs 10 x 5 mm on the top of k and three under k', radial. Pass a 20 mm stainless tube 313 mm long down through k until its end is flush with k's underside, and hold it with a shaft collar each side of k. The tube is open at the top: it is the air pipe.

Materiales para este paso:

Plancha de HDPEPlancha de HDPE1 pieza
Chapa de acero inoxidableChapa de acero inoxidable1 pieza
Varilla de acero inoxidableVarilla de acero inoxidable1 pieza
Tubo de acero inoxidableTubo de acero inoxidable1 pieza
Shaft CollarShaft Collar2 piezas
Tabla de madera duraTabla de madera dura1 pieza
Tornillos para maderaTornillos para madera30 piezas

Herramientas necesarias:

BrújulaBrújula
Sierra de calarSierra de calar
Juego de brocas de palaJuego de brocas de pala
Taladro inalámbricoTaladro inalámbrico
Juego de brocasJuego de brocas
Tijeras de chapaTijeras de chapa
Limas (lima de mano)Limas (lima de mano)
Tornillo de bancoTornillo de banco
Sierra para metalesSierra para metales
Juego de destornilladoresJuego de destornilladores
6

Body g, disk i and lid f

Use a 20-litre food-grade bucket as the body g. Set the step m on its floor and stand the dasher on it. Cut a 6 mm HDPE disk i to fit the bucket 150 mm up (282 mm across for ours), with a 100 mm opening in the middle, slide it down over the tube and press it until it wedges in the bucket's taper, so it cannot turn. Cut a 12 mm HDPE lid f to the bucket's top with a 32 mm hole, fit the printed bush in it, and screw three hardwood cleats under its edge that touch the wall; fix the lid by a screw through the wall into each cleat, above the cream.

Materiales para este paso:

Cubo de 20 litrosCubo de 20 litros1 pieza
Plancha de HDPEPlancha de HDPE2 piezas
Tabla de madera duraTabla de madera dura1 pieza
Tornillos para maderaTornillos para madera9 piezas
Filamento PETGFilamento PETG1 pieza

Herramientas necesarias:

Impresora 3D de filamento (FDM)Impresora 3D de filamento (FDM)

BrújulaBrújula
Sierra de calarSierra de calar
Juego de brocas de palaJuego de brocas de pala
Taladro inalámbricoTaladro inalámbrico
Juego de brocasJuego de brocas
Juego de destornilladoresJuego de destornilladores
Cinta métricaCinta métrica
7

Print the lid bush

The bush the tube turns in, fitted in the lid's hole: 32 mm across, 18 high, 20.6 mm bore. PETG, 0.2 mm layers, 30 % infill, 4 walls.
Archivo de DisenoSTLCC0 - Free
8

Print the crown wheel a

The driving wheel a on the crank shaft c: a crown wheel of 42 teeth, module 2.5, 16.2 mm bore. PETG, 0.2 mm layers, 30 % infill, 4 walls.
Archivo de DisenoSTLCC0 - Free
9

Print the pinion b

The pinion b on the tube h: 14 teeth, module 2.5, 14 mm face, 20.4 mm bore. PETG, 0.2 mm layers, 30 % infill, 4 walls.
Archivo de DisenoSTLCC0 - Free
10

Stand e, shaft c, wheel a, pinion b and crank d

Pin the pinion b on the tube with its teeth centred 40 mm above the lid. Cut two hardwood posts 50 x 25 x 118 mm, bore them 16.6 mm across 92 mm up, and screw them to the lid either side of the tube, one 60 to 85 mm in front of it and one 25 to 50 mm behind, as the stand e. Run a 16 mm stainless shaft c 180 mm long through them, pin the crown wheel a on it meshing the pinion, hold it with a shaft collar, and pin on a crank d of mild steel flat bar, 100 mm throw, with a hardwood handle.

Materiales para este paso:

Varilla de acero inoxidableVarilla de acero inoxidable1 pieza
Tabla de madera duraTabla de madera dura1 pieza
Shaft CollarShaft Collar1 pieza
Pasador de aletasPasador de aletas3 piezas
Pletina de acero dulcePletina de acero dulce1 pieza
Espigas de madera duraEspigas de madera dura1 pieza
Tornillos para maderaTornillos para madera4 piezas
Filamento PETGFilamento PETG1 pieza

Herramientas necesarias:

Impresora 3D de filamento (FDM)Impresora 3D de filamento (FDM)
Sierra de mesaSierra de mesa
Taladro inalámbricoTaladro inalámbrico
Juego de brocasJuego de brocas
Sierra para metalesSierra para metales
Limas (lima de mano)Limas (lima de mano)
Tornillo de bancoTornillo de banco
SargentoSargento
Juego de destornilladoresJuego de destornilladores
11

The build in 3D

FreeCAD model of this build, the bucket cut open: the step, the dasher with its two plates, curved wings, openings and ribs on the hollow tube, the fixed disk above it, the lid with its bush and cleats, and the stand with the crank, crown wheel and pinion.
Archivo de DisenoBLENDCC0 - Free
12

Churn

Before fitting the lid, pour about 8 litres of heavy cream at about 15 °C, checked with the thermometer, into the bucket, so it stands just under the disk i. Fit the lid and pin the pinion. Turn the crank briskly, timing it. When the butter comes, unpin the pinion, take off the lid, lift out the disk and the dasher, take out the butter, pour the buttermilk into a bowl, wash the butter in cold water until it runs clear, salt and weigh it.

Materiales para este paso:

Crema de leche espesaCrema de leche espesa8 l
Sal marina gruesaSal marina gruesa1 pieza
AguaAgua1 pieza

Herramientas necesarias:

Termómetro de sonda permanenteTermómetro de sonda permanente
CronómetroCronómetro
Báscula digital de cocinaBáscula digital de cocina
Bol grande de acero inoxidableBol grande de acero inoxidable
13

Troubleshooting

Centrifugal-dasher churn troubleshooting.

Flow

Loading...
14

History and honest limits

**John W. Kellberg** of Pittsburg, Allegheny County, Pennsylvania, US 30,409, 16 October 1860, "Churn". He claimed "the dasher and disk, made and operating substantially as described", and wrote that a churn on his plan completed a churning "in from four to six minutes"; we have not tested that. His gears were a bevel wheel and pinion on a cast stand; ours are a printed crown wheel and pinion on wooden posts. The patent does not say how the disk i is fastened; ours wedges in the bucket's taper. The patent gives no sizes; every size here is ours.

Materiales

15

Herramientas requeridas

18

Archivos de diseño

5

CC0 Dominio público

Este Blueprint se publica bajo CC0. Eres libre de copiar, modificar, distribuir y usar este trabajo para cualquier propósito, sin pedir permiso.

Apoya al Maker comprando productos a través de su Blueprint, donde gana una Comisión del Maker establecida por los vendedores, o crea una nueva iteración de este Blueprint e inclúyela como conexión en tu propio Blueprint para compartir ingresos.

Discusión

(0)

Iniciar sesión para unirte a la discusión

Cargando comentarios...