Colaboración
ARTE
BELLEZA Y BIENESTAR
ARTESANÍA
CULTURA E HISTORIA
ENTRETENIMIENTO
MEDIO AMBIENTE
COMIDA Y BEBIDAS
INGENIERÍA INVERSA
CIENCIAS
DEPORTES
TECNOLOGÍA
TECNOLOGÍA VESTIBLE
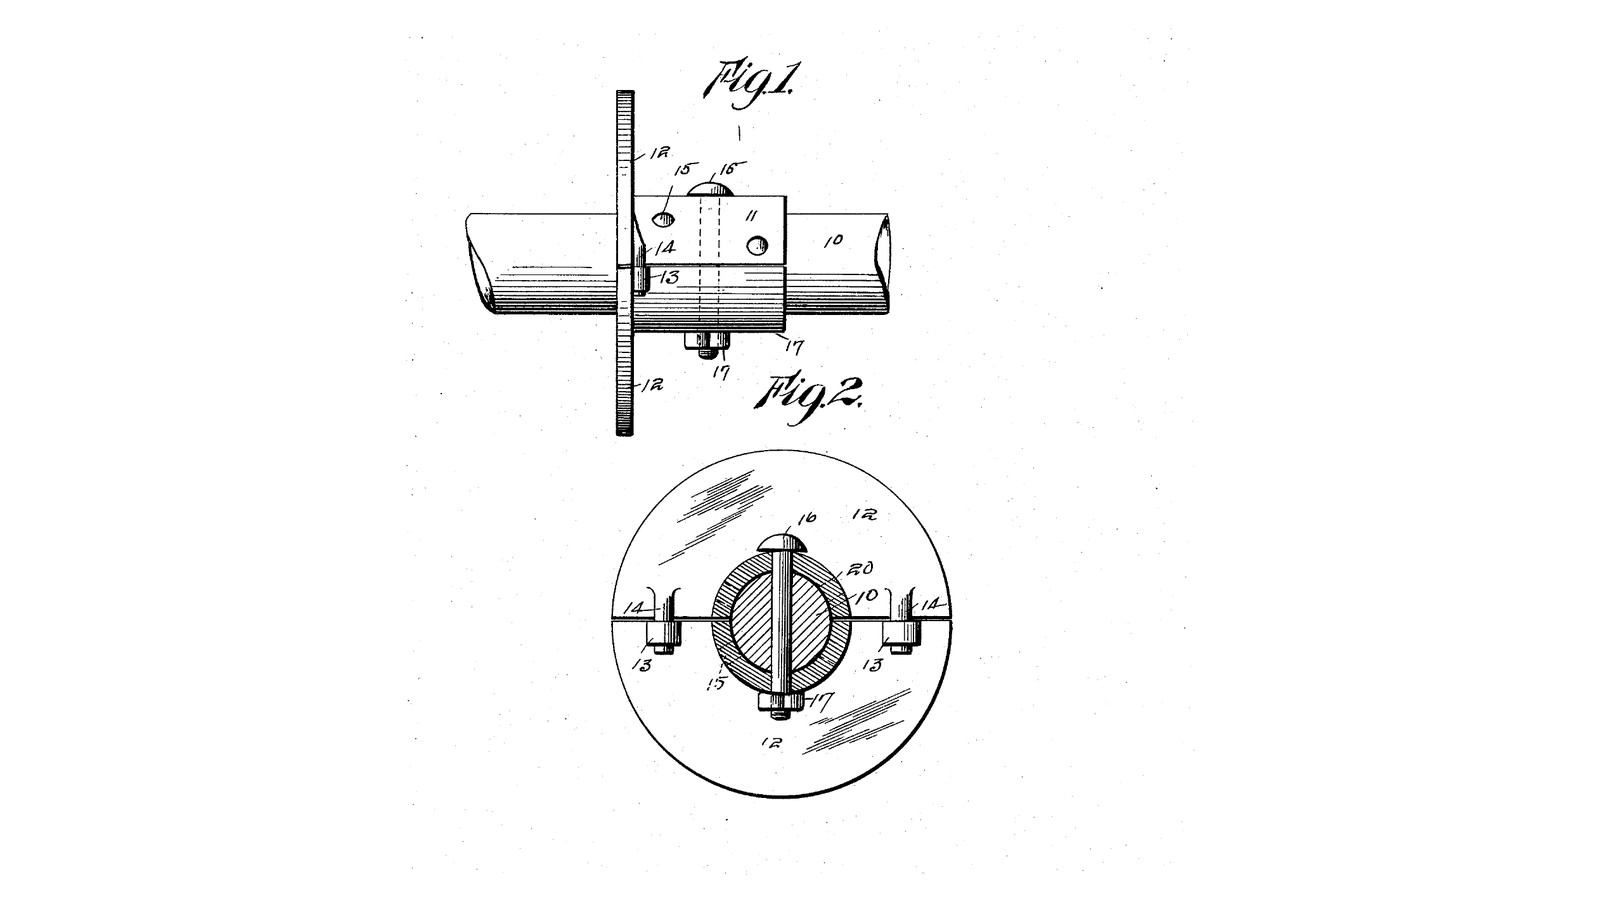


Divisible Flanged Shaft Collar: Two Halves Locked by Lugs, Bolted Through the Shaft in One of Three Hole Pairs (Obey, 1916)
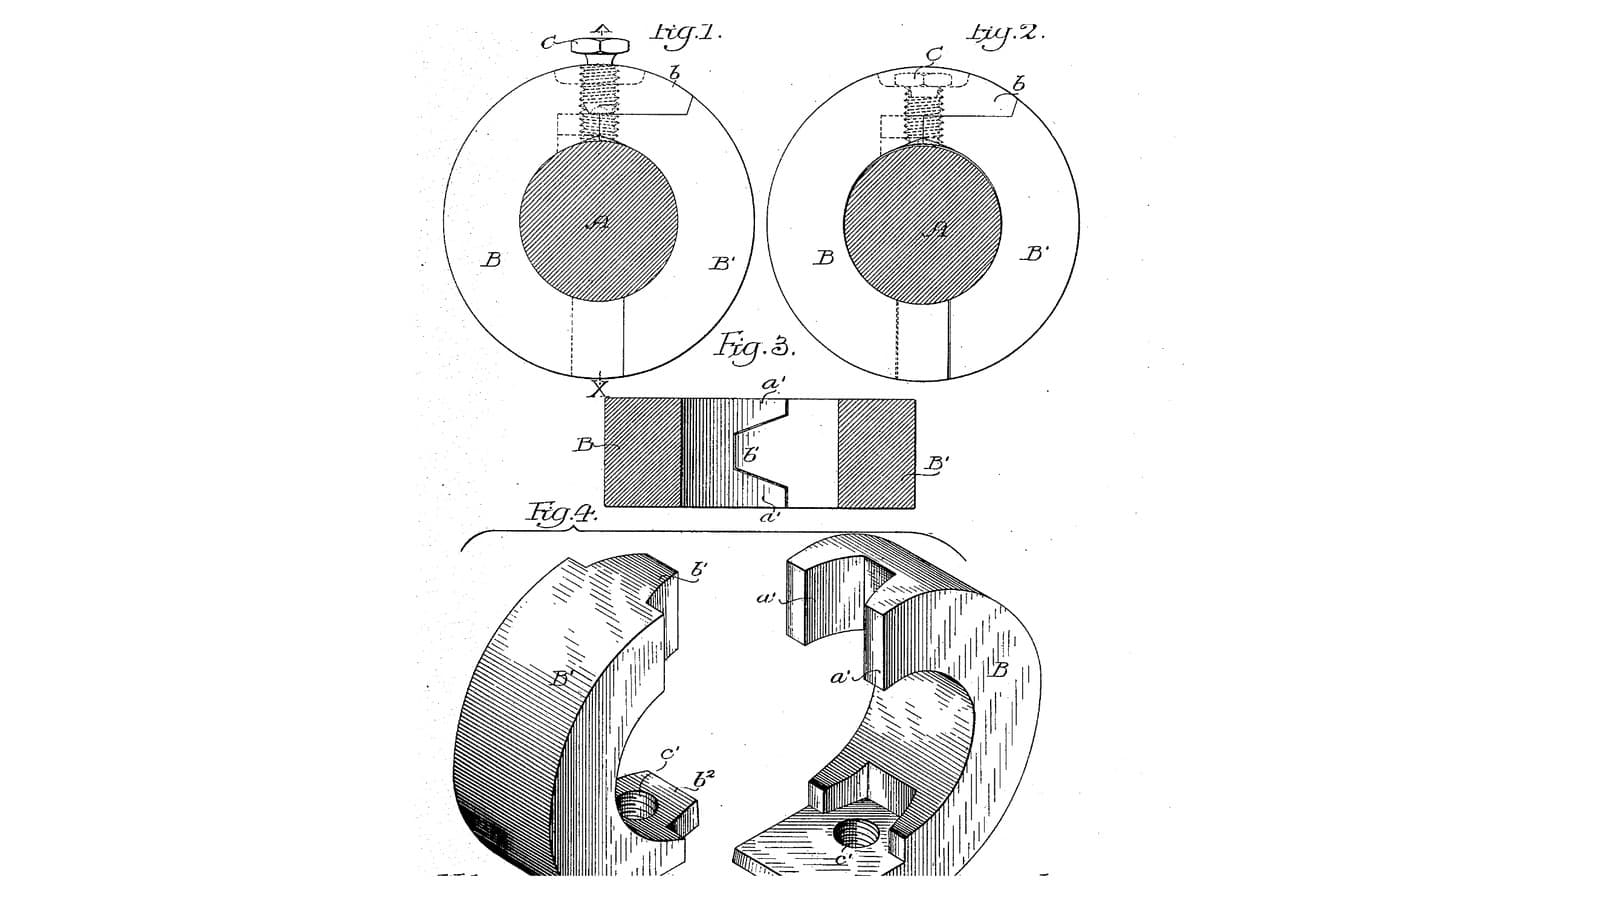
James F. Obey of Centerville, Iowa, received US 1,201,863, dated 17 October 1916, for a flanged collar that comes in two halves. It was meant for the chain rods of railway dump cars, whose collars often broke, and a whole rod then had to come out of its bearings. Lugs on one half of the flange go into slots in the other. A bolt through the rod's own hole and through a pair of openings in the collar holds it, with a nut. The collar has several pairs at different places, so it can be set in more than one position.
We turn ours in one piece and saw it in half. The patent gives no sizes; every size here is ours.
Intermedio
About 6 hours
Instrucciones
1
1
Where each pair of openings puts the collar
Where each pair of openings puts the collar
Cargando el cuaderno de Jupyter…
2
2
Read US 1,201,863
Read US 1,201,863
"These shaft collars frequently become broken and it is one of the important purposes of my invention to provide a shaft-collar which can be quickly and easily installed on the shaft without the removal of the shaft from its bearings."
3
3
Turn the flanged collar
Turn the flanged collar
Grip 75 mm round bar in the 3-jaw chuck. Face it and turn the flange to 70 mm. Turn the hub to 32 mm for 40 mm, leaving the flange 10 mm thick. Centre-drill, drill through 15 mm and ream 16 mm. Part off at 50 mm and face the flange's outer face.
Materiales para este paso:
 Barra redonda de acero dulce1 pieza
 Aceite de corte1 pieza
Herramientas necesarias:
 Torno de metal
 Plato de torno de 3 mordazas
 Herramienta de corte para torno
 Gubia de tronzar
 Juego de brocas de centrar
 Juego de brocas
 Escariador
 Calibre digital de 6 pulgadas
 Gafas de seguridad
4
4
Mark out and drill the holes
Mark out and drill the holes
Blue the flange and hub. Scribe the split line across the flange through the centre and along both sides of the hub. Mark two chord holes across the split line, 28 mm each side of the centre, in the middle of the flange's thickness; drill them 5 mm right through the flange, square to the split line. Mark three pairs of openings round the hub, at 18, 30 and 42 mm from the flange's outer face and at 90, 30 and 150 degrees from the split line. Centre-punch, and with the collar in the V-block drill each pair 6.5 mm straight through the hub and the bore.
Herramientas necesarias:
 Azul de mecánico
 Punta de trazar
 Escuadra combinada
 Transportador de ángulos
 Granete
 Taladro de columna
 Mordaza de máquina
 Bloque en VJuego de brocasCalibre digital de 6 pulgadas
5
5
Saw it in half and fit the lugs
Saw it in half and fit the lugs
In soft jaws, saw down the split line through flange and hub with a fine hacksaw blade, through the middle of the chord holes. File the cut faces flat. Tap a 5 mm steel dowel pin 20 mm long into each chord hole of one half, leaving 9 mm sticking out: these are the lugs, and the other half's holes are the slots. Put the halves together: they must close with only the saw cut between them, and slide apart only straight.
Materiales para este paso:
 Pasador de acero2 piezas
Herramientas necesarias:
 Tornillo de banco
 Mordazas blandas para tornillo de banco
 Sierra para metales
 Juego de limas
 Martillo de bola
 Desbarbador
6
6
The collar in 3D
The collar in 3D
FreeCAD model, our sizes: the two halves with flange and hub on a 16 mm shaft, the two pins across the split in the flange, the three pairs of openings, and the M6 bolt and nut through the first pair and the shaft.
7
7
Drill the shaft and fit the collar
Drill the shaft and fit the collar
Mark where the collar's flange must stand and drill a 6.5 mm hole straight across the shaft, 18 mm from that mark, with the shaft in the V-block. Put the two halves round the shaft from the sides, the lugs into the slots, and turn the collar until the 18 mm pair lines up with the hole. Push an M6 x 50 bolt through and tighten a nyloc nut on it. To move the collar, take the bolt out, slide and turn the collar until another pair lines up, and bolt it again.
Materiales para este paso:
 Surtido de tornillos hexagonales1 pieza
 Tuerca autoblocante con inserto de nailon1 pieza
Herramientas necesarias:
Taladro de columnaBloque en VJuego de brocasGranete Llave inglesa ajustable
8
8
Troubleshooting
Troubleshooting
Obey collar troubleshooting.
Flow
Loading...
9
9
History and honest limits
History and honest limits
**James F. Obey** of Centerville, Appanoose County, Iowa, US 1,201,863, dated 17 October 1916, filed 3 August 1915. He claimed a shaft with a transverse hole, "a collar mounted thereon consisting of a longitudinally halved cylinder with an annular flange at one end, one half of the flange being provided with lugs, the other half being provided with corresponding slots", pairs of aligned openings at different points along and round the cylinder, and a bolt through the shaft's hole and a chosen pair. His lugs are bent pieces on the face of the flange that hook into yokes on the other half; ours are pins in holes through the flange, which do the same job. His bolt has a round head; ours is a hex bolt with a nyloc nut. The patent gives no sizes or material; every size here is ours.
Materiales
5- 1 piezaMarcador de posición
- 1 piezaMarcador de posición
- 2 piezasMarcador de posición
- Marcador de posición
- Marcador de posición
Herramientas requeridas
24- Marcador de posición
- Marcador de posición
- Marcador de posición
- Marcador de posición
- Marcador de posición
- Marcador de posición
- Marcador de posición
- Marcador de posición
- Marcador de posición
- Marcador de posición
- Marcador de posición
- Marcador de posición
- Marcador de posición
- Marcador de posición
- Marcador de posición
- Marcador de posición
- Marcador de posición
- Marcador de posición
- Marcador de posición
- Marcador de posición
- Marcador de posición
- Marcador de posición
- Marcador de posición
- Marcador de posición
Archivos de diseño
1Este plano hace
Blueprints relacionados
Estos blueprints comparten conocimiento — técnicas, materiales o principios
CC0 Dominio público
Este Blueprint se publica bajo CC0. Eres libre de copiar, modificar, distribuir y usar este trabajo para cualquier propósito, sin pedir permiso.
Apoya al Maker comprando productos a través de su Blueprint, donde gana una Comisión del Maker establecida por los vendedores, o crea una nueva iteración de este Blueprint e inclúyela como conexión en tu propio Blueprint para compartir ingresos.