Colaboración
ARTE
BELLEZA Y BIENESTAR
ARTESANÍA
CULTURA E HISTORIA
ENTRETENIMIENTO
MEDIO AMBIENTE
COMIDA Y BEBIDAS
INGENIERÍA INVERSA
CIENCIAS
DEPORTES
TECNOLOGÍA
TECNOLOGÍA VESTIBLE
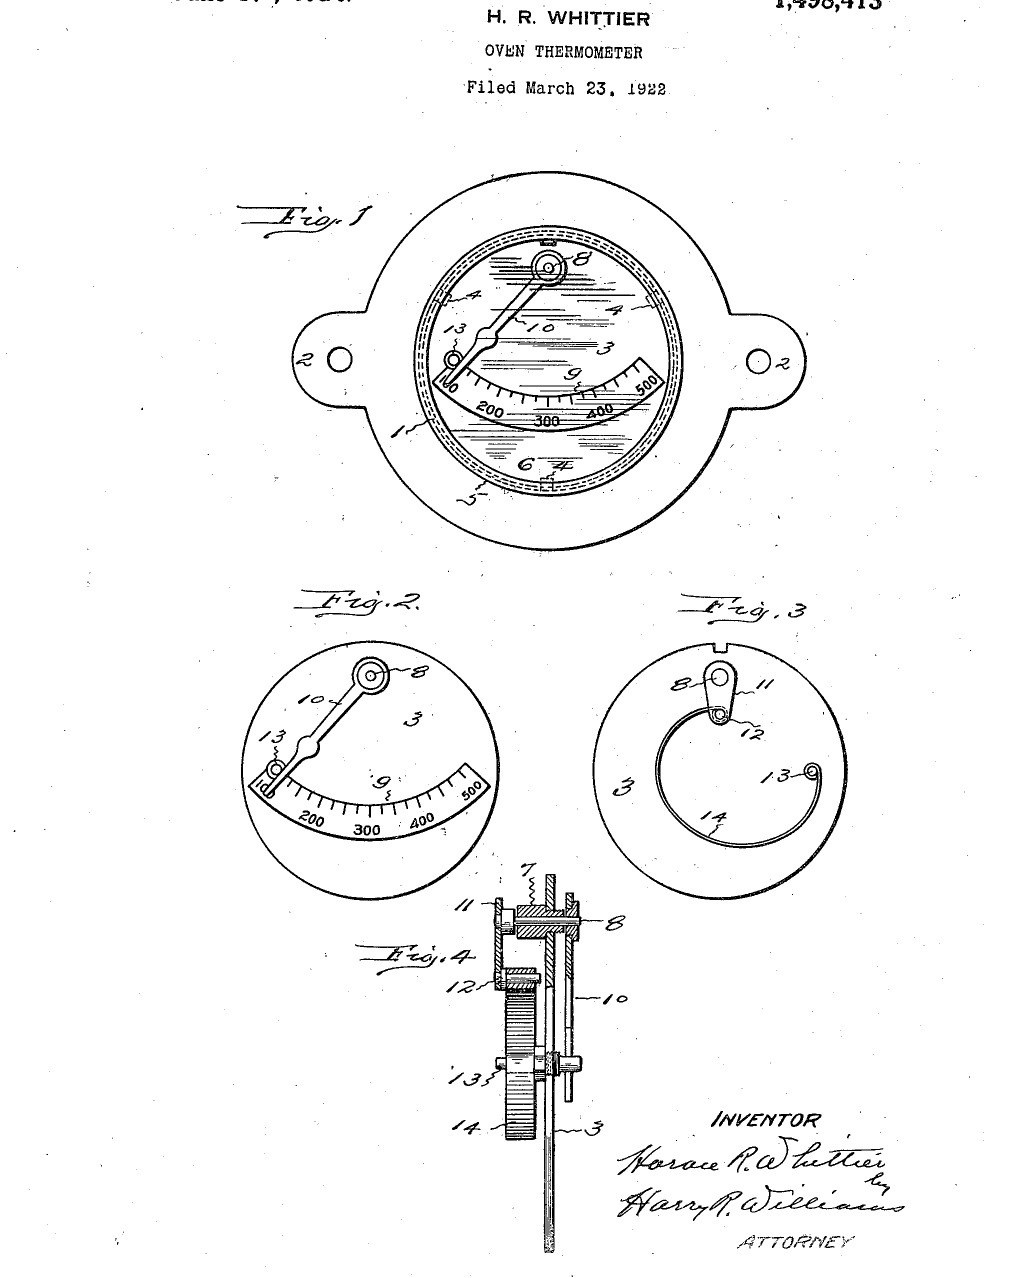


Oven Thermometer: Door-Mounted Dial with a Curved Bimetal Strip (Whittier, US 1,498,413, 1924)
A dial thermometer that fits in an oven door or wall. Behind an enamelled dial plate, a curved bimetal strip runs from a fixed stud to a little arm on a spindle; as the oven heats, the strip bends, turns the spindle and swings the pointer across the scale on the front. Everything is mounted on the dial plate as one unit and dropped into a shallow stamped case with a glass cap.
Result: a compact oven thermometer, easy to calibrate and adjust.
Source: H. R. Whittier, US 1,498,413 (1924). Unknown: metals, sizes and the scale unit. Picture: the patent drawing.
Intermedio
Unknown
Instrucciones
1
1
Make the dial unit
Make the dial unit
Cut a metal disk for the dial plate, enamel its front and mark the scale (the patent's drawing reads 200 to 500). Thread a sleeve through the plate near one edge and pass a spindle loosely through it, with a pointer fixed on its front end and a short arm on its back end. Set a stud through the plate: in front it stops the pointer, behind it anchors one end of a curved bimetal strip whose other end is pinned to the arm. Not given: metals, sizes, the scale unit.
Materiales para este paso:
 Metal desconocido1 dial plate, sleeve, spindle, pointer, arm, stud
 Material desconocido1 enamel and scale
 Lámina bimetálica1 curved strip
Herramientas necesarias:
 Juego de machos y terrajas
 Alicates de punta redonda
 Dimensiones desconocidas
2
2
Make the case
Make the case
Stamp a shallow case from thin sheet metal, closed at the back, with perforated ears for fixing it in the oven door or wall, and press lugs in from its wall for the dial plate to sit on. Make a cap with a glass to close the open front. Ours: steel sheet and a watch glass.
Materiales para este paso:
 Chapa de acero dulce1 case and cap
 Vidrio de reloj1 window
Herramientas necesarias:
 Tijeras de chapaDimensiones desconocidas
3
3
Assemble, calibrate and fit
Assemble, calibrate and fit
Calibrate the strip and set the pointer while the unit is out of the case, then drop the dial unit onto the lugs and fit the cap, which holds the plate in place. Fasten the case through its ears in the oven door or wall. As the oven heats, the strip bends and the pointer swings across the scale. Not given: how it is calibrated.
Herramientas necesarias:
 HornoAlicates de punta redonda
Materiales
5- 1 dial plate, sleeve, spindle, pointer, arm, studMarcador de posición
- 1 enamel and scaleMarcador de posición
- 1 curved stripMarcador de posición
- 1 case and capMarcador de posición
- 1 windowMarcador de posición
Herramientas requeridas
5- Marcador de posición
- Marcador de posición
- Marcador de posición
- Marcador de posición
- Marcador de posición
Este plano hace

Blueprints relacionados
Estos blueprints comparten conocimiento — técnicas, materiales o principios
CC0 Dominio público
Este Blueprint se publica bajo CC0. Eres libre de copiar, modificar, distribuir y usar este trabajo para cualquier propósito, sin pedir permiso.
Apoya al Maker comprando productos a través de su Blueprint, donde gana una Comisión del Maker establecida por los vendedores, o crea una nueva iteración de este Blueprint e inclúyela como conexión en tu propio Blueprint para compartir ingresos.