Colaboración
ARTE
BELLEZA Y BIENESTAR
ARTESANÍA
CULTURA E HISTORIA
ENTRETENIMIENTO
MEDIO AMBIENTE
COMIDA Y BEBIDAS
INGENIERÍA INVERSA
CIENCIAS
DEPORTES
TECNOLOGÍA
TECNOLOGÍA VESTIBLE
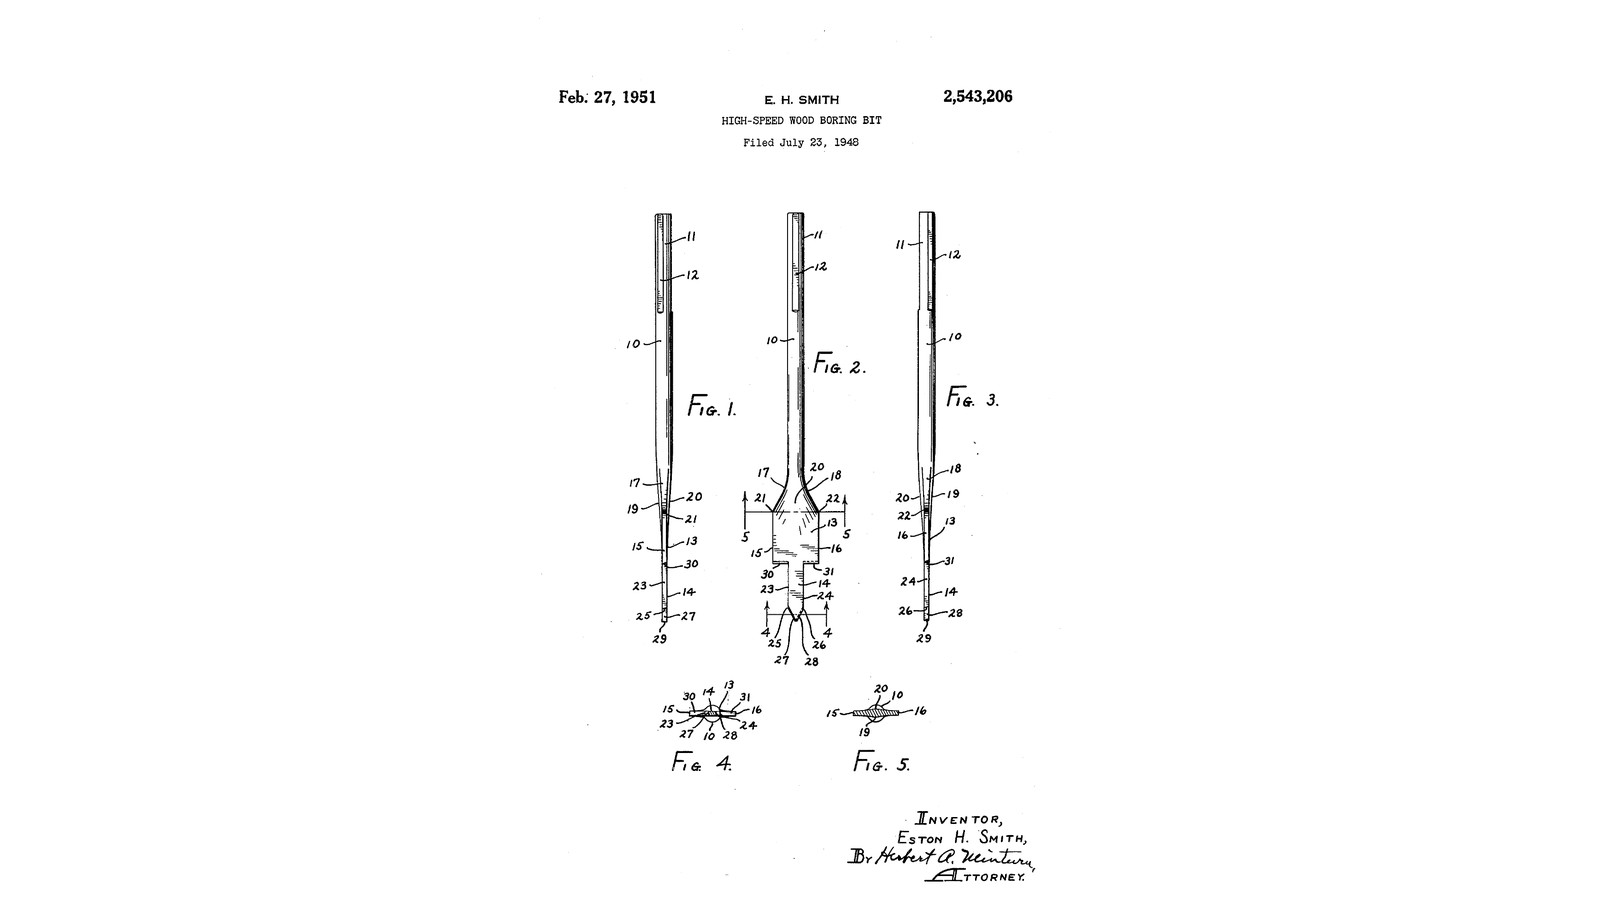


Long-Pilot High-Speed Wood Bits: A Flat Plate and a Long Square-Edged Pilot, No Screw Feed (Smith, 1951)
Eston H. Smith of Indianapolis received US 2,543,206, dated 27 February 1951, for a flat wood-boring bit made for the high speeds of an electric drill, 2,000 to 3,500 revolutions a minute. A flat plate on a thin stem has edges square to its faces and exactly the same width all the way down. A long flat pilot below it keeps the bit centred until it is through. With no screw feed it can bore at an angle, into another hole, or overlapping one, without splitting the wood. The thin stem leaves room for the shavings to come out.
We forge his 3/4 inch bit to his figures, with 1/2 and 1 inch bits beside it.
Intermedio
About 1 day
Instrucciones
1
1
His figures in millimetres
His figures in millimetres
Cargando el cuaderno de Jupyter…
2
2
Read US 2,543,206
Read US 2,543,206
"It is extremely important however that these edges 15 and 16 be of exactly constant width from top to bottom, else the holes will not be bored true, and chattering and heating might develop."
3
3
Forge the blades
Forge the blades
Cut three 170 mm lengths of 10 mm octagonal tool steel. Heat 50 mm of one end to a bright orange in the forge and flatten it on the anvil to about 3 mm thick, centred on the bar. Hammer across it with the peen to spread it wider than the bit, about 2 mm over its size: 15, 21 and 27 mm. Draw the neck down smoothly where the blade meets the bar and keep the blade in line with it. Reheat as soon as the colour fades to red. Finally heat each one to a cherry red and let it cool slowly in the air, to soften it for filing.
Materiales para este paso:
 Barra octogonal de acero para herramientas3 piezas
Herramientas necesarias:
 Sierra para metales
 Tornillo de banco
 Fragua
 Yunque
 Martillo de forja
 Tenazas de fragua
 Guantes de soldador
 Gafas de seguridad
4
4
Print the grinding template
Print the grinding template
Full-size A4 template: the outlines of the 1/2, 3/4 and 1 inch bits with the long flat pilot. Print at 100 %; its 50 mm bar must measure 50 mm.
5
5
Grind the outline
Grind the outline
Glue each outline on its blade, centred on the bar, and grind to the lines on the bench grinder, dipping the steel in water often. Grind the faces flat and parallel to 2.4 mm (3/32 inch). Grind the plate's two side edges and the pilot's two side edges square to the faces and exactly parallel; check the plate's width with the caliper at the top and the bottom, it must not change. Grind three flats on the end of the stem, 20 mm long, for the chuck's jaws.
Herramientas necesarias:
 Impresora de inyección de tinta
 Cola
 Esmeril de banco
 Cubo de temple
 Agua
 Juego de limasTornillo de banco
 Calibre digital de 6 pulgadasGafas de seguridad
6
6
Grind the clearances
Grind the clearances
The bit turns clockwise seen from the stem. Grind each cutting edge either side of the pilot square to the axis, with no top rake, and a clearance of 15 degrees behind it, on the face that trails. Grind the pilot's two point edges to 58 degrees included and give each a clearance of 9 degrees the same way. Leave a 1 mm flat at the tip, square to the axis.
Herramientas necesarias:
Esmeril de bancoCubo de templeAguaJuego de limasTornillo de banco7
7
Harden and temper
Harden and temper
Heat the blade and the neck evenly to a cherry red, until a magnet no longer sticks to it, and quench it straight down in water, moving it up and down. Rub the faces bright with a stone. Heat the shank gently 30 mm behind the blade and watch the colours run down; quench again as soon as a dark straw colour reaches the shoulders and the point. Do the other two.
Herramientas necesarias:
FraguaTenazas de fragua Imán pequeñoCubo de templeAgua
 Piedra de afilarGuantes de soldadorGafas de seguridad
8
8
Sharpen and test
Sharpen and test
Hone the cutting edges on the shoulders and the point with the stone, keeping their angles, and take the burr off. Chuck a bit by its flats and bore a scrap of hardwood: it should start on the point without wandering, cut two clean shavings from the shoulders and leave a round hole of its own size; check it with the caliper.
Herramientas necesarias:
Piedra de afilar Taladro inalámbrico
 Tabla de madera duraCalibre digital de 6 pulgadasGafas de seguridad
9
9
Troubleshooting
Troubleshooting
Long-pilot bit troubleshooting.
Flow
Loading...
10
10
History and honest limits
History and honest limits
**Eston H. Smith** of Indianapolis, assignor to Benjamin B. Aufderheide, US 2,543,206, dated 27 February 1951, filed 23 July 1948. He claimed a flat plate on a stem with a flat pilot, their edge faces at ninety degrees to their faces, a pilot point of 55 to 60 degrees with 8 to 10 degree clearances, and cutting edges square to the pilot with a clearance of between 15 and 20 degrees (his text says 10 to 20). His figures are for the 3/4 inch bit; the 1/2 and 1 inch bits are ours, with his pilot and edge height. His stem is about 1/4 inch with flats; ours is octagonal tool steel with three ground flats. He gives no material or heat treatment; those are ours.
Materiales
1- Marcador de posición
Herramientas requeridas
19- Marcador de posición
- Marcador de posición
- Marcador de posición
- Marcador de posición
- Marcador de posición
- Marcador de posición
- Marcador de posición
- Marcador de posición
- Marcador de posición
- Marcador de posición
- Marcador de posición
- Marcador de posición
- Marcador de posición
- Marcador de posición
- Marcador de posición
- Marcador de posición
- Marcador de posición
- 1 vendor sell this, none ship to you yetMarcador de posición
- Marcador de posición
Archivos de diseño
1Este plano hace

Blueprints relacionados
Estos blueprints comparten conocimiento — técnicas, materiales o principios
CC0 Dominio público
Este Blueprint se publica bajo CC0. Eres libre de copiar, modificar, distribuir y usar este trabajo para cualquier propósito, sin pedir permiso.
Apoya al Maker comprando productos a través de su Blueprint, donde gana una Comisión del Maker establecida por los vendedores, o crea una nueva iteración de este Blueprint e inclúyela como conexión en tu propio Blueprint para compartir ingresos.