Colaboración
ARTE
BELLEZA Y BIENESTAR
ARTESANÍA
CULTURA E HISTORIA
ENTRETENIMIENTO
MEDIO AMBIENTE
COMIDA Y BEBIDAS
INGENIERÍA INVERSA
CIENCIAS
DEPORTES
TECNOLOGÍA
TECNOLOGÍA VESTIBLE
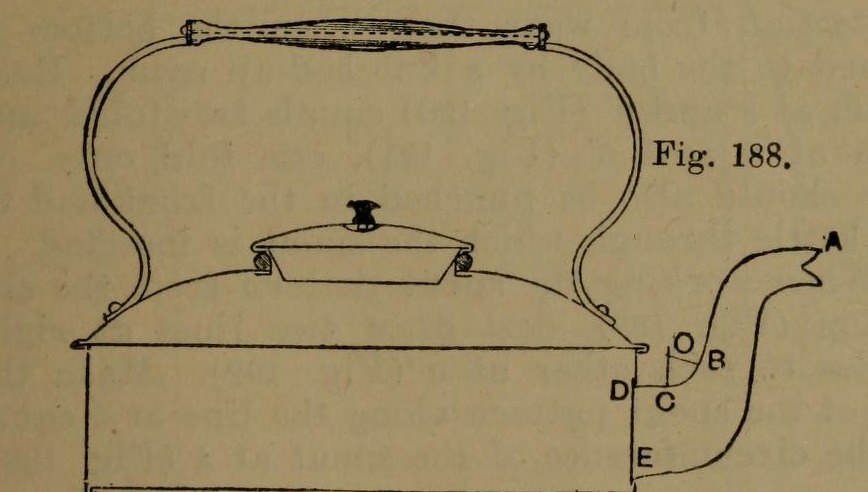


Stovetop Kettle: a Square Copper Kettle (Hasluck, 1907)
A tinsmith's square kettle in sheet copper, 9 x 9 in and 3 5/8 in deep: a box body with folded corner seams, a hollowed top pened on, a brazed and bent spout, a small cover, and a wooden handle on brass uprights.
Hasluck prefers copper; tinplate also works and is a separate route.
Source: Paul N. Hasluck, Tinplate Work (1907), pp. 91-98. Unknown: copper gauge, solder. Picture: Figs. 188-189 of the book.
Avanzado
Unknown
Instrucciones
1
1
Cut the patterns
Cut the patterns
For a body 9 x 9 x 3 5/8 in, cut two ends 9 1/2 x 4 in and two sides 9 1/4 x 4 in, notched for box seams at the corners (Figs. 190-191), with allowances to fold at top and bottom. Punch the spout hole in the front. Cut the bottom 9 1/2 in square, notched for a 1/4 in edge. Set out the top as a 10 1/2 in square with curved allowances for hollowing and a 4 in circle for the cover hole (Fig. 193); set out the spout from the elevation (Fig. 192), the cover and its cone-shaped rim (Figs. 194-195).
Materiales para este paso:
 Lámina de cobre1 body, bottom, top, spout, cover
Herramientas necesarias:
 Compás de puntas
 Punta de trazar
 Tijeras de chapa
2
2
Braze and shape the spout
Braze and shape the spout
Thin the long edges by hammering. Set in the throat with a stretching hammer on a beak iron, bend the spout round until the edges overlap, bind it with wire, lay spelter and borax along the inside of the seam and braze it; then close and braze the under seam. Fill it with lead and bend the neck with a round-faced hammer on the hollowing block; file off spare spelter and smooth it. Run out the lead, throw off a seating round the large end, trim the top with snips and tin the inside.
Materiales para este paso:
 Metal desconocido1 spelter
 Estaño1 tinning
Herramientas necesarias:
 Martillo de aplanar
 Estaca
 Alambre de hierro
 Bórax en polvo
 Soplete de soldadura fuerte
 Plomo
 Espumadera perforada
 Bloque de madera dura
 Lima para metalTijeras de chapa
3
3
Fold and seam the body
Fold and seam the body
Fold the top edges square, the front and back outwards and the sides likewise; fold the bottom edges right over inwards to take the bottom (Fig. 188). Hook each side's end over the front's and work the corner seam on a straight-edged tool (Figs. 198-199). Turn up the bottom's 1/4 in edge, push it edge-down into the bottom folds, and solder the bottom and seams.
Materiales para este paso:
 Estaño-plomo de soldadura1 pieza
Herramientas necesarias:
 Mazo de maderaEstaca
 Soldador eléctrico
 Fundente
4
4
Hollow the top and make the cover
Hollow the top and make the cover
Hollow the top on the block: sink the four sides a little, hollow the corners with a bullet-faced hammer, flatten each side along the block edge, even the shoulder and smooth it all over. Pare the edges, mark the flange with an edging machine, set it down square with a hatchet stake and mallet, and take up an edge to fit over the body. Cut the cover hole with circular snips and fit a narrow wired rim, worked over inside. Make the cover: solder its cone rim to fit the wired rim, throw off a flange, hollow the cover disc and seam it on, and fix the knob.
Materiales para este paso:
Alambre de hierro1 rimEstaño-plomo de soldadura1 piezaMetal desconocido1 cover knobHerramientas necesarias:
Martillo de aplanarBloque de madera duraEstacaMazo de maderaTijeras de chapaSoldador eléctricoFundente5
5
Handle, top and spout
Handle, top and spout
Cut two handle uprights from stout brass or copper band (Fig. 196), drill them for rivets and for the spindle that carries the wooden handle, and bend them to shape. Rivet them to the top and solder over the rivet heads inside. Pene the top down onto the body and solder along each edge. Push the spout through its hole from inside until its large end butts against the front, and solder it strongly from inside.
Materiales para este paso:
 Lámina de latón1 handle uprights
 Barra de latón1 spindle
 Mango1 wood
 Remaches de cobre1 number not givenEstaño-plomo de soldadura1 pieza
Herramientas necesarias:
 Taladro de mano
 Martillo de remacharMazo de maderaSoldador eléctricoFundente
Materiales
9- 1 body, bottom, top, spout, coverMarcador de posición
- 1 cover knobMarcador de posición
- 1 tinningMarcador de posición
- 3 piezasMarcador de posición
- 1 rimMarcador de posición
- 1 handle uprightsMarcador de posición
- 1 spindleMarcador de posición
- 1 woodMarcador de posición
- 1 number not givenMarcador de posición
Herramientas requeridas
17- Marcador de posición
- Marcador de posición
- Marcador de posición
- Marcador de posición
- Marcador de posición
- Marcador de posición
- Marcador de posición
- Marcador de posición
- Marcador de posición
- Marcador de posición
- Marcador de posición
- Marcador de posición
- Marcador de posición
- Marcador de posición
- Marcador de posición
- Marcador de posición
- Marcador de posición
Materiales de Blueprints conectados


Este plano hace

CC0 Dominio público
Este Blueprint se publica bajo CC0. Eres libre de copiar, modificar, distribuir y usar este trabajo para cualquier propósito, sin pedir permiso.
Apoya al Maker comprando productos a través de su Blueprint, donde gana una Comisión del Maker establecida por los vendedores, o crea una nueva iteración de este Blueprint e inclúyela como conexión en tu propio Blueprint para compartir ingresos.