Collaboration
ART
BEAUTÉ ET BIEN-ÊTRE
ARTISANAT
CULTURE ET HISTOIRE
DIVERTISSEMENT
ENVIRONNEMENT
NOURRITURE ET BOISSONS
INGÉNIERIE INVERSE
SCIENCES
SPORTS
TECHNOLOGIE
TECHNOLOGIE PORTABLE
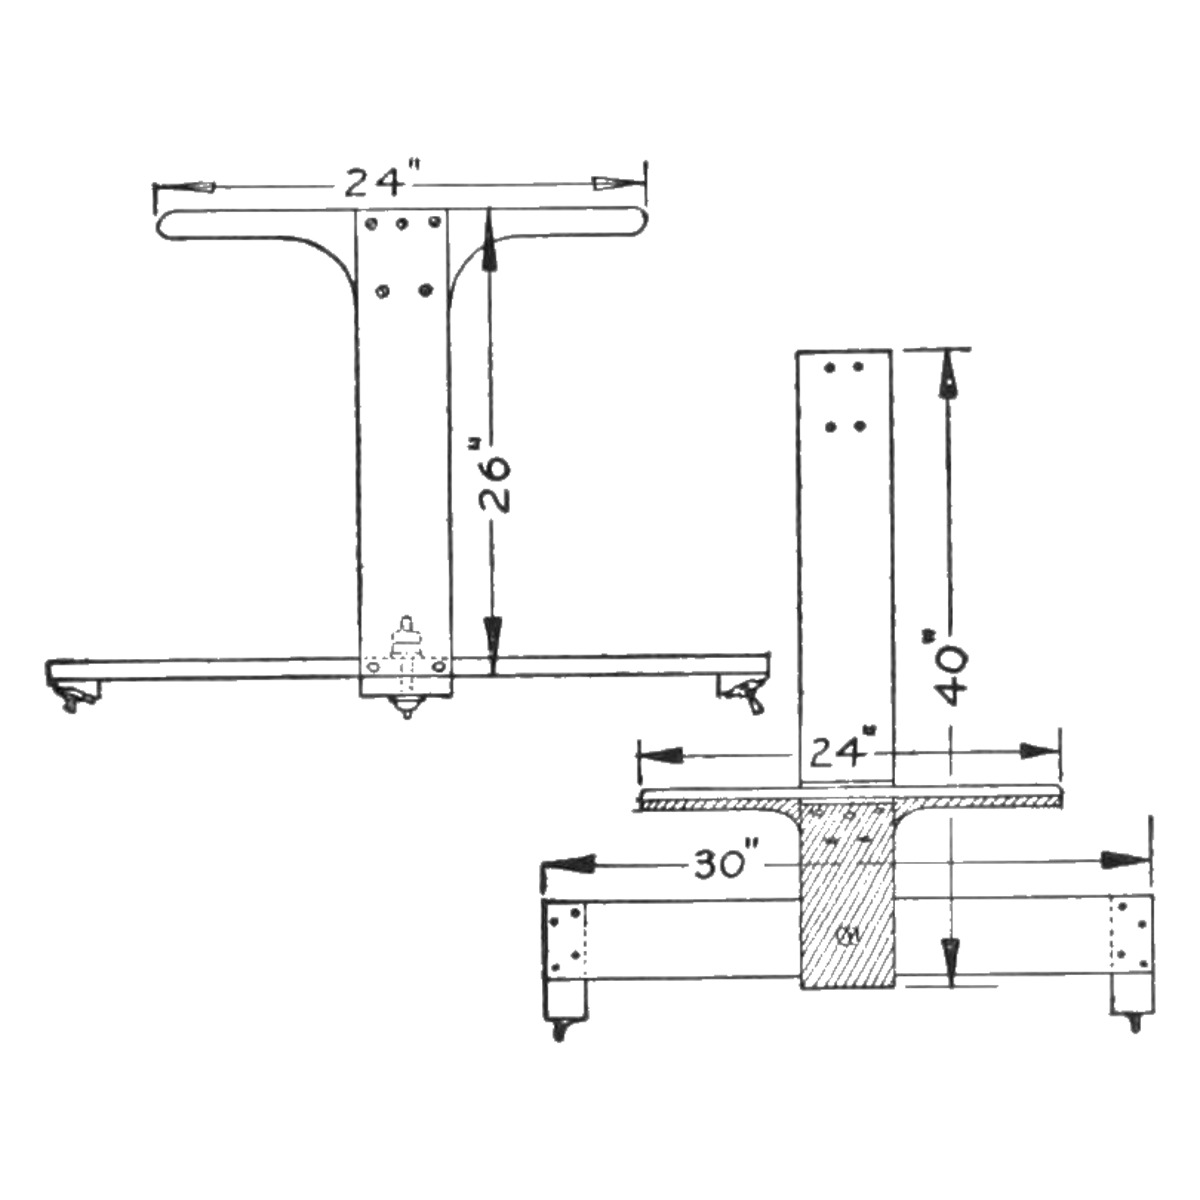


Ice Glider: Three-Skate Push Scooter With a Steering Crosspiece and Spiked Pusher (Boy Mechanic, 1915)
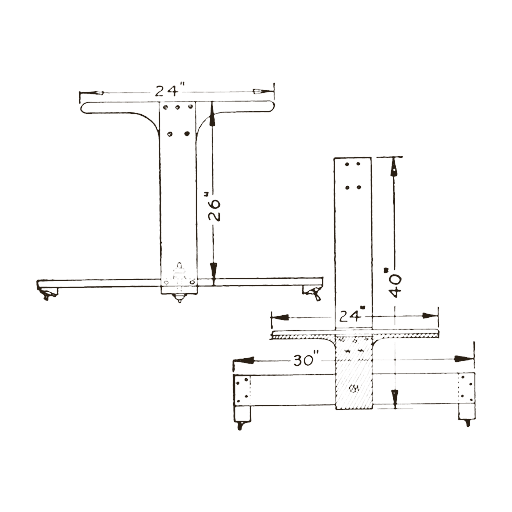
Mildred E. Thomas's ice glider from The Boy Mechanic, Book 2 (1915), "similar to an ice yacht, only a great deal smaller": a 40 in rear board on one skate, bolted to a 30 in front crosspiece on two skates tilted about 30 deg, with a 26 in upright and a handle to steer. It is pushed along with a spiked block strapped to one shoe.
Débutant
About 1 day
Consignes
1
1
Her sizes, and the skate angle
Her sizes, and the skate angle
Chargement du notebook Jupyter…
2
2
Read The Boy Mechanic, Book 2
Read The Boy Mechanic, Book 2
"The enthusiastic pushmobilist need not put aside his hobby during the winter, as an amusement device for use on ice, which will surpass the very best pushmobile, can be easily made as shown in the illustration."
3
3
Make the front crosspiece
Make the front crosspiece
Cut the front crosspiece 30 in long and about 8 in wide, with its front and back edges cut on a slant. Fasten a tapering block to each end so that the skates on them stand at an angle of about 30 deg, edges outward, and fix a skate to each block with screws through holes drilled in the top plates (or with straps).
Matériaux pour cette étape :
 Planche de pin1 pièce
 Planche de bois dur1 pièce
 Patin à glace2 pièces
 Vis à bois1 pièce
Outils nécessaires :
 Scie égoïne
 Rabot
 Rapporteur
 Chignole à main
 Crayon
 Mètre ruban
4
4
Build the upright and handle
Build the upright and handle
In the centre of the crosspiece build an upright 26 in high: nail a piece to its front and back edges so that, on the slanted edges, they stand sloping toward the rear. Fasten a handle 24 in long between the two uprights at the top.
Matériaux pour cette étape :
Planche de pin1 piècePlanche de bois dur1 pièce Clous1 pièceVis à bois1 pièce
Outils nécessaires :
Scie égoïne MarteauChignole à main
5
5
Make the rear board and join it
Make the rear board and join it
Cut the rear board 8 in wide and 40 in long and fasten the third skate in a perfectly straight position on its rear end. Bore a hole in the front end of the board and bolt it to the centre of the front crosspiece, so the crosspiece turns to guide the glider.
Matériaux pour cette étape :
Planche de pin1 piècePatin à glace1 pièce Boulon de carrosserie1 pièce
 Rondelle plate2 piècesVis à bois1 pièce
Outils nécessaires :
Scie égoïne Vilebrequin et mècheChignole à main
6
6
Make the pusher
Make the pusher
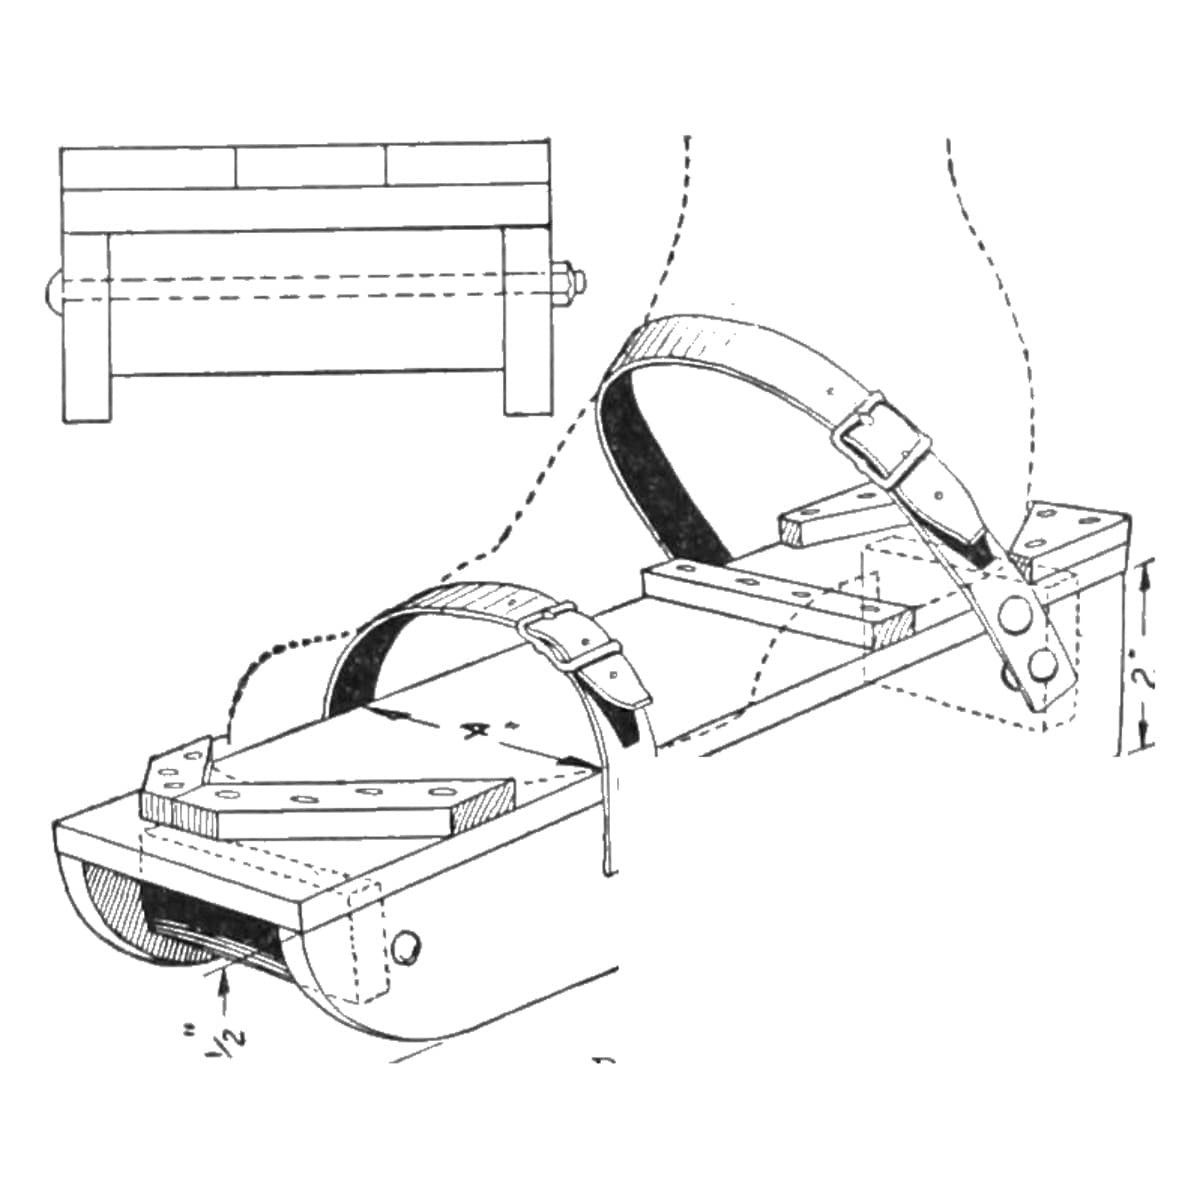
Drive nails through a block of wood so their points project on the underside, and strap the block to one shoe. Or use sole leather instead of the block, with small slots cut in the sides for the straps and nails driven through so the points project. Push the glider along like a pushmobile.
Matériaux pour cette étape :
Planche de bois dur1 pièceClous1 pièce Lanière de cuir1 pièce
Outils nécessaires :
Scie égoïneMarteau7
7
Troubleshooting
Troubleshooting
Ice glider troubleshooting.
Flow
Loading...
8
8
History and honest limits
History and honest limits
From "An Ice Glider" by Mildred E. Thomas, in **The Boy Mechanic, Book 2**, Popular Mechanics, 1915 (Project Gutenberg 44585; checked on the archive.org scan boymechanicbook200chic2, pp. 31-32). She gives no board thicknesses, bolt size or block taper, only the 30 deg skate angle. The tools and metric figures are ours.
Matériaux
8- 1 pièceEspace réservé
- 1 pièceEspace réservé
- 2 piècesEspace réservé
- 3 piècesEspace réservé
- 2 piècesEspace réservé
- 1 pièceEspace réservé
- 2 piècesEspace réservé
- 1 pièceEspace réservé
Outils requis
8- Espace réservé
- Espace réservé
- Espace réservé
- Espace réservé
- 1 vendor sell this, none ship to you yetEspace réservé
- 1 vendor sell this, none ship to you yetEspace réservé
- Espace réservé
- Espace réservé
Ce plan fabrique
Blueprints liés
Ces blueprints partagent des connaissances — techniques, matériaux ou principes
CC0 Domaine public
Ce blueprint est publié sous CC0. Vous êtes libre de copier, modifier, distribuer et utiliser ce travail pour tout usage, sans demander la permission.
Soutenez le Maker en achetant des produits via son Blueprint où il perçoit une Commission Maker définie par les Vendeurs, ou créez une nouvelle itération de ce Blueprint et incluez-le comme connexion dans votre propre Blueprint pour partager les revenus.