
ART
BEAUTÉ ET BIEN-ÊTRE
ARTISANAT
CULTURE ET HISTOIRE
DIVERTISSEMENT
ENVIRONNEMENT
NOURRITURE ET BOISSONS
INGÉNIERIE INVERSE
SCIENCES
SPORTS
TECHNOLOGIE
TECHNOLOGIE PORTABLE
Craft Knife: Doniger's Hinged Handle and Reversible Blade
Forge

Créé par

Forge

26. octobre 2026NO
11
0
0
0
0

Craft Knife: Doniger's Hinged Handle and Reversible Blade

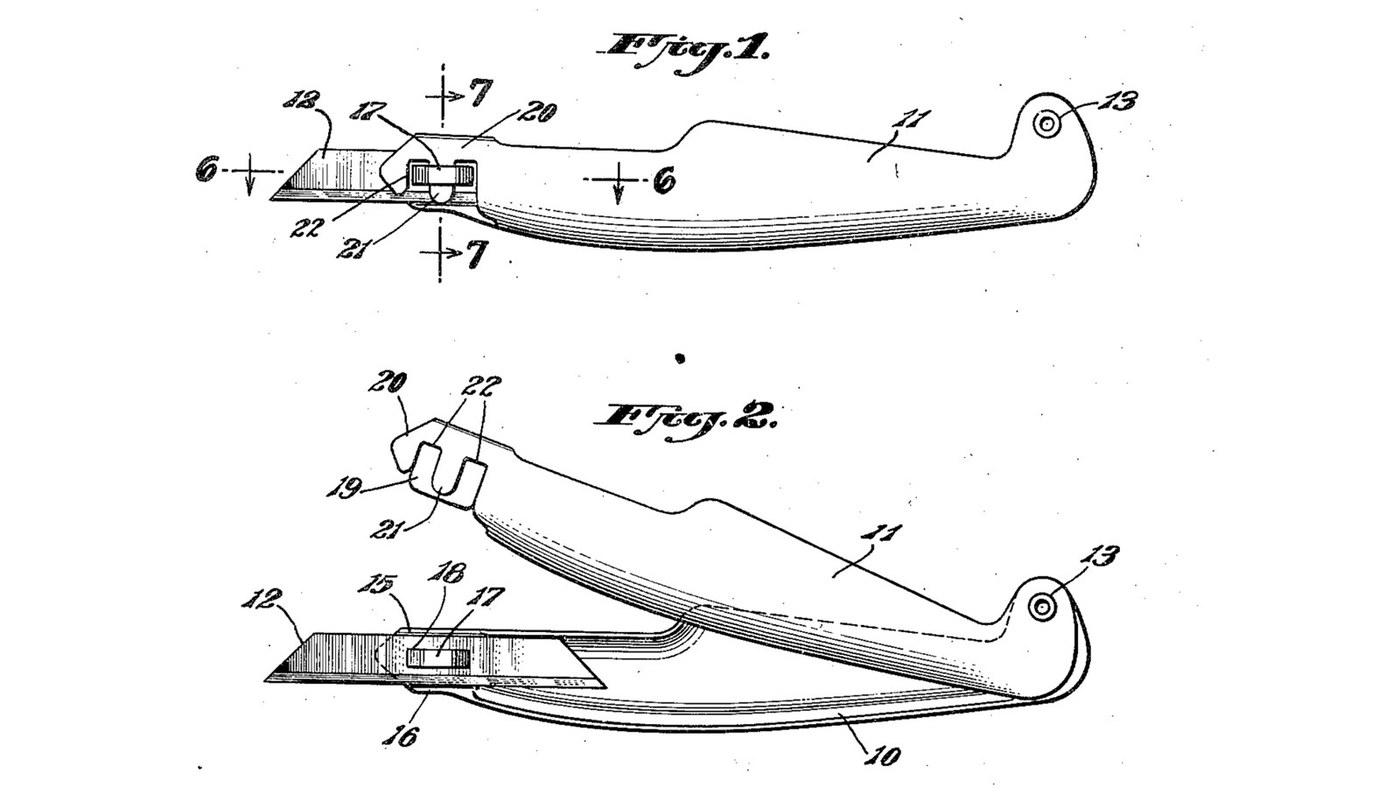
A knife for model carving and fine cutting, by Sundel Doniger of New York, founder of X-Acto (US 2,463,682, filed 1945, granted 1949). The handle is two shell-like metal halves pivoted at the rear. A thin blade with a slot in its middle drops over a small 'staple' pressed out of one half; closing the other half pushes a tongue into the staple and locks the blade solid. Swing it open to change the blade or turn it end for end: the spare end rests inside the handle. The patent gives no sizes or metals. Mild steel sheet, the rivet, the spring steel blade and the sizes are ours. The picture: Figs. 1 and 2 of the patent.
Intermédiaire
1 day

Consignes

1

Mark out the two handle halves

Scribe two mirror-image halves, about 130 mm long, on mild steel sheet about 0.8 mm thick (ours). Give each a flat rear ear for the pivot and a nose at the blade end.

Matériaux pour cette étape :

Tôle d'acier douxTôle d'acier doux1 pièce

Outils nécessaires :

Pointe à tracerPointe à tracer
RègleRègle
2

Cut and file the halves

Cut both halves out with tin snips and file the edges smooth.

Outils nécessaires :

Cisaille à tôleCisaille à tôle
Lime à métauxLime à métaux
Étau d'établiÉtau d'établi
3

Dome the grip, keep the ends flat

Hammer the middle of each half into a shallow bulge over a hollow in a hardwood block. Leave the pivot ends flat, so the pivot cannot wobble, and leave the noses flat.

Outils nécessaires :

Marteau à panne bombéeMarteau à panne bombée
Bloc de bois durBloc de bois dur
4

Form the blade wall and its shoulders

On the mounting half (10), the nose is a flat wall (14) in the plane where the halves meet. Turn its top and bottom edges inward into shoulders (15, 16) just as far apart as the blade is wide.

Outils nécessaires :

Pince platePince plate
Marteau à panne bombéeMarteau à panne bombée
Étau d'établiÉtau d'établi
5

Press out the staple

Slit the middle of the wall along two short parallel lines, lengthwise. Press the strip between the slits outward to form the staple (17).

Outils nécessaires :

Burin à froidBurin à froid
PointeauPointeau
Marteau à panne bombéeMarteau à panne bombée
EnclumeEnclume
6

Bend the locking channel

Bend the nose of the locking half (11) into a springy channel: a broad rear flange (19) about the size of the wall, and a front flange (20) with a tongue (21) and a cut-out (22) each side of it to clear the staple's legs.

Outils nécessaires :

Cisaille à tôleCisaille à tôle
Jeu de limes aiguillesJeu de limes aiguilles
Pince platePince plate
7

Drill the pivot

Clamp the halves together, punch the centre of the rear ear and drill through both.

Outils nécessaires :

PointeauPointeau
Chignole à mainChignole à main
Étau d'établiÉtau d'établi
8

Rivet the pivot

Rivet the flat ends together (Doniger used an eyelet; ours: a steel rivet). Close it firmly: the friction of the flat ends must hold the halves wherever you swing them.

Matériaux pour cette étape :

Rivets en acierRivets en acier1 pièce

Outils nécessaires :

Marteau à riverMarteau à river
EnclumeEnclume
9

Anneal and cut the blade blank

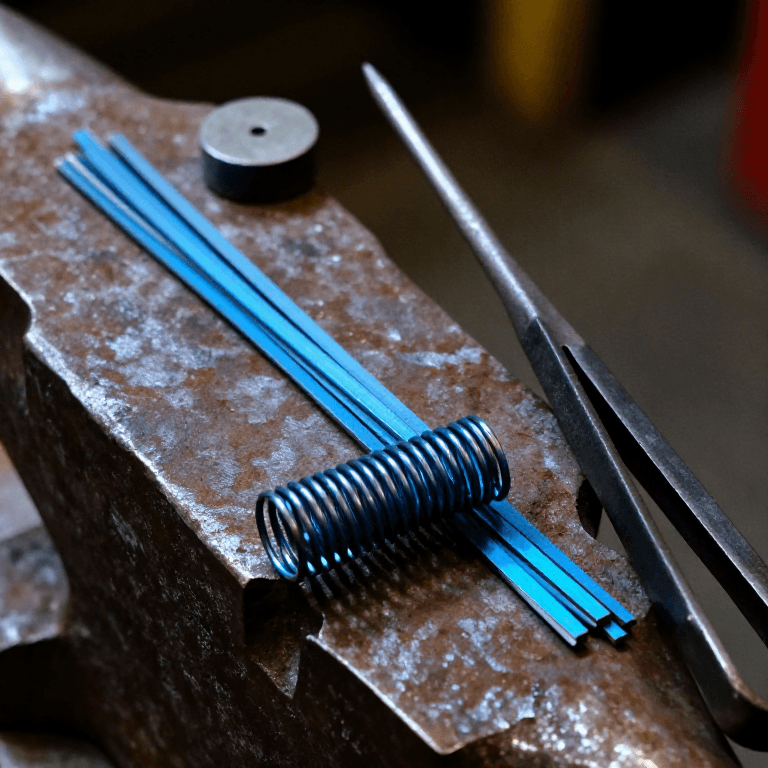
Soften a piece of spring steel strip about 0.4 mm thick (ours), as in the connected spring-steel blueprint. Cut a blank as wide as the gap between the shoulders.

Matériaux pour cette étape :

Feuillard d'acier à ressortFeuillard d'acier à ressort1 pièce

Outils nécessaires :
ForgeForge
Tenailles de forgeTenailles de forge
Cendre de bois durCendre de bois dur
Cisaille à tôleCisaille à tôle
Gants de soudeurGants de soudeur
10

Cut the centre slot

Cut a slot (18) in the exact middle of the blank that fits closely over the staple. Drill its ends and file out between them.

Outils nécessaires :

PointeauPointeau
Chignole à mainChignole à main
Jeu de limes aiguillesJeu de limes aiguilles
Étau d'établiÉtau d'établi
11

Shape both points

Cut each end of the blank to a slanting point, as in Fig. 1, and grind a cutting bevel at both ends.

Outils nécessaires :

Cisaille à tôleCisaille à tôle
Pierre à aiguiser à rouePierre à aiguiser à roue
Lime à métauxLime à métaux
12

Harden and temper the blade

Harden the blade in oil as in the connected spring-steel blueprint. Temper it to the knife colour given in the connected heat-treatment blueprint, not to spring blue.

Outils nécessaires :

ForgeForge
Tenailles de forgeTenailles de forge
Huile de colzaHuile de colza
Gants de soudeurGants de soudeur
13

Hone both edges

Hone both ends keen on the sharpening stone.

Outils nécessaires :

Pierre à aiguiserPierre à aiguiser
14

Fit and lock the blade

Swing the halves open. Lay the blade flat on the wall, its slot over the staple and its edges between the shoulders. Swing the locking half shut: the tongue enters the staple and the channel grips the blade. No tools needed.
15

Reverse or change the blade

Swing the locking half up, lift the blade off the staple and turn it end for end, or fit a new one. The spare end sits protected inside the handle.
16

What the patent says, and what is ours

The patent fixes the parts and how they lock: hinged shell halves, flat riveted pivot ends that hold by friction, a wall with shoulders and a pressed-out staple, a slotted double-ended blade, a springy channel with tongue and cut-outs. It gives no sizes, no metals and no blade making. All sizes, the mild steel, the rivet and the spring steel blade are our choices. Doniger's better-known X-Acto knives hold the blade in a round collet instead.

Matériaux

3

Outils requis

21

CC0 Domaine public

Ce blueprint est publié sous CC0. Vous êtes libre de copier, modifier, distribuer et utiliser ce travail pour tout usage, sans demander la permission.

Soutenez le Maker en achetant des produits via son Blueprint où il perçoit une Commission Maker définie par les Vendeurs, ou créez une nouvelle itération de ce Blueprint et incluez-le comme connexion dans votre propre Blueprint pour partager les revenus.

Commentaires

(0)

Se connecter pour participer à la discussion

Chargement des commentaires...