

Dog Clutch
Consignes
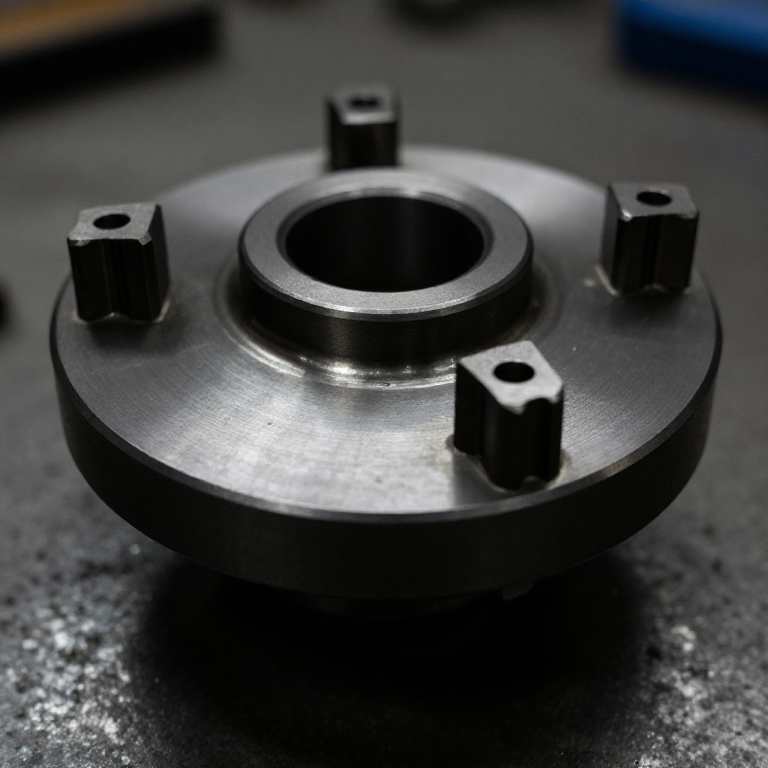
Cut four square dog teeth per face
Cut four square dog teeth per face
Few teeth, big teeth. That is the opposite of a gear and it is deliberate.
- Cut two 70 mm discs from 18 mm ply faced with 6 mm aluminium, or from solid aluminium bar.
- Mark four teeth on each face, 90 degrees apart, each spanning about 30 degrees of arc.
- Cut the gaps between them slightly WIDER than the teeth — about 35 degrees.
- File the tooth flanks square to the face, or with a very slight back-taper.
- Chamfer the leading corners of every tooth.
Why so few teeth. More teeth means each is smaller and weaker, and — more importantly — the clutch can then only engage at more closely matched positions. Four big teeth engage from any of four positions and carry the load on a large area. Gears want many small teeth for smooth motion; a dog clutch wants few large ones for strength and easy engagement, because it never runs meshed-and-rotating relative to its partner.
The clearance between tooth and gap is what lets it engage at all. Cut them the same size and thermal expansion or a speck of dirt will stop it engaging.Matériaux pour cette étape :
 Contreplaqué de bouleau de Baltique1 feuille
 Plat en aluminium1 pièce
Outils nécessaires :
 Scie à chantourner
 Jeu de limes
 Étau d'établi
 Équerre combinée
 Pied à coulisse numérique 6 pouces
 Pointeau
Mount one half fixed, one half sliding
Mount one half fixed, one half sliding
One disc is keyed to its shaft; the other slides along its own shaft to engage.
- Fix the first disc to the driven shaft with two M5 cup point set screws at 90 degrees.
- File a flat along the driving shaft and fit the second disc with a set screw riding in it.
- Confirm the sliding disc moves 20 mm freely along the shaft but cannot rotate on it.
- Mount both shafts in 608 bearings in ply blocks, fixed with M5 × 40 socket head cap screws × 4, M5 flat washers × 8 and M5 hex nuts × 4.
- Set the two discs coaxial — check with a straightedge across both rims.
Matériaux pour cette étape :
 Rond en aluminium2 pièces
 Ball Bearing - Non-Flanged (8mm Bore, 22mm OD)4 pièces
 Vis sans tête à bout cuvette4 pièces
 Rondelle plate8 pièces
 Écrou hexagonal4 pièces
Outils nécessaires :
 Perceuse sans fil
 Jeu de forets
 Jeu de clés AllenJeu de limesÉquerre combinée
Add the shift fork and its detent
Add the shift fork and its detent
The fork slides the disc; a detent keeps it where you put it.
- Turn a groove in the sliding disc's back face, or fit two collars either side of a fork.
- Cut a fork from 6 mm aluminium and pivot it on an M6 × 40 hex bolt with M6 flat washers × 2.
- Drill two shallow detent dimples in the fork's travel — one for engaged, one for disengaged.
- Fit a spring-loaded ball or pin bearing into those dimples.
The detent is not a convenience. A dog clutch left half engaged carries load on the tooth corners only, and that is how teeth break. The detent makes the two valid positions the only comfortable places for the lever to sit, so the mechanism resists being left in between.
Every gearbox has this. What feels like a positive gear-change action is a detent doing exactly this job, and it exists for exactly this reason.Matériaux pour cette étape :
Plat en aluminium1 pièce Jeu de ressorts de compression1 jeuRondelle plate4 pièces
Outils nécessaires :
Perceuse sans filJeu de foretsJeu de clés AllenJeu de limes Monture de scie à métaux avec lames
Engage at rest, then engage at speed
Engage at rest, then engage at speed
The second test is the whole lesson, and it is audible.
- With both shafts stationary and roughly aligned, engage. It drops in cleanly.
- Load the output and confirm zero slip — the connection is absolute.
- Now spin the input by hand and try to engage the stationary output.
- Listen. Try again at a bigger speed difference.
Outils nécessaires :
 ChronomètrePied à coulisse numérique 6 pouces
The synchroniser answer, and history
The synchroniser answer, and history
The gearbox solution is to use both clutches together. A synchroniser is a small cone clutch that engages FIRST, dragging the next gear up to matching speed, after which the dog teeth slide in without clashing. Earl Thompson at Cadillac developed the synchromesh gearbox in the late 1920s, and it turned gear changing from a skill — double-declutching, matching revs by ear — into something anyone could do. The dog clutch did not get better; it got a helper.
Where dog clutches are still used bare: racing sequential gearboxes, where the shock is accepted in exchange for near-instant shifts and no synchroniser drag; tractor power take-offs; and machine tool feed engagement, where positive drive matters and speeds are low or stopped.
Its place in this catalogue: the ratchet and pawl also gives positive, non-slipping engagement — but only in one direction, and it engages at discrete steps with an audible click. The dog clutch is bidirectional and locks fully. The sprag clutch is one-way like a ratchet but silent and stepless. Four ways to connect two rotating parts, and the differences are exactly what a designer chooses between.
Honest limit: aluminium dog teeth will deform under real torque. This build demonstrates the geometry and the engagement behaviour; a working clutch wants hardened steel teeth, because the corners carry enormous local stress at the instant of engagement.
Matériaux
8- 1 feuilleEspace réservé
- 1 pièceEspace réservé
- 2 piècesEspace réservé
- Ball Bearing - Non-Flanged (8mm Bore, 22mm OD)10 % de commission4 pièces€1.12
- 4 piècesEspace réservé
- 12 piècesEspace réservé
- 4 piècesEspace réservé
- Espace réservé
Outils requis
11- Espace réservé
- Espace réservé
- Espace réservé
- Espace réservé
- Espace réservé
- Espace réservé
- 1 vendor sell this, none ship to you yetEspace réservé
- Espace réservé
- Espace réservé
- Espace réservé
- Espace réservé
Blueprints liés
Ces blueprints partagent des connaissances — techniques, matériaux ou principes
CC0 Domaine public
Ce blueprint est publié sous CC0. Vous êtes libre de copier, modifier, distribuer et utiliser ce travail pour tout usage, sans demander la permission.
Soutenez le Maker en achetant des produits via son Blueprint où il perçoit une Commission Maker définie par les Vendeurs, ou créez une nouvelle itération de ce Blueprint et incluez-le comme connexion dans votre propre Blueprint pour partager les revenus.