Collaboration
ART
BEAUTÉ ET BIEN-ÊTRE
ARTISANAT
CULTURE ET HISTOIRE
DIVERTISSEMENT
ENVIRONNEMENT
NOURRITURE ET BOISSONS
INGÉNIERIE INVERSE
SCIENCES
SPORTS
TECHNOLOGIE
TECHNOLOGIE PORTABLE
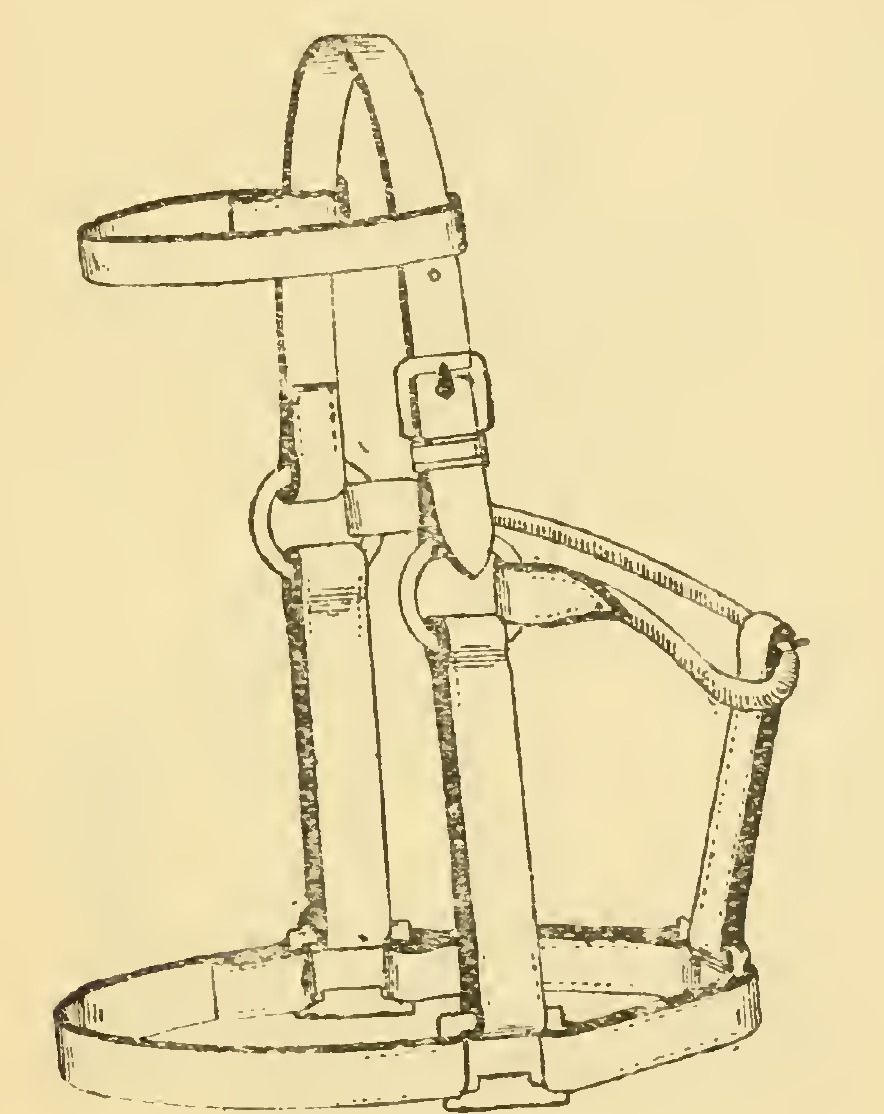


Newmarket Head Collar: Stable Halter With Squared Stays, Noseband, Cheeks and Throat Lash (Hasluck, Saddlery, 1904)
A head collar, also called a headstall or stable collar, ties a horse up in the stable. This is the Newmarket pattern from Paul N. Hasluck's Saddlery (1904): two short stays carrying three stop squares, a noseband, two cheeks, an upward stay, a forehead band, a top strap and a throat lash. Every size is his.
It has no bit; the rein is fastened to the centre square.
Intermédiaire
About 1 day
Consignes
1
1
Cutting list
Cutting list
Chargement du notebook Jupyter…
2
2
Read Saddlery, ch. VIII
Read Saddlery, ch. VIII
"Head collars, also called headstalls and stable collars, are made in various ways, and one of the most useful styles will be described in this chapter."
3
3
Make the short stays
Make the short stays
Cut two short straps 1 ft by 1-1/4 in and turn them in to 5 in long, leaving 1 in or a little more for overlap. Shave the ends and prick them eight to the inch. Put one square in the centre between them and one in each end, with the stops on the same side. Lay a strip of leather along the centre of each to raise the stay, then stitch with beeswaxed three-cord hemp thread, with a strong cross-stitch at the end of each line.
Matériaux pour cette étape :
 Cuir de harnais1 pièce
 Carré de licol3 pièces
 Ficelle de chanvre1 pièce
 Cire d'abeille1 pièce
Outils nécessaires :
 Couteau à cuir
 Griffe à frapper
 Alêne
 Deux aiguilles de sellier
 Pince de sellier
 Mètre ruban
4
4
Make the noseband
Make the noseband
Cut the noseband 1 ft 3 in long when turned down. Prepare it and put one end, forming a chape, in each of the end squares of the short stays. Stitch two rows along the edges of the turn-down and trim the ends neatly.
Matériaux pour cette étape :
Cuir de harnais1 pièceFicelle de chanvre1 pièceCire d'abeille1 pièceOutils nécessaires :
Couteau à cuirGriffe à frapperAlêneDeux aiguilles de sellier5
5
Make the cheeks
Make the cheeks
Cut a pair of cheeks 1-1/4 in by 8 in when bent in both ends. Prepare one end of each for a buckle and shave the points of the other turn-down. Put a runner on each cheek and a loop and the 1-1/4 in roller buckle on one end, then stitch the opposite ends to the two outer squares.
Matériaux pour cette étape :
Cuir de harnais1 pièce Boucle à rouleau1 pièceFicelle de chanvre1 pièceCire d'abeille1 pièce
Outils nécessaires :
Couteau à cuirAlêneDeux aiguilles de sellier Mandrin à passants
6
6
Make the upward stay
Make the upward stay
Cut the short upward stay and stitch it behind in the centre square. Its length when doubled is about 4-1/2 in, with an opening left at the top for the throat lash to run through.
Matériaux pour cette étape :
Cuir de harnais1 pièceFicelle de chanvre1 pièceCire d'abeille1 pièceOutils nécessaires :
Couteau à cuirAlêneDeux aiguilles de sellier7
7
Make the forehead band, top strap and throat lash
Make the forehead band, top strap and throat lash
Make the forehead band like the snaffle bridle front. Cut the top strap 2 ft by 1-1/4 in and, when finished, punch about four holes on both sides. Make the throat lash 3 ft 6 in by 3/4 in, with the 3/4 in roller buckle, a loop and a runner, and about nine holes.
Matériaux pour cette étape :
Cuir de harnais1 pièceBoucle à rouleau1 pièceFicelle de chanvre1 pièceCire d'abeille1 pièceOutils nécessaires :
Couteau à cuir Emporte-pièce pour cuirAlêneDeux aiguilles de sellierMandrin à passants
8
8
Put it together
Put it together
Put the forehead band on the head strap and buckle it on both sides in the cheeks. Run the throat lash from the near side through the opening in the upward stay and under the head strap, then through the opening in the forehead band on each side, and bring the point down to the buckle on the near side. If the collar has only one cheek, on the near side, make the strap on the other side 2 ft 9 in long.
9
9
Troubleshooting
Troubleshooting
Head collar troubleshooting.
Flow
Loading...
10
10
History and honest limits
History and honest limits
From **Saddlery**, edited by Paul N. Hasluck, David McKay, 1904 (archive.org saddlery00hasl), chapter VIII, "Head Collars", the Newmarket head collar, Fig. 23; every fraction was read on the scan. His list names one 1-1/4 in roller buckle and one 3/4 in buckle; the throat lash takes a roller buckle of its own width, and fitting the larger one to the cheek is our reading. Not made here: the Albert and Queen's pattern collars and the head collar reins. The metric figures are ours.
Matériaux
5- 5 piècesEspace réservé
- 3 piècesEspace réservé
- 5 piècesEspace réservé
- 5 piècesEspace réservé
- 1 pièceEspace réservé
Outils requis
8- Espace réservé
- Espace réservé
- Espace réservé
- Espace réservé
- Espace réservé
- 1 vendor sell this, none ship to you yetEspace réservé
- Espace réservé
- Espace réservé
Ce plan fabrique
Blueprints liés
Ces blueprints partagent des connaissances — techniques, matériaux ou principes
CC0 Domaine public
Ce blueprint est publié sous CC0. Vous êtes libre de copier, modifier, distribuer et utiliser ce travail pour tout usage, sans demander la permission.
Soutenez le Maker en achetant des produits via son Blueprint où il perçoit une Commission Maker définie par les Vendeurs, ou créez une nouvelle itération de ce Blueprint et incluez-le comme connexion dans votre propre Blueprint pour partager les revenus.