
Collaboration
ART
BEAUTÉ ET BIEN-ÊTRE
ARTISANAT
CULTURE ET HISTOIRE
DIVERTISSEMENT
ENVIRONNEMENT
NOURRITURE ET BOISSONS
INGÉNIERIE INVERSE
SCIENCES
SPORTS
TECHNOLOGIE
TECHNOLOGIE PORTABLE
Portable Bench Saw: A Lift-Out Power Unit on Trunnions, Its Motor on Spring Bars, Under a Tilting Platform (Henkel, 1928)
Forge

Créé par

Forge

13. novembre 2026NO
9
0
0
0
0

Portable Bench Saw: A Lift-Out Power Unit on Trunnions, Its Motor on Spring Bars, Under a Tilting Platform (Henkel, 1928)

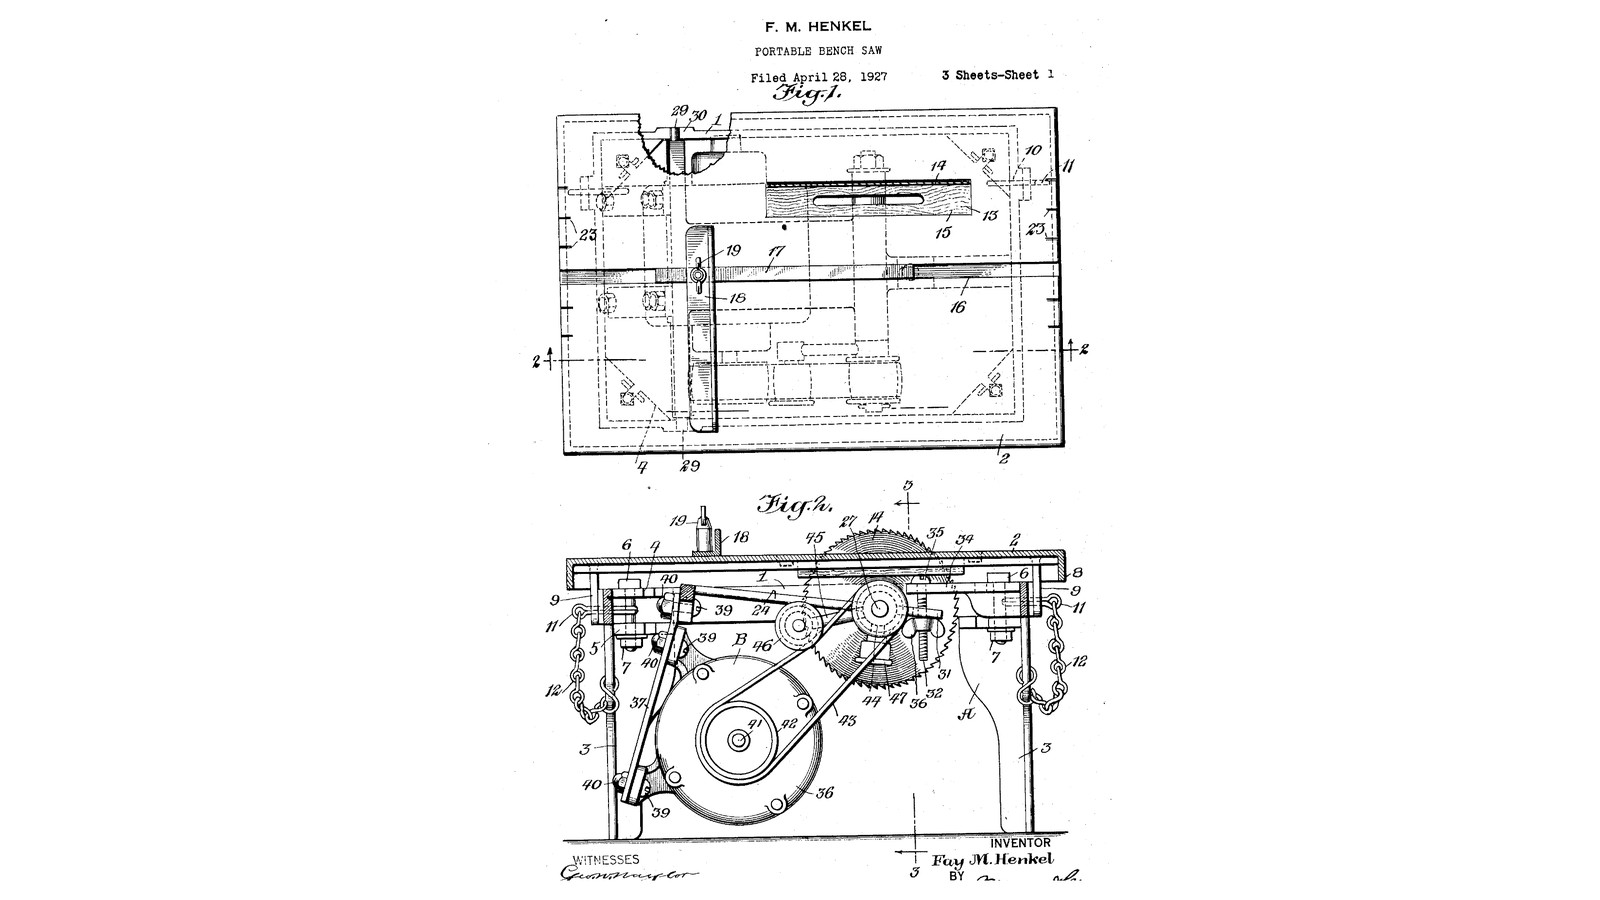
Fay M. Henkel of New Rochelle, New York, received US 1,695,188, dated 11 December 1928, for a cheap, compact bench saw in two parts. The stand has a platform that tilts on hinge pins for angled cuts, with a sliding angle follower and a rip guide. The power unit drops into it on trunnions, and a wing nut on a hanging screw raises or lowers the saw. The motor sits on two spring bars that soak up its vibration and keep the belt tight. Lifted out, the power unit stands on the bars' cap nuts and runs an emery wheel. The patent gives no sizes; every size here is ours, and our stand is wood and steel where his is cast.
Avancé
About 4 days

Consignes

1

Raising the saw and tilting the platform

Chargement du notebook Jupyter…
2

Read US 1,695,188

"It will thus be seen that the power unit has a three-point bearing which maintains it against accidental displacement, or, in other words, prevents it from getting out of proper alinement."
3

The stand: frame 1 and legs 3

Make a rectangular frame 460 x 360 mm of 25 x 90 mm hardwood, glued and screwed at the corners. Bolt a 250 mm pine leg 45 x 45 mm in each corner through a short length of steel angle screwed to frame and leg, as his corner plates 4 and lugs 5. Cut a notch 30 in the top of each long side, 60 mm from one end, 21 mm wide and 25 deep, for the trunnions. Screw a steel arm 34 across the other end with a 10.5 mm hole, and a lug 50 with an M10 tapped hole on the side away from the hinges.

Matériaux pour cette étape :

Planche de bois durPlanche de bois dur2 pièces
Bois de pinBois de pin1 pièce
Cornière en acier douxCornière en acier doux1 pièce
Plat en acier douxPlat en acier doux1 pièce
Assortiment de boulons à tête hexagonaleAssortiment de boulons à tête hexagonale8 pièces

Vis à boisVis à bois24 pièces
Colle à boisColle à bois1 pièce

Outils nécessaires :

Scie sauteuseScie sauteuse
Perceuse sans filPerceuse sans fil
Jeu de foretsJeu de forets
Serre-joint à pompeSerre-joint à pompe
Équerre combinéeÉquerre combinée
Mètre rubanMètre ruban
Scie à métauxScie à métaux
Jeu de tarauds et filièresJeu de tarauds et filières
Tourne-à-gaucheTourne-à-gauche
4

The platform 2

Cut 18 mm plywood 500 x 400 mm and glue a hardwood strip round its underside edges as the flange 8. Cut the opening 13 for the saw, 230 x 30 mm, and a hardwood block 15 to fill it. Rout a square groove 16 the length of the platform for the follower's bar. Screw two steel lugs 9 under one long edge, drilled to line up with holes 10 in the frame, and hinge it with steel pins held by split pins. Run an M10 tilt screw 49 up through lug 50, with a wing nut on its lower end as a handle, its top bearing under the platform.

Matériaux pour cette étape :

Panneau de contreplaquéPanneau de contreplaqué1 pièce
Planche de bois durPlanche de bois dur1 pièce
Plat en acier douxPlat en acier doux1 pièce
Barre ronde en acier douxBarre ronde en acier doux1 pièce
Goupille fendueGoupille fendue2 pièces
Tige filetéeTige filetée1 pièce
Écrou papillonÉcrou papillon1 pièce
Vis à boisVis à bois16 pièces
Colle à boisColle à bois1 pièce

Outils nécessaires :

Scie sauteuseScie sauteuse
DéfonceuseDéfonceuse
Coffret de fraises de défonceuseCoffret de fraises de défonceuse
Perceuse sans filPerceuse sans fil
Jeu de foretsJeu de forets
Scie à métauxScie à métaux
Serre-joint à pompeSerre-joint à pompe
5

The power unit's frame, arbor and trunnions

Bolt two 40 x 6 mm steel flat bars 340 mm long into a frame 24 with spacers. Across one end fix a 20 mm round bar 28 whose ends stand out 25 mm each side as the trunnions 29. At the other end bolt two 30 mm flange bearings for the arbor 26, turned from 30 mm bar like the twin-saw table's, with a collar, a loose flange and an M20 thread for the blade's nut. Bolt a forked steel lug 31 on that end, its slot straddling the hanging screw.

Matériaux pour cette étape :

Plat en acier douxPlat en acier doux1 pièce
Barre ronde en acier douxBarre ronde en acier doux2 pièces
Palier appliquePalier applique2 pièces
Assortiment de boulons à tête hexagonaleAssortiment de boulons à tête hexagonale10 pièces

Écrou hexagonalÉcrou hexagonal3 pièces

Outils nécessaires :

Scie à métauxScie à métaux

Perceuse à colonnePerceuse à colonne
Jeu de foretsJeu de forets
Jeu de limesJeu de limes
Étau d'établiÉtau d'établi
Tour à métauxTour à métaux
Mandrin de tour à 3 morsMandrin de tour à 3 mors
Outil de coupe pour tourOutil de coupe pour tour
Pied à coulisse numérique 6 poucesPied à coulisse numérique 6 pouces
Clé à moletteClé à molette
Lunettes de sécuritéLunettes de sécurité
6

Spring bars, motor and belt

Bend two strips of spring steel 37, 30 x 3 mm, with a slight bend near one end, and bolt them under the cross bar 28 so they reach out beyond the trunnions. Bolt the motor 36 to them, with cap nuts 40 on the bolts' ends: these are its feet when the unit stands alone. Fit a V-belt pulley 42 on the motor and one 44 on the arbor, and the A-section belt 43. Pivot an arm 45 on the arbor's bearing with a weighted pulley 46 at its free end resting on the belt to take up the slack. Have the motor wired to a switch.

Matériaux pour cette étape :

Feuillard d'acier à ressortFeuillard d'acier à ressort1 pièce
Moteur électriqueMoteur électrique1 pièce
Poulie pour courroie trapézoïdale (section A)Poulie pour courroie trapézoïdale (section A)3 pièces
Courroie trapézoïdale (section A)Courroie trapézoïdale (section A)1 pièce
Plat en acier douxPlat en acier doux1 pièce
Assortiment de boulons à tête hexagonaleAssortiment de boulons à tête hexagonale6 pièces
Écrou hexagonalÉcrou hexagonal6 pièces
Vis sans tête à bout cuvetteVis sans tête à bout cuvette3 pièces
Interrupteur marche/arrêtInterrupteur marche/arrêt1 pièce

Outils nécessaires :

Étau d'établiÉtau d'établi
Perceuse à colonnePerceuse à colonne
Jeu de foretsJeu de forets
Clé à moletteClé à molette
Jeu de clés AllenJeu de clés Allen
7

Put the unit in and set the saw

Fit the 200 mm blade on the arbor. Hang an M10 screw 32 from arm 34 with its head 35 on top. Lower the power unit in, the trunnions into the notches 30 and the forked lug 31 round the screw, and run a wing nut 36 up under the lug. Turn the wing nut to raise the blade through the opening to the depth wanted.

Matériaux pour cette étape :

Circular Saw Blade SetCircular Saw Blade Set1 pièce
Tige filetéeTige filetée1 pièce
Écrou papillonÉcrou papillon1 pièce
Rondelle plateRondelle plate2 pièces

Outils nécessaires :

Clé à moletteClé à molette
8

Follower and rip guide

Angle follower: a hardwood bar 17 sliding in the groove, with an angle fence 18 clamped at any angle by a wing nut 19. Rip guide 20: a hardwood bar across the platform held by two hook bolts 21 that hook under the flange 8, with wing nuts 22. Mark a scale 23 on the platform's ends to set it.

Matériaux pour cette étape :

Planche de bois durPlanche de bois dur1 pièce
Tige filetéeTige filetée1 pièce
Écrou papillonÉcrou papillon3 pièces
Plat en acier douxPlat en acier doux1 pièce

Outils nécessaires :

Scie sauteuseScie sauteuse
Perceuse sans filPerceuse sans fil
Jeu de foretsJeu de forets
Scie à métauxScie à métaux
Étau d'établiÉtau d'établi
Mètre rubanMètre ruban
9

Try it, and as a grinder

With the platform flat, check the blade is square to it with the square, rip a board along the guide and crosscut another against the follower. Tilt the platform with the tilt screw (and the block under it for steep angles) and check the angle with the protractor. Lift the power unit out, stand it on its cap nuts, swap the blade for the grinding wheel, swing the idler arm to the belt's other side, and run it.

Outils nécessaires :

Meule abrasiveMeule abrasive
Équerre combinéeÉquerre combinée
RapporteurRapporteur
Lunettes de sécuritéLunettes de sécurité
Protection auditive (casque, SNR 30 dB)Protection auditive (casque, SNR 30 dB)
10

Troubleshooting

Portable bench saw troubleshooting.

Flow

Loading...
11

History and honest limits

**Fay M. Henkel** of New Rochelle, New York, US 1,695,188, dated 11 December 1928, filed 28 April 1927. He claimed a supporting unit with a platform and a power unit with a frame, "trunnions on the end of said frame, said supporting unit having recesses therein receiving the trunnions", a bearing and arbor, spring bars and a motor fixed to them, pulleys and a belt; and the spring bars' couplings serving as feet when the unit is removed. His frame, platform and legs are castings; ours are hardwood, plywood and steel. His bearing is a sleeve with a grease cup; ours are two greased flange bearings. He gives no sizes, motor or speeds; those are ours.

Matériaux

22

Outils requis

24

CC0 Domaine public

Ce blueprint est publié sous CC0. Vous êtes libre de copier, modifier, distribuer et utiliser ce travail pour tout usage, sans demander la permission.

Soutenez le Maker en achetant des produits via son Blueprint où il perçoit une Commission Maker définie par les Vendeurs, ou créez une nouvelle itération de ce Blueprint et incluez-le comme connexion dans votre propre Blueprint pour partager les revenus.

Commentaires

(0)

Se connecter pour participer à la discussion

Chargement des commentaires...