
Collaboration
ART
BEAUTÉ ET BIEN-ÊTRE
ARTISANAT
CULTURE ET HISTOIRE
DIVERTISSEMENT
ENVIRONNEMENT
NOURRITURE ET BOISSONS
INGÉNIERIE INVERSE
SCIENCES
SPORTS
TECHNOLOGIE
TECHNOLOGIE PORTABLE
Chinese Dragon Kite: Bamboo-Ring Head With Revolving Eyes and 20 Sections on a Seine-Twine Harness (Boy Mechanic, 1919)
Spartan

Créé par

Spartan

13. novembre 2026NO
9
0
0
0
0

Chinese Dragon Kite: Bamboo-Ring Head With Revolving Eyes and 20 Sections on a Seine-Twine Harness (Boy Mechanic, 1919)

C. M. Miller's dragon kite from The Boy Mechanic, Book 3 (1919): a 12 in bamboo-ring head with horns and two paper eyes that spin in the wind, followed by up to 20 round section kites, each with a 36 in balancer stick, tied 30 in apart on three cords of seine twine. Twenty sections make a kite about 50 ft long.
Avancé
Several days

Consignes

1

Strip lengths and kite length

Chargement du notebook Jupyter…
2

Read The Boy Mechanic, Book 3

"Dragon kites are made as hideous as the maker can possibly conceive, and while the one to be considered is no beauty, it is more droll than fierce-looking."
3

Split and pare the bamboo

Split bamboo into strips about 3/16 in wide and pare them to less than 1/16 in thick for the head's inner ring A. To bend a strip to a sharp angle, heat it over a candle flame until it gives under pressure, bend it, and it keeps its shape when cold.

Matériaux pour cette étape :

Perches de bambouPerches de bambou1 pièce

Outils nécessaires :

Couteau de poche en acierCouteau de poche en acier
BougieBougie
4

Frame the head

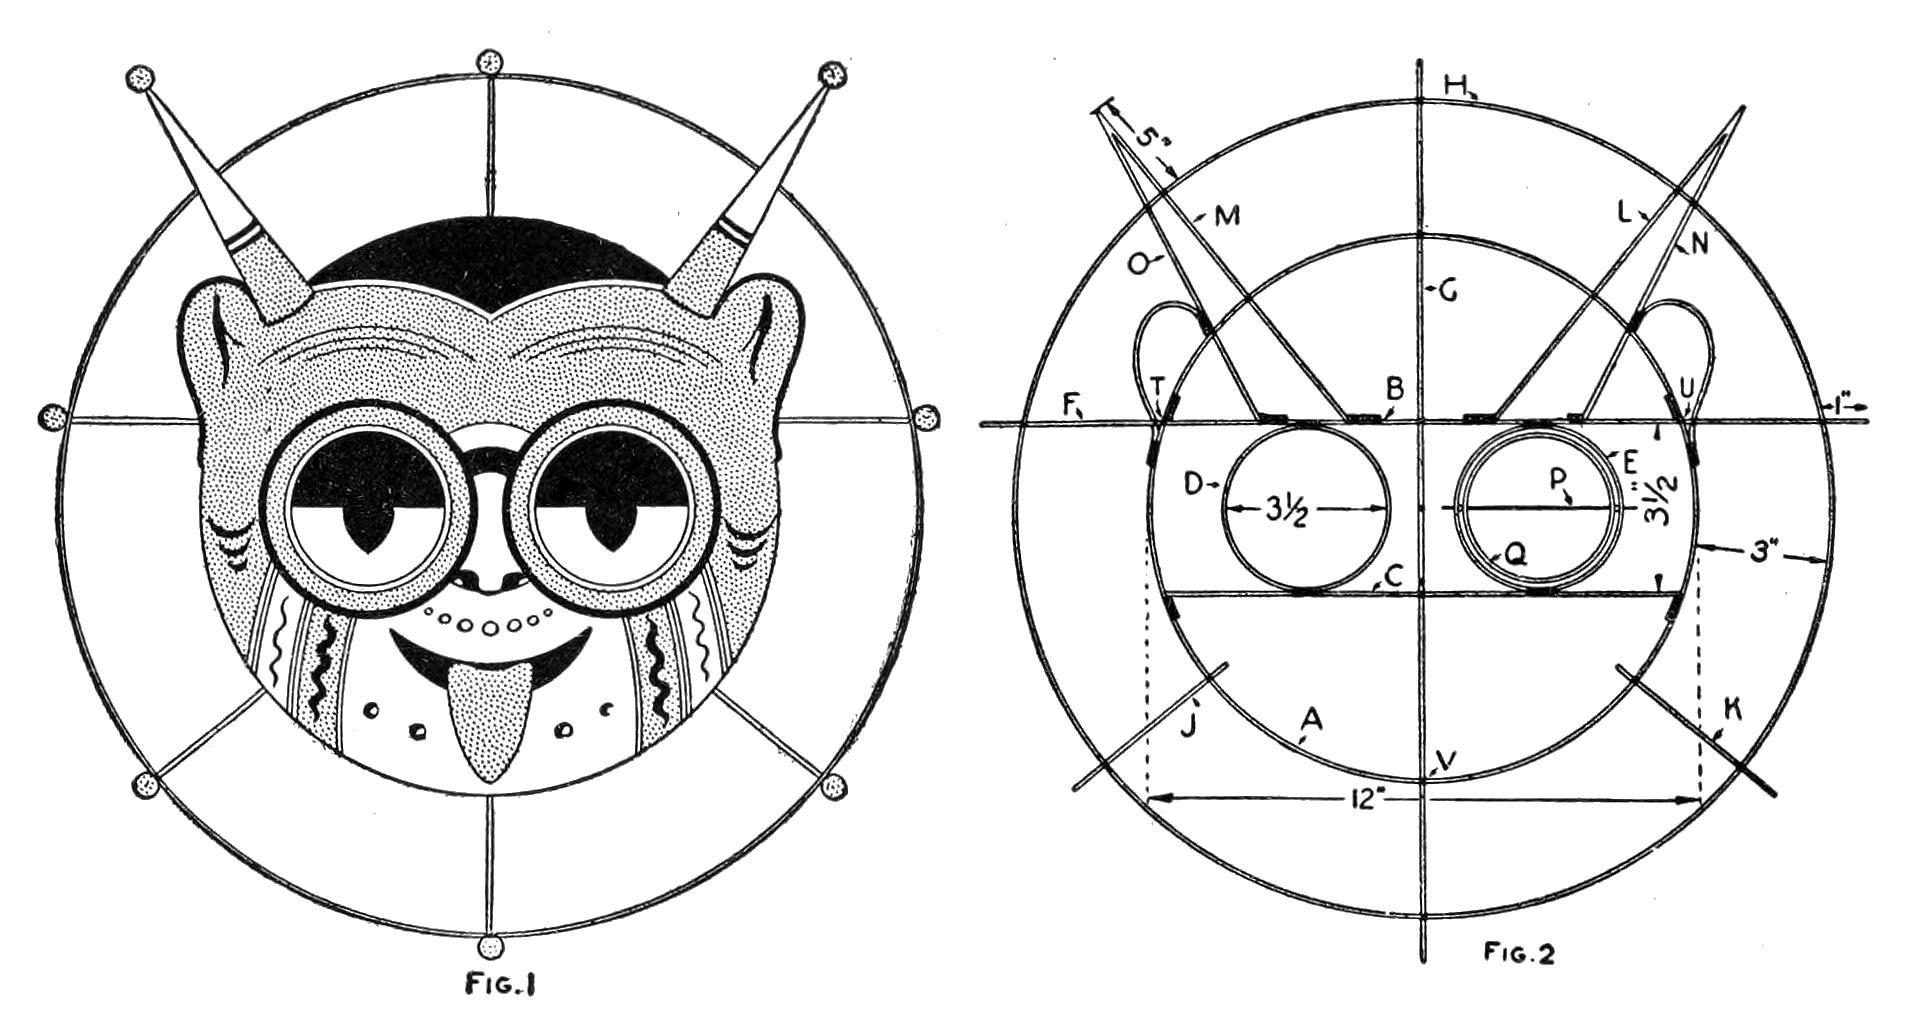
Make ring A 12 in across from a strip about 38 in long, lapping the ends and winding them with linen thread (or with wet pasted strips of rice paper about 1/2 in wide, which bind as they dry). Lash two crosspieces B and C of the same stock 3-1/2 in apart, parallel and equally spaced from the centre, their ends bent sharply and lashed inside the ring. Lash two eye rings D and E, 3-1/2 in across, between them, shaped round a 3-1/2 in cylinder so they are true. Lash stiffeners F and G, 1/16 by 1/8 by 20 in, across the back. Add outer ring H, 3 in outside A (18 in across), of 1/8 in strip under 1/16 in thick, in two pieces if needed, and the short pieces J and K between the rings. Lash the horn supports, 1/8 in wide, to the upper crosspiece and both rings, with L and M halfway between the ends of F and G and radiating from the centre of A, and N and O pointing at the eye-ring centres (Fig. 2).

Matériaux pour cette étape :

Perches de bambouPerches de bambou1 pièce
Fil de linFil de lin1 pièce

Outils nécessaires :

Couteau de poche en acierCouteau de poche en acier
BougieBougie
Mètre rubanMètre ruban
CiseauxCiseaux
5

Cover and paint the head

Cover only the inside of ring A, the horns and the ears with Chinese rice paper, stretched tight with no bagging, leaving the eye rings open. Put the rings on the horns and stick ends, 1/2 to 2 in across, cut from stiff paper (larger ones of bamboo). Shade with a brush and water colours, leaving the face white or tinting it; leave the horns white and colour the tongue red (Fig. 1).

Matériaux pour cette étape :

Papier de rizPapier de riz1 pièce
Colle de pâte de bléColle de pâte de blé1 pièce
Papier cartonnéPapier cartonné1 pièce
Peinture aquarellePeinture aquarelle1 pièce

Outils nécessaires :
Pinceau à collePinceau à colle
Jeu de pinceaux d'artisteJeu de pinceaux d'artiste
CiseauxCiseaux
6

Make the revolving eyes

Pare bamboo to 1/32 in and form each eye into a true ring 3-1/4 in across. Pass a wire axle exactly on a diameter through the eye ring and through its socket ring D or E, with a glass bead on the wire each side between the two rings; fix the wire to the eye ring with a strip of paper wrapped tight and pasted. Cover each side halfway with rice paper, the front upper half and the back lower half, so the wind turns the eye. Blacken the front upper half and paste a round pupil between the halves so it shows on both sides (Figs. 3, 4).

Matériaux pour cette étape :

Perches de bambouPerches de bambou1 pièce
Fil de ferFil de fer1 pièce
Perles de verrePerles de verre4 pièces
Papier de rizPapier de riz1 pièce
Colle de pâte de bléColle de pâte de blé1 pièce
Peinture aquarellePeinture aquarelle1 pièce

Outils nécessaires :

Couteau de poche en acierCouteau de poche en acier

Pince platePince plate
CiseauxCiseaux
Jeu de pinceaux d'artisteJeu de pinceaux d'artiste
7

Make the section kites

For each section make a 12 in ring of bamboo 1/8 in wide and 1/16 in thick and cover it tight like the head. Lash on a balancer stick 36 in long, small, light and well balanced, at about the place of cross-stick F, with tufts of tissue paper or feathers at its tips. Colour the discs as you like; give the last section's balancer streamers of light cloth (Figs. 5, 6). Sections may instead be 9 in with 30 in balancers, but uniform sections are better and easier.

Matériaux pour cette étape :

Perches de bambouPerches de bambou1 pièce
Fil de linFil de lin1 pièce
Papier de rizPapier de riz1 pièce
Colle de pâte de bléColle de pâte de blé1 pièce
Papier de soiePapier de soie1 pièce
PlumesPlumes1 pièce
Tissu de cotonTissu de coton1 pièce
Peinture aquarellePeinture aquarelle1 pièce

Outils nécessaires :

Couteau de poche en acierCouteau de poche en acier
BougieBougie
CiseauxCiseaux
Jeu de pinceaux d'artisteJeu de pinceaux d'artiste
8

Tie the harness and bridle

Cut three cords of six-ply hard-twisted seine twine as long as the kite plus the knots. Fasten the head to a wall, tie the three cords to it at T, U and V (Fig. 2), and tie each section at the matching points exactly 30 in from the last (Fig. 7). Tie a three-string bridle to the head at T, U and V, the lower string longer than the two upper ones so the head, and with it every section, leans to the wind. A ball balancer of bamboo strips may hang from the head (Fig. 8).

Matériaux pour cette étape :

Fil à filetsFil à filets1 pièce
Fil de cerf-volantFil de cerf-volant1 pièce
Perches de bambouPerches de bambou1 pièce

Outils nécessaires :

Mètre rubanMètre ruban
CiseauxCiseaux
9

Flying and troubleshooting

Dragon kite flying.

Flow

Loading...
10

History and honest limits

From "How to Make Combined Kites, Part I: A Dragon Kite" by C. M. Miller, in **The Boy Mechanic, Book 3**, Popular Mechanics, 1919 (Project Gutenberg 71856; checked on the archive.org scan boymechanic0003unse, pp. 145-148). He gives no bridle lengths and no line size beyond "a strong cord". Fig. 2 also marks 5 in at the horn tip and 1 in where F passes ring H. The tools and metric figures are ours.

Matériaux

13

Outils requis

7

Blueprints liés

Ces blueprints partagent des connaissances — techniques, matériaux ou principes
CC0 Domaine public

Ce blueprint est publié sous CC0. Vous êtes libre de copier, modifier, distribuer et utiliser ce travail pour tout usage, sans demander la permission.

Soutenez le Maker en achetant des produits via son Blueprint où il perçoit une Commission Maker définie par les Vendeurs, ou créez une nouvelle itération de ce Blueprint et incluez-le comme connexion dans votre propre Blueprint pour partager les revenus.

Commentaires

(0)

Se connecter pour participer à la discussion

Chargement des commentaires...