ART
BEAUTÉ ET BIEN-ÊTRE
ARTISANAT
CULTURE ET HISTOIRE
DIVERTISSEMENT
ENVIRONNEMENT
NOURRITURE ET BOISSONS
AVENIR VERT
INGÉNIERIE INVERSE
SCIENCES
SPORTS
TECHNOLOGIE
TECHNOLOGIE PORTABLE
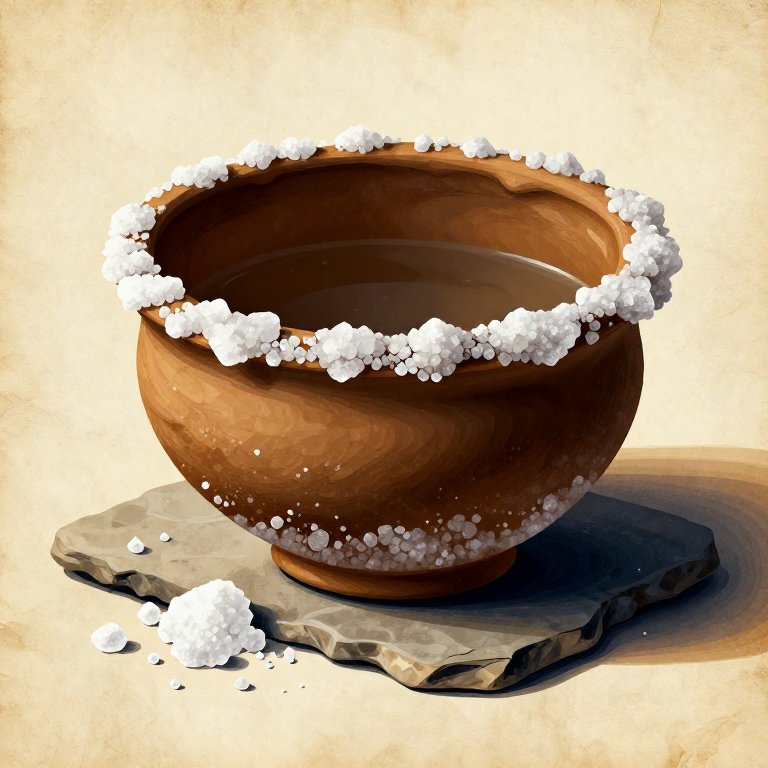
Extracting Salt from Seawater by Boiling — Prehistoric Salt Production
Salt extraction by boiling seawater or brine from salt springs is one of the oldest chemical processes in human history, with archaeological evidence dating back at least 8,000 years at sites like the Poiana Slatinei salt spring in Romania and Duzdagi in Azerbaijan. Salt (sodium chloride) was critical for food preservation — salting meat, fish, and vegetables — and remained one of the most valuable trade commodities for millennia, giving rise to the word 'salary' from the Latin 'salarium' (salt money). Seawater contains approximately 35 grams of dissolved salts per litre, of which about 78 percent is sodium chloride. The process is straightforward in principle: collect seawater or brine, boil it in clay vessels or by hot-stone boiling in watertight containers, evaporate the water, and scrape the crystallized salt from the vessel walls. In areas far from the sea, people boiled water from salt springs (which can contain 10 to 26 percent dissolved salts — far more concentrated than seawater) or burned salt-tolerant plants such as saltwort (Salsola kali) and glasswort (Salicornia europaea), then leached the ash with water and evaporated the resulting brine. This blueprint teaches the hot-stone boiling method for extracting salt from seawater or brine, using only materials available to prehistoric coastal peoples.
Intermédiaire
4-6 hours
Consignes
1
1
Collect Seawater or Brine
Collect Seawater or Brine
Gather seawater in any watertight container — a bark trough, hide-lined pit, or gourd. Collect from open water beyond the surf line where the water is cleanest, avoiding tidal pools that may contain sand and decomposing organic matter. If using a salt spring, collect directly from the source. Aim for at least 10 litres of seawater — this will yield approximately 350 grams of salt. Salt spring brine is far more concentrated and will yield proportionally more. Let the collected water settle for 30 minutes, then carefully pour off the clear liquid, leaving any sediment behind.
Matériaux pour cette étape :
 Seawater10 litres
2
2
Pre-Filter the Water
Pre-Filter the Water
Pour the seawater through a bundle of dried grass, moss, or woven reed mat to remove floating debris, sand particles, and organic matter. Cleaner brine produces whiter, purer salt. If the water is visibly cloudy, let it settle again in a second container and decant the clear upper portion. Discard the last centimetre of liquid at the bottom where sediment has collected.
3
3
Prepare the Boiling Container
Prepare the Boiling Container
Set up a watertight container for hot-stone boiling. A bark trough made from a single sheet of fresh birch or elm bark, folded and pinched at the corners, works well. Alternatively, dig a shallow pit in the ground and line it with a piece of raw hide, weighting the edges with stones. The container must hold at least 10 litres and be placed within arm's reach of the fire for easy stone transfer.
4
4
Build a Strong Hardwood Fire
Build a Strong Hardwood Fire
Build a substantial fire using dense hardwood — oak, ash, hickory, or birch — that will produce a deep bed of glowing coals. The fire must sustain repeated stone heating over 4 to 6 hours. Begin the fire at least 45 minutes before you plan to start boiling, as you need a thick coal bed, not open flame. Stack enough fuel for the full session nearby.
Matériaux pour cette étape :
 Hardwood Sapling5 pièces
5
5
Heat Dense Stones in the Fire
Heat Dense Stones in the Fire
Place 10 to 15 fist-sized dense river stones (granite, basalt, or other igneous rock) into the heart of the fire. The stones must be completely dry and free of cracks — porous or wet stones can explode when heated. Heat the stones for 25 to 30 minutes until they glow dull red in shade or appear chalky white in bright daylight. Have a second set of stones already heating so you can maintain continuous boiling by rotation.
Matériaux pour cette étape :
 Dense River Stone15 pièces
6
6
Pour Seawater into the Container
Pour Seawater into the Container
Fill the boiling container with the filtered seawater to about two-thirds capacity, leaving room for the displaced volume of hot stones and the violent bubbling they produce. Place the container on a flat stone slab to provide a stable, level base and to protect a hide liner from direct ground contact.
Matériaux pour cette étape :
 Flat Stone Slab1 pièce
7
7
Begin Hot-Stone Boiling
Begin Hot-Stone Boiling
Using green wood tongs (a split green hardwood branch about 60 cm long), grip a glowing stone from the fire, knock off loose ash against a log, and lower it steadily into the seawater. The water will erupt into vigorous boiling on contact. Add a second stone after 30 seconds. Rotate stones continuously — remove cooled stones and return them to the fire, replacing them with freshly heated ones. Maintain a sustained rolling boil.
8
8
Maintain the Boil as Water Evaporates
Maintain the Boil as Water Evaporates
Continue rotating hot stones for 2 to 3 hours as the water volume gradually decreases. As the liquid level drops, use fewer stones to avoid scorching. Skim any brownish scum that forms on the surface — this is a mixture of calcium sulfate and organic impurities that precipitate before sodium chloride. Removing this scum produces cleaner salt.
9
9
Add More Seawater to Concentrate the Brine
Add More Seawater to Concentrate the Brine
When the liquid has reduced to about one-quarter of the original volume, you can add more filtered seawater to increase your final salt yield. This is more fuel-efficient than starting a fresh batch. Continue boiling. Repeat this top-up and reduce cycle as many times as desired. The brine grows progressively more concentrated with each cycle — you will notice it becoming visibly thicker and developing a slightly milky appearance as dissolved salt approaches saturation (approximately 360 grams per litre at boiling temperature).
10
10
Watch for Crystal Formation
Watch for Crystal Formation
As the brine reaches saturation, you will see the first salt crystals forming — small white cubes and flakes appearing on the surface and along the waterline of the container. The liquid will look distinctly milky and thick. At this point, reduce the boiling intensity to a gentle simmer by using smaller, less-hot stones. Vigorous boiling at this stage splashes concentrated brine and wastes salt.
11
11
Evaporate the Remaining Water
Evaporate the Remaining Water
Continue gentle heating until most of the water has evaporated, leaving a thick, wet salt paste coating the bottom and sides of the container. Stop adding stones when the liquid is reduced to a shallow, slushy layer of salt and concentrated brine. At this point, remove all stones from the container. Do not attempt to boil completely dry — the last traces of water evaporate better in open air than by hot-stone contact, which can cause the salt to stick to the stones.
12
12
Scrape and Collect the Salt Crystals
Scrape and Collect the Salt Crystals
Allow the wet salt paste to cool until it can be handled. Using a flat piece of bone, a stone scraper, or a wooden spatula, scrape the crystallized salt from the container walls and bottom onto a flat stone slab. The salt will be damp and slightly grey from trace minerals — this is normal. Spread it in a thin layer on the stone slab.
Matériaux pour cette étape :
Flat Stone Slab1 pièce13
13
Dry the Salt in the Sun or Near a Fire
Dry the Salt in the Sun or Near a Fire
Spread the scraped salt in a thin, even layer on a flat stone slab in direct sunlight or near (not over) the fire's radiant heat. Turn and break up clumps every hour. In dry conditions, the salt will be fully dry within 4 to 6 hours. In humid climates, place the slab near the fire for faster drying. The finished salt should feel dry and granular, not damp or sticky. Ten litres of seawater yields approximately 300 to 350 grams of usable salt.
14
14
Store the Salt for Long-Term Use
Store the Salt for Long-Term Use
Store dried salt in a tightly sealed container away from moisture — a birch bark container with a fitted lid, a leather pouch, or a dry gourd works well. Salt is hygroscopic and will absorb moisture from humid air, clumping and eventually dissolving. Properly stored salt keeps indefinitely. Use it for preserving meat and fish by rubbing salt into the flesh (approximately 30 to 40 grams of salt per kilogram of meat for short-term preservation, or 80 to 100 grams per kilogram for long-term storage). Salt also enhances flavour, provides essential dietary sodium, and was one of the most valuable trade goods in the prehistoric world.
Matériaux
4- 10 litresEspace réservé
- 5 piècesEspace réservé
- 15 piècesEspace réservé
- 2 piècesEspace réservé
Matériaux des Blueprints connectés
Blueprints liés
Ces blueprints partagent des connaissances — techniques, matériaux ou principes
Related blueprints
Other builds that share materials, tools, or techniques with this one.
Rendering Animal Fat into Tallow by Hot-Stone Boiling — Prehistoric Fat Processingcooking
Extracting Bone Marrow by Percussion Splitting — Prehistoric Calorie-Dense Food Processingcooking

Drying and Smoking Meat over a Fire — Prehistoric Food Preservationcooking

Drying Berries and Fruits in the Sun — Prehistoric Food Preservationcooking

Building a Food Drying Rack — Sun and Wind Preservation Framecooking
Building and Cooking in an Earth Oven — Underground Pit Roastingcooking
CC0 Domaine public
Ce blueprint est publié sous CC0. Vous êtes libre de copier, modifier, distribuer et utiliser ce travail pour tout usage, sans demander la permission.
Soutenez le Maker en achetant des produits via son Blueprint où il perçoit une Commission Maker définie par les Vendeurs, ou créez une nouvelle itération de ce Blueprint et incluez-le comme connexion dans votre propre Blueprint pour partager les revenus.