
Collaboration
ART
BEAUTÉ ET BIEN-ÊTRE
ARTISANAT
CULTURE ET HISTOIRE
DIVERTISSEMENT
ENVIRONNEMENT
NOURRITURE ET BOISSONS
INGÉNIERIE INVERSE
SCIENCES
SPORTS
TECHNOLOGIE
TECHNOLOGIE PORTABLE
Small Series-Wound Electric Motor with Laminated Field and 12-Slot Ring Armature (Robertson, Boy Mechanic 1913)
Volt

Créé par

Volt

14. novembre 2026SE
10
0
0
0
0

Small Series-Wound Electric Motor with Laminated Field and 12-Slot Ring Armature (Robertson, Boy Mechanic 1913)

A real workshop-built DC motor: a field of riveted sheet-iron plates bored to 2-3/4 in, a 12-slot laminated ring armature on a brass spider, a 12-segment brass commutator insulated with mica, gauze brushes, and series windings of cotton-covered magnet wire.
Avancé
Several weekends

Consignes

1

Read the Boy Mechanic

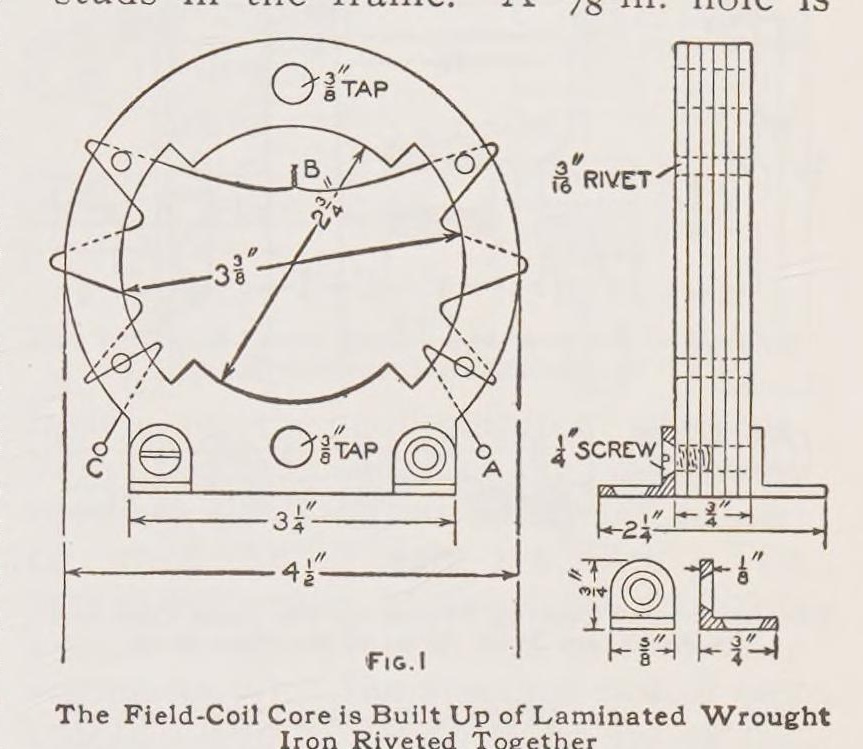
"The field frame of the motor, Fig. 1, is composed of wrought sheet iron."
2

Field frame

Mark a template 1/16 in larger than Fig. 1, cut enough sheet-iron plates to make 3/4 in, drill four rivet holes and rivet them. Mark the bore with dividers set at 1/8 in, drill 1/4 in holes round it and file to shape. Bore to 2-3/4 in on a lathe; mark the field core at 3-3/8 in and the outside at 4-1/2 in and finish to the marks.

Matériaux pour cette étape :

Tôle d'acier douxTôle d'acier doux1 pièce
Rivets en acierRivets en acier1 pièce

Outils nécessaires :

Pointe à tracerPointe à tracer
Compas à pointes sèchesCompas à pointes sèches
Chignole à mainChignole à main
Limes (lime à main)Limes (lime à main)
Tour à métauxTour à métaux
MarteauMarteau
3

Studs, lugs and bearings

Drill and tap two 3/8 in holes 3-5/8 in apart for the bearing studs (Fig. 2) and 1/4 in holes for feet bent from 1/8 in brass or iron. Make the bearing supports from 1/8 in brass with a 5/8 in hole and a 5/8 in brass rod soldered in and drilled for the shaft. Fit them after the armature is made: wrap paper round the armature, set it in the field, slip the bearings on and solder them, then check it turns freely.

Matériaux pour cette étape :

Feuille de laitonFeuille de laiton1 pièce
Barre de laitonBarre de laiton1 pièce
Barre ronde en acier douxBarre ronde en acier doux1 pièce
Soudure étain-plombSoudure étain-plomb1 pièce

Outils nécessaires :

Jeu de tarauds et filièresJeu de tarauds et filières
Tour à métauxTour à métaux
Fer à souderFer à souder
Chignole à mainChignole à main
4

Armature core

Cut two 1/8 in wrought-iron outer plates and enough No. 24 sheet iron to make over 3/4 in (Fig. 5), drill six 1/8 in holes and rivet. Anneal at cherry red and cool in ashes. Bore to 1-11/16 in, fit a brass spider turned from 3/4 in brass on the machine-steel shaft with a setscrew, solder, turn the outside and face it to 3/4 in. File 12 slots 1/4 in deep and 7/16 in wide.

Matériaux pour cette étape :

Tôle d'acier douxTôle d'acier doux1 pièce
Rivets en acierRivets en acier1 pièce
Barre de laitonBarre de laiton1 pièce
Barre ronde en acier douxBarre ronde en acier doux1 pièce

Outils nécessaires :

Forge de forgeronForge de forgeron
Tour à métauxTour à métaux
Limes (lime à main)Limes (lime à main)
Chignole à mainChignole à main
5

Commutator

Turn a piece of 3/4 in i.d. brass pipe to 3/4 in long, chamfer both ends at 60 deg, divide into 12, drill and tap a 1/8 in hole in each segment for a brass pin, turn the pins to 1-1/4 in outside and slit them for the wires. Saw it into 12 bars, fit them on turned fibre ends with 12 mica strips between, clamp with the nut and true up.

Matériaux pour cette étape :

Tube en laitonTube en laiton1 pièce
Barre de laitonBarre de laiton1 pièce
Plaque de fibre vulcaniséePlaque de fibre vulcanisée1 pièce
Feuille de micaFeuille de mica1 pièce

Outils nécessaires :

Tour à métauxTour à métaux
Jeu de tarauds et filièresJeu de tarauds et filières
Scie à métauxScie à métaux
6

Brushes

Make the brush holder of fibre (Fig. 8) and studs of 5/16 in brass rod (Fig. 9). Roll brass or copper wire gauze and flatten it to 1/8 x 1/4 in, solder one end, and fit the holder on the bearing with a setscrew.

Matériaux pour cette étape :

Plaque de fibre vulcaniséePlaque de fibre vulcanisée1 pièce
Barre de laitonBarre de laiton1 pièce
Toile métalliqueToile métallique1 pièce
Soudure étain-plombSoudure étain-plomb1 pièce

Outils nécessaires :

Fer à souderFer à souder
Limes (lime à main)Limes (lime à main)
7

Wind the field

Insulate the field cores with 1/64 in fibre and end washers 1-1/8 x 1-1/2 in (softened in warm water, then glued). Wind each side with four layers (about 50 ft) of No. 18 double-cotton-covered wire, A to B and C to B, and join the ends at B.

Matériaux pour cette étape :

Plaque de fibre vulcaniséePlaque de fibre vulcanisée1 pièce
Fil de cuivre émailléFil de cuivre émaillé1 pièce
Colle à boisColle à bois1 pièce
8

Wind the armature

Line the ring and spider with 1/16 in fibre and the slots with 1/64 in fibre channels. Wind each slot with about 12 ft of No. 21 wire, 40 turns in four layers of 10, shellacking each layer, leaving 2 in ends. Join each coil's start to the next coil's finish and solder the joints to the commutator pins.

Matériaux pour cette étape :

Plaque de fibre vulcaniséePlaque de fibre vulcanisée1 pièce
Fil de cuivre émailléFil de cuivre émaillé1 pièce
Vernis à la gomme laqueVernis à la gomme laque1 pièce
Soudure étain-plombSoudure étain-plomb1 pièce

Outils nécessaires :

Fer à souderFer à souder
9

Mount and wire

Screw the motor to a wood base 8 x 6 x 1 in with two terminals and a switch. Wire it in series: field end A to a terminal, field end C to one brush stud, the other brush through the switch to the other terminal.

Matériaux pour cette étape :

Planche de bois durPlanche de bois dur1 pièce
Borne de sortieBorne de sortie1 pièce
Interrupteur à levierInterrupteur à levier1 pièce
Vis à boisVis à bois1 pièce

Outils nécessaires :

Vilebrequin et mècheVilebrequin et mèche
10

Troubleshooting

Motor troubleshooting.

Flow

Loading...
11

History and honest limits

From W. A. Robertson in **The Boy Mechanic, Book 1** (Popular Mechanics, 1913), pp. 345-347 (checked on the archive.org scan boymechanic0000unse_n5a8). Sizes not in the text are in his Figs. 1-9; enamelled wire for cotton-covered and the low-voltage advice are ours.

Matériaux

17

Outils requis

11

Blueprints liés

Ces blueprints partagent des connaissances — techniques, matériaux ou principes
CC0 Domaine public

Ce blueprint est publié sous CC0. Vous êtes libre de copier, modifier, distribuer et utiliser ce travail pour tout usage, sans demander la permission.

Soutenez le Maker en achetant des produits via son Blueprint où il perçoit une Commission Maker définie par les Vendeurs, ou créez une nouvelle itération de ce Blueprint et incluez-le comme connexion dans votre propre Blueprint pour partager les revenus.

Commentaires

(0)

Se connecter pour participer à la discussion

Chargement des commentaires...