Collaboration
ART
BEAUTÉ ET BIEN-ÊTRE
ARTISANAT
CULTURE ET HISTOIRE
DIVERTISSEMENT
ENVIRONNEMENT
NOURRITURE ET BOISSONS
INGÉNIERIE INVERSE
SCIENCES
SPORTS
TECHNOLOGIE
TECHNOLOGIE PORTABLE
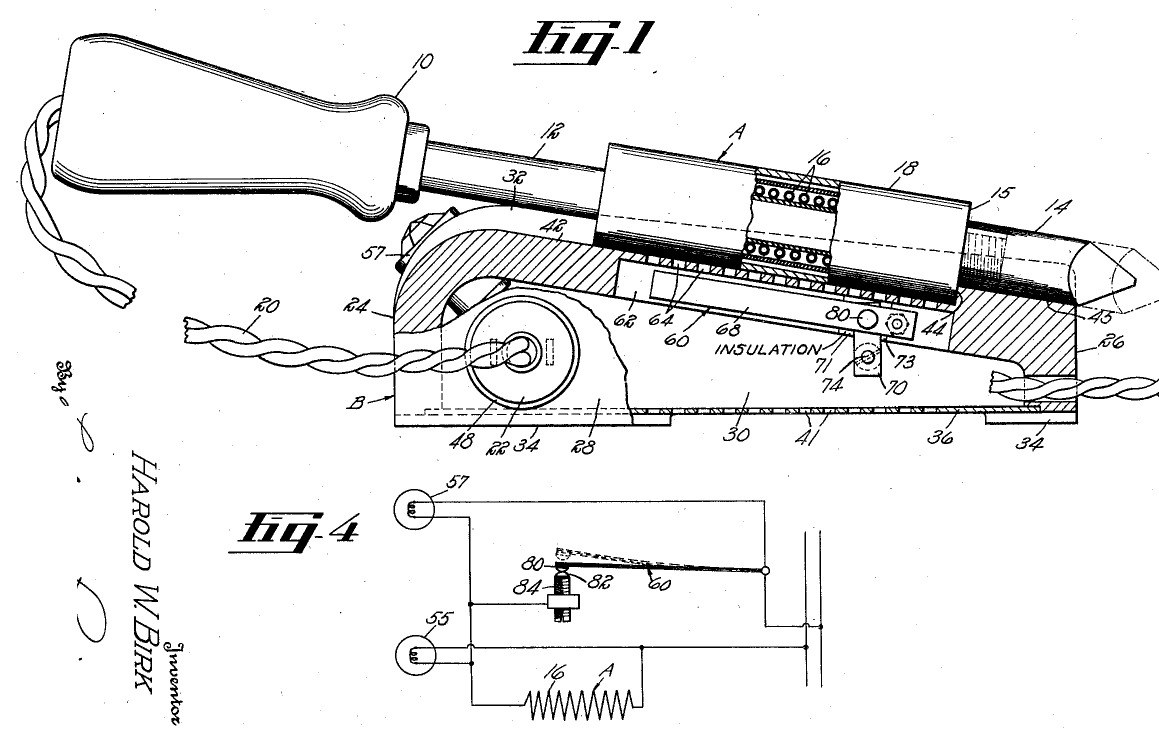


Soldering Station: a Stand Whose Bimetal Switch Reads the Iron's Heat (Birk, Hart Mfg., US 2,248,486, 1941)
A soldering station: an ordinary electric iron plugs into its stand, and the stand controls it. When the iron is laid in the stand's trough, its heater housing sits over a flue with a U-shaped bimetal switch inside; the heat it gives off opens the switch at the temperature you set with a screw, and closes it again as it cools. A red lamp shows the iron heating, a green lamp shows it hot and idling.
Result: a stand that keeps an electric iron at a set temperature between jobs and shows its state.
Source: H. W. Birk (Hart Manufacturing), US 2,248,486 (1941). Unknown: sizes, the bimetal, the lamps. Picture: the patent drawing.
Intermédiaire
Unknown
Consignes
1
1
Make the stand
Make the stand
Cast or form a box-shaped stand in one piece from a fire-resistant material such as porcelain: a high front wall, a low back wall, two side walls and a top sloping down about 10° toward the back, with feet at the corners so air can pass beneath. Close the bottom with a removable plate screwed to a flange and pierced with air holes. In the top, hollow a trough shaped to the iron's heater housing, ending at a shoulder, then a narrower groove for the tip. Cut a flue through the top along the trough, under a cover with holes. Ours: porcelain. Not given: sizes.
Matériaux pour cette étape :
 Matériau inconnu1 porcelain stand
 Métal inconnu1 bottom plate, screws
Outils nécessaires :
 Dimensions inconnues
2
2
Fit the bimetal switch
Fit the bimetal switch
Bend a strip of bimetal into a U whose legs spread apart when cool and close together when hot. Rivet one leg to a metal strip fixed beside the flue (on an insulating bracket if the stand conducts); put a contact on the free leg's end. Face it with a fixed contact on a screw stud threaded through a metal plate and out through the side wall in an insulating sleeve, slotted for a screwdriver: turning it sets the temperature, low for wax melting or high for electric branding irons. Not given: the bimetal, the contact metal.
Matériaux pour cette étape :
 Lame bimétallique1 pièceMétal inconnu1 strips, plate, contacts, stud
 Isolant inconnu1 bracket, sleeve, plate
Outils nécessaires :
 Jeu à river
 Jeu de tarauds et filières
3
3
Wire the outlet and lamps
Wire the outlet and lamps
Set an outlet in a side wall for the iron's plug, held by a flange and a split ring, and wire it in series with the switch to the supply cord. At the top of the front wall, set two lamp sockets at about 45°, one with a red lens and one with a green: wire the red in parallel with the iron's heater, the green in parallel with the switch. Not given: the lamp ratings, the outlet type.
Matériaux pour cette étape :
 Connecteur inconnu1 outlet
 Douille de lampe2 pièces
 Ampoule2 piècesMatériau inconnu2 red and green lenses
 Cordon souple avec fiche1 pièce
Outils nécessaires :
 Jeu de tournevis
4
4
Use it
Use it
Set the temperature by turning the slotted stud with a screwdriver. Plug an electric soldering iron into the stand's outlet and lay it in the trough so its heater housing closes the flue. While the bimetal is cool the switch is closed and the red lamp lights: the iron heats. At the set temperature the switch opens; the green lamp glows, the red goes dark and the iron idles. Lift the iron off and air rushes up the flue, cooling the bimetal so the iron heats again. Because it senses the heater, not the tip, the heater cannot burn out even if the tip is loose.
Matériaux pour cette étape :
 Fer à souder1 electric soldering iron
Outils nécessaires :
Jeu de tournevisMatériaux
9- 2 red and green lensesEspace réservé
- 1 strips, plate, contacts, studEspace réservé
- 1 pièceEspace réservé
- 1 bracket, sleeve, plateEspace réservé
- 1 outletEspace réservé
- 2 piècesEspace réservé
- 2 piècesEspace réservé
- 1 pièceEspace réservé
- Espace réservé
Outils requis
4- Espace réservé
- Espace réservé
- Espace réservé
- Espace réservé
Matériaux des Blueprints connectés



Ce plan fabrique

CC0 Domaine public
Ce blueprint est publié sous CC0. Vous êtes libre de copier, modifier, distribuer et utiliser ce travail pour tout usage, sans demander la permission.
Soutenez le Maker en achetant des produits via son Blueprint où il perçoit une Commission Maker définie par les Vendeurs, ou créez une nouvelle itération de ce Blueprint et incluez-le comme connexion dans votre propre Blueprint pour partager les revenus.