Collaboration
ART
BEAUTÉ ET BIEN-ÊTRE
ARTISANAT
CULTURE ET HISTOIRE
DIVERTISSEMENT
ENVIRONNEMENT
NOURRITURE ET BOISSONS
INGÉNIERIE INVERSE
SCIENCES
SPORTS
TECHNOLOGIE
TECHNOLOGIE PORTABLE
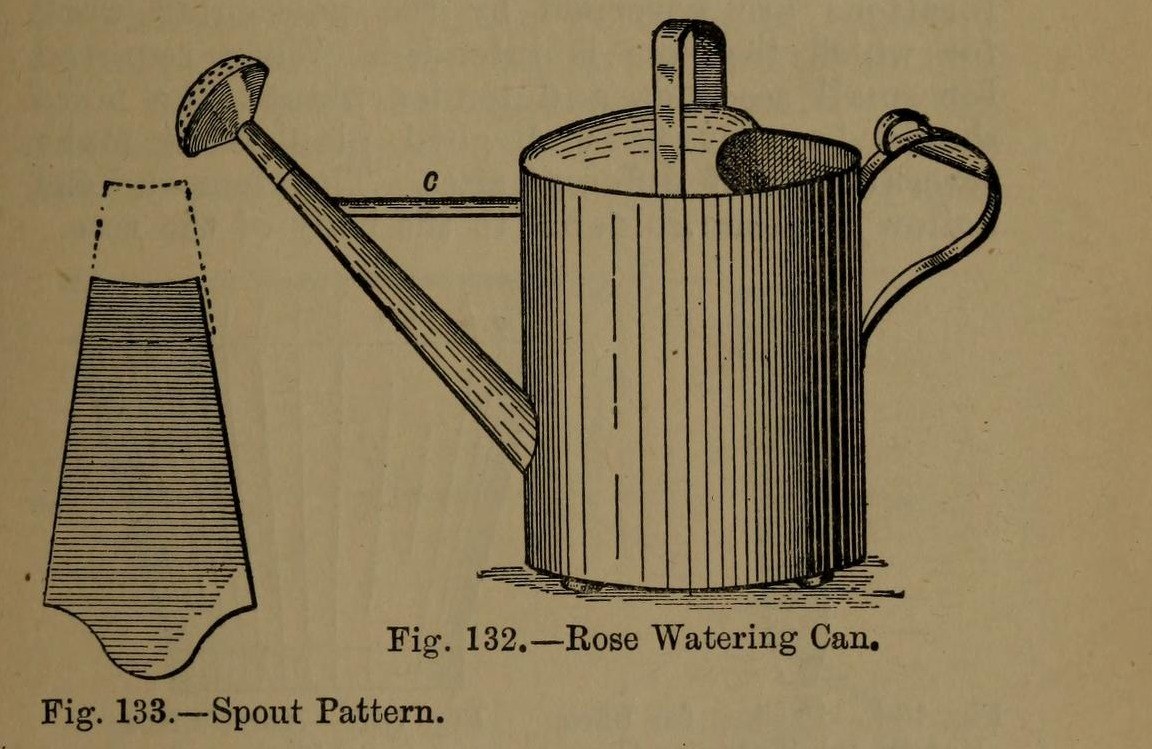


Watering Can: the Tinplate Rose Watering-Can (Hasluck, 1907)
A tinsmith's garden watering can: a round body from one sheet 2 ft 1 in x 8 1/2 in, a two-piece spout with a perforated rose, a hollowed top with a cross handle, and a back handle with a thumb ring. Tinplate or galvanised iron.
Variable: the rose. Its pattern diameter is the rose diameter x 4 / 3; finer holes for seedlings.
Source: Paul N. Hasluck, Tinplate Work (1907), pp. 54-57. Unknown: solder. Picture: Figs. 132-135 of the book.
Intermédiaire
Unknown
Consignes
1
1
Make the body and bottom
Make the body and bottom
Cut a sheet 2 ft 1 in by 8 1/2 in. Wire one edge, sink it in the crease iron, round it and groove the seam; solder the seam inside. Cut the spout hole opposite the seam, 2 1/2 in from the bottom. Edge the bottom to fit, beat it up and solder it from inside.
Matériaux pour cette étape :
 Tôle de fer-blanc1 body, bottom
 Fil de fer1 edge
 Soudure étain-plomb1 pièce
Outils nécessaires :
 Cisaille à tôle
 Piquet
 Maillet en bois
 Fer à souder électrique
 Flux
2
2
Make and fit the spout
Make and fit the spout
Cut the spout in two pieces (Fig. 133), bend them to shape and solder the seams. Solder the larger piece into the body. Make it longer for plants out of reach, with an elbow for plants up high. Make the stay: a taper strip as long as the gap between can and spout, bent to a half-round section and soldered in.
Matériaux pour cette étape :
Tôle de fer-blanc1 spout, staySoudure étain-plomb1 pièceOutils nécessaires :
Cisaille à tôlePiquetFer à souder électriqueFlux3
3
Make the rose
Make the rose
Set out the rose body (Fig. 135): its diameter is the rose diameter x 4 / 3, so a 3 in rose needs a 4 in pattern, with lines a b at right angles. Bend it over a funnel stake and solder the seam. Hollow a disc for the front, with edges for capping on. Inside the hollow, mark circles and pierce them at intervals with a bradawl over a hard wood block; very fine for seedlings. Solder front and stem to the rose body. Several roses of different sizes are useful.
Matériaux pour cette étape :
Tôle de fer-blanc1 roseSoudure étain-plomb1 pièceOutils nécessaires :
 Compas à pointes sèchesCisaille à tôlePiquet
 Marteau à planer
 Alêne
 Bloc de bois durFer à souder électriqueFlux
4
4
Fit the top and handles
Fit the top and handles
Hollow the top (Fig. 134), fit it to the body, wire its inner arc and solder it on. Cross handle: a strip about 1 3/4 in wide, wired with No. 12 B.W.G., bent to shape; cut two holes in the top with a small sharp chisel and solder the ends inside and on top. Back handle (Fig. 136): wire and bend it, solder a small boss under its upper part, and solder it opposite the spout with a thumb ring at the top. Solder three small hollowed studs under the bottom.
Matériaux pour cette étape :
Tôle de fer-blanc1 top, handles, studsFil de fer1 No. 12 B.W.G.Soudure étain-plomb1 pièceOutils nécessaires :
Cisaille à tôleMarteau à planer Ciseau à froid en acierFer à souder électriqueFlux
5
5
Clean and paint
Clean and paint
Clean with turpentine and whiting. Give two good coats of paint: red inside and green outside suit it.
Matériaux pour cette étape :
 Peinture à l'huile2 coats
Outils nécessaires :
 Térébenthine
 Carbonate de calcium (blanc de Meudon)
Matériaux
4- 1 top, handles, studsEspace réservé
- 1 No. 12 B.W.G.Espace réservé
- 4 piècesEspace réservé
- 2 coatsEspace réservé
Outils requis
12- Espace réservé
- Espace réservé
- Espace réservé
- Espace réservé
- Espace réservé
- Espace réservé
- Espace réservé
- Espace réservé
- Espace réservé
- Espace réservé
- Espace réservé
- Espace réservé
Matériaux des Blueprints connectés



Ce plan fabrique

CC0 Domaine public
Ce blueprint est publié sous CC0. Vous êtes libre de copier, modifier, distribuer et utiliser ce travail pour tout usage, sans demander la permission.
Soutenez le Maker en achetant des produits via son Blueprint où il perçoit une Commission Maker définie par les Vendeurs, ou créez une nouvelle itération de ce Blueprint et incluez-le comme connexion dans votre propre Blueprint pour partager les revenus.