सहयोग
कला
सौंदर्य और कल्याण
हस्तशिल्प
संस्कृति और इतिहास
मनोरंजन
पर्यावरण
खाद्य और पेय
रिवर्स इंजीनियरिंग
विज्ञान
खेल
प्रौद्योगिकी
पहनने योग्य


Pocket Morse Code Learning Board - v.1
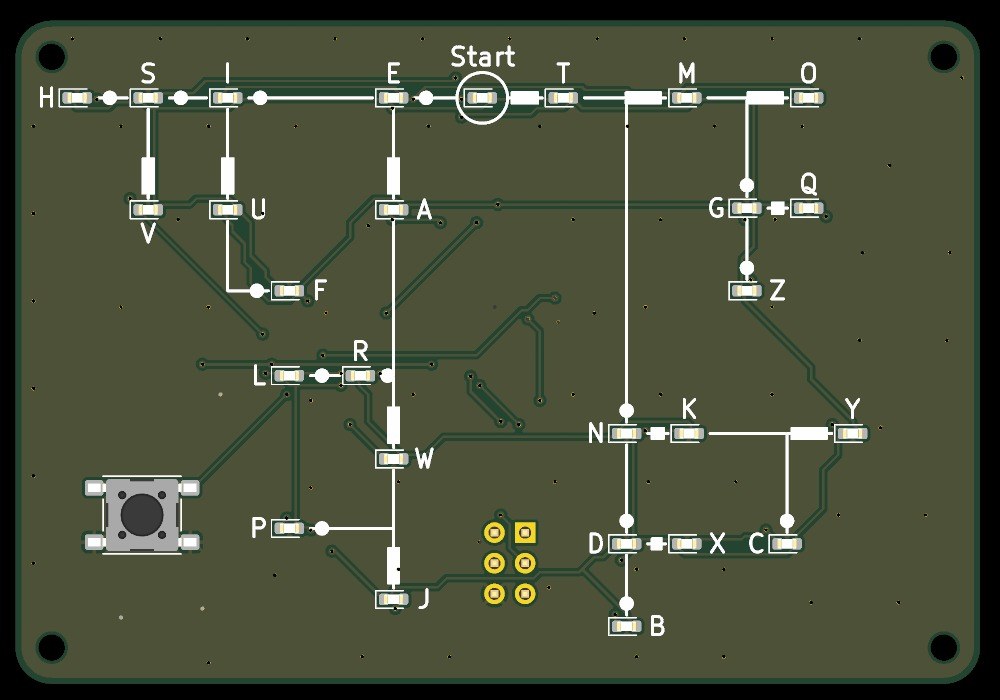
A pocket board, 80 x 55 mm, that teaches you to read Morse code. Its front is Dave Nathanson's Morse decoding chart: from Start, dots run one way and dashes the other, and every letter sits where its dots and dashes lead. Here every letter has its own LED. Press the key short for a dot and long for a dash, and the LED of the letter you have reached lights; pause, and it blinks.
It runs on one CR2032 coin cell and sleeps between uses. The board was drawn with Youblob's Draw PCB, and its checks pass, but it has not been built yet.
उन्नत
About 1 day, plus board delivery
निर्देश
1
1
LED current and keying speed
LED current and keying speed
Jupyter नोटबुक लोड हो रही है…
2
2
The code it decodes
The code it decodes
This board reads the International Morse code letters as ITU-R M.1677-1 gives them.
3
3
Read the chart
Read the chart
Dave Nathanson (KG6ZJO) drew his decoding chart in 2010: "Start with your finger at "Start Here". Then move your finger to track the Morse dots & dashes. You will arrive at the correct letter!" On this board the LEDs do the tracking. ITU-R M.1677-1: "A dash is equal to three dots."
4
4
The schematic
The schematic
ATmega328P on its internal 8 MHz clock, straight from the coin cell; 27 LEDs charlieplexed on PC0-PC5 through six 330 Ω resistors; the key on INT0; a 2x3 ISP footprint.
KiCanvas व्यूअर लोड हो रहा है...
पेशेवर PCB डिज़ाइन व्यूअर
5
5
The board
The board
Two layers, 80 x 55 mm. The chart, LEDs and key on the front; the chip, resistors, capacitors and cell holder on the back.
KiCanvas व्यूअर लोड हो रहा है...
पेशेवर PCB डिज़ाइन व्यूअर
6
6
Order the board
Order the board
Open the board in KiCad and plot Gerber and drill files (File > Fabrication Outputs). Order a two-layer board, 1.6 mm thick, from any board maker that takes Gerbers.
इस चरण के लिए सामग्री:
 मुद्रित परिपथ बोर्ड1 टुकड़ा
आवश्यक उपकरण:
 Arduino IDE वाला कंप्यूटर
7
7
Solder the parts
Solder the parts
Back first: paste and reflow U1, R1-R7, C1-C3 and the cell holder BT1 with hot air. Then the front: the 27 red LEDs D1-D27 with pad 1 (cathode) as the board's assembly drawing shows, and the key SW1. Leave J1 empty. Clean off the flux, then test each LED's direction with the meter's diode test.
इस चरण के लिए सामग्री:
 ATmega328P माइक्रोकंट्रोलर1 टुकड़ा
 चिप LED27 टुकड़े
 चिप प्रतिरोधक7 टुकड़े
 सिरेमिक चिप संधारित्र3 टुकड़े
 दाब बटन1 टुकड़ा
 बैटरी धारक1 टुकड़ा
 सोल्डर पेस्ट (सीसा-रहित)1 टुकड़ा
 सोल्डर तार1 टुकड़ा
आवश्यक उपकरण:
 गर्म हवा री-वर्क स्टेशन
 टाँका लगाने की छड़
 नुकीली नोक वाली चिमटी
 फ्लक्स
 आवर्धक शीशा
 मल्टीमीटर
 आइसोप्रोपिल ऐल्कोहॉल 99 %
8
8
The firmware
The firmware
pocket_morse_decoder_az.ino: every timing is a named constant at the top of the sketch. Board in the Arduino IDE: Arduino Pro or Pro Mini, ATmega328P (3.3V, 8 MHz).
pocket_morse_decoder_az.inoarduino
9
9
Set the fuses and upload
Set the fuses and upload
Do not use Burn Bootloader: the Pro board setting expects a crystal, and this board has none. Hold an ISP programmer's 2x3 pins on J1 and set the internal 8 MHz clock: avrdude -c usbasp -p m328p -U lfuse:w:0xE2:m -U hfuse:w:0xD9:m -U efuse:w:0xFF:m. Then, in the Arduino IDE, use Sketch > Upload Using Programmer.
आवश्यक उपकरण:
 AVR ISP प्रोग्रामरArduino IDE वाला कंप्यूटर
10
10
Print the back shell
Print the back shell
An open-front shell, 84.8 x 59.8 x 8.9 mm, with four standoffs for M2 screws, a slot to slide the cell out and a window under J1. PLA, 0.2 mm layers, 20 % infill, printed on its floor.
11
11
Fit the shell
Fit the shell
The shell leaves 5.0 mm for the back parts: measure your cell holder with a cell in it before you print. Check the holder's open side faces the board's left edge, where the shell's cell slot is. Slide in a CR2032 and screw the board into the shell with four M2 self-tapping screws.
इस चरण के लिए सामग्री:
 PLA तंतु1 टुकड़ा
 सेल्फ़-टैपिंग पेंच4 टुकड़े
 सिक्का बैटरी CR20321 टुकड़ा
आवश्यक उपकरण:
 फिलामेंट वाला 3D प्रिंटर (FDM)
 वर्नियर कैलिपर
 सूक्ष्म पेचकस सेट
12
12
Troubleshooting
Troubleshooting
Pocket Morse decoder troubleshooting.
Flow
Loading...
13
13
History and honest limits
History and honest limits
The chart is **Dave Nathanson**'s (KG6ZJO), drawn in 2010 and shared as copyleft; his post says it is a novel way to decode by following a path. The letter codes are ITU-R M.1677-1's. The board, sizes, parts and timings are ours, drawn with Youblob's Draw PCB: its ERC and DRC pass with no errors and every LED's wiring was checked against the firmware by script, but it has not been built, flashed or tested.
सामग्री
12- 1 टुकड़ाप्लेसहोल्डर
- 1 टुकड़ाप्लेसहोल्डर
- 27 टुकड़ेप्लेसहोल्डर
- 7 टुकड़ेप्लेसहोल्डर
- 3 टुकड़ेप्लेसहोल्डर
- प्लेसहोल्डर
- प्लेसहोल्डर
- 1 टुकड़ाप्लेसहोल्डर
- 1 टुकड़ाप्लेसहोल्डर
- 1 टुकड़ाप्लेसहोल्डर
- 4 टुकड़ेप्लेसहोल्डर
- 1 टुकड़ाप्लेसहोल्डर
आवश्यक उपकरण
12- प्लेसहोल्डर
- प्लेसहोल्डर
- 2 vendors sell this, none ship to you yetप्लेसहोल्डर
- प्लेसहोल्डर
- प्लेसहोल्डर
- प्लेसहोल्डर
- प्लेसहोल्डर
- प्लेसहोल्डर
- प्लेसहोल्डर
- प्लेसहोल्डर
- प्लेसहोल्डर
- प्लेसहोल्डर
डिज़ाइन फ़ाइलें
1यह ब्लूप्रिंट बनाता है

संबंधित ब्लूप्रिंट
ये ब्लूप्रिंट ज्ञान साझा करते हैं — तकनीक, सामग्री या सिद्धांत


CC0 पब्लिक डोमेन
यह ब्लूप्रिंट CC0 के तहत जारी किया गया है। आप बिना अनुमति माँगे इस कार्य को किसी भी उद्देश्य के लिए कॉपी, संशोधित, वितरित और उपयोग करने के लिए स्वतंत्र हैं।
उनके ब्लूप्रिंट के माध्यम से उत्पाद खरीदकर मेकर का समर्थन करें जहाँ वे मेकर कमीशन कमाते हैं जो विक्रेताओं द्वारा निर्धारित होता है, या इस ब्लूप्रिंट का नया संस्करण बनाएँ और राजस्व साझा करने के लिए इसे अपने ब्लूप्रिंट में कनेक्शन के रूप में शामिल करें।