همکاری
هنر
زیبایی و سلامت
صنایع دستی
فرهنگ و تاریخ
سرگرمی
محیط زیست
غذا و نوشیدنی
مهندسی معکوس
علوم
ورزش
فناوری
پوشیدنیها
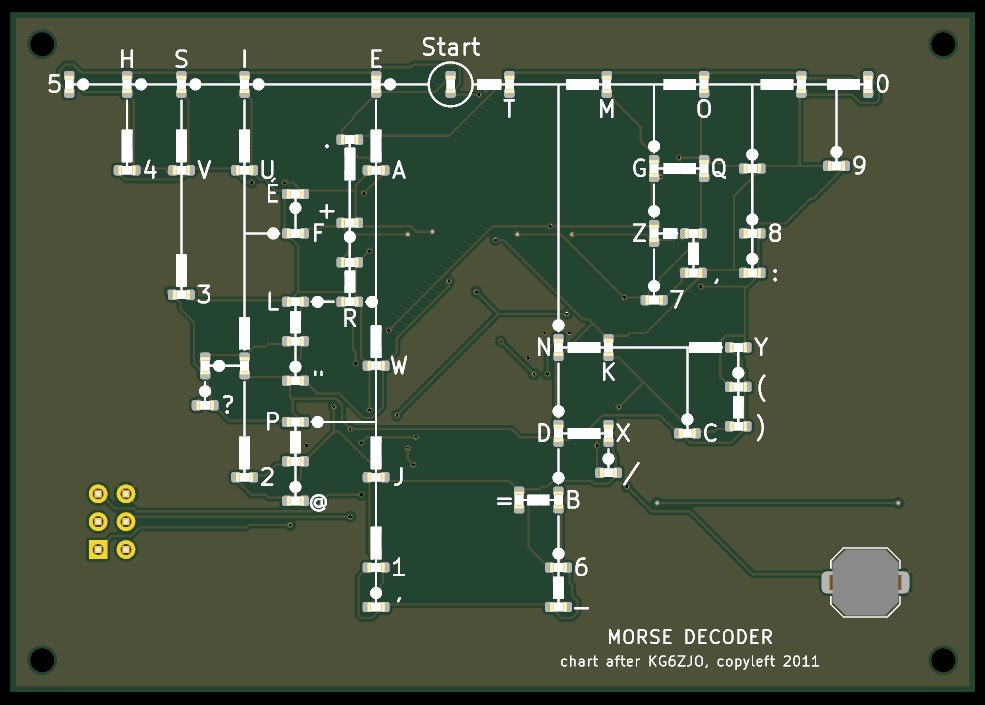


Pocket Morse Code Learning Board - v.2
The complete pocket Morse decoder, 88 x 62 mm: every letter, the figures 0-9, the thirteen punctuation signs of the international code and the accented E, each with its own LED on Dave Nathanson's decoding chart. Press the key short for a dot and long for a dash, and the LED of the character you have reached lights; pause, and it blinks.
It runs on one CR2032 coin cell and sleeps between uses. The board was drawn with Youblob's Draw PCB, and its checks pass, but it has not been built yet.
پیشرفته
About 1 day, plus board delivery
دستورالعملها
1
1
LED current and keying speed
LED current and keying speed
در حال بارگذاری دفترچهٔ Jupyter…
2
2
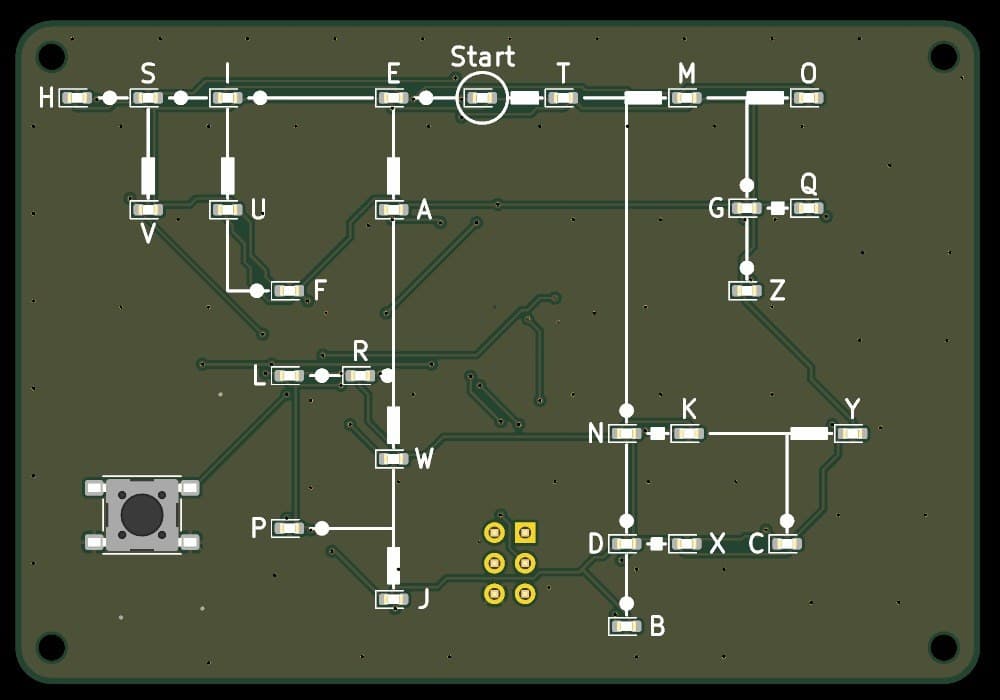
The letters-only board, before it
The letters-only board, before it
The same design with 27 LEDs. This one adds the figures and the signs, 59 LEDs in all.
3
3
Read the chart
Read the chart
Dave Nathanson's (KG6ZJO) complete chart adds the figures to his letters: "A-Z and Numbers (I left off the punctuation & symbols for simplicity)". This board adds them back from ITU-R M.1677-1 on new branches: . , : ? ' - / ( ) " = + @ and the accented E. Eight unlabelled LEDs are waypoints on the way to a figure or sign.
4
4
The schematic
The schematic
ATmega328P on its internal 8 MHz clock, straight from the coin cell; 59 LEDs charlieplexed on nine lines (PC0-PC5, PD0, PD1, PD3) through 300 Ω resistors; the key on INT0; a 2x3 ISP footprint.
بارگذاری نمایشگر KiCanvas...
نمایشگر حرفهای طراحی PCB
5
5
The board
The board
Two layers, 88 x 62 mm. The chart, LEDs and key on the front; the chip, resistors, capacitors and cell holder on the back.
بارگذاری نمایشگر KiCanvas...
نمایشگر حرفهای طراحی PCB
6
6
Order the board
Order the board
Open the board in KiCad and plot Gerber and drill files (File > Fabrication Outputs). Order a two-layer board, 1.6 mm thick, from any board maker that takes Gerbers.
مواد مورد نیاز این مرحله:
 برد مدار چاپی1 قطعه
ابزارهای مورد نیاز:
 رایانه با Arduino IDE
7
7
Solder the parts
Solder the parts
Back first: paste and reflow U1, R1-R10, C1-C3 and the cell holder BT1 with hot air. Then the front: the 59 red LEDs D1-D59 with pad 1 (cathode) as the board's assembly drawing shows, and the key SW1, a two-pad 6 x 6 mm switch to match its footprint. J1 is optional. Clean off the flux, then test each LED's direction with the meter's diode test.
مواد مورد نیاز این مرحله:
 میکروکنترلر ATmega328P1 قطعه
 الایدی تراشهای59 قطعه
 مقاومت تراشهای10 قطعه
 خازن سرامیکی تراشهای3 قطعه
 کلید فشاری1 قطعه
 نگهدارندهٔ باتری1 قطعه
 خمیر لحیم (بدون سرب)1 قطعه
 سیم لحیم1 قطعه
ابزارهای مورد نیاز:
 ایستگاه هویهٔ هوای گرم
 هویه
 موچین نوکتیز
 فلاکس لحیم
 ذرهبین
 مولتیمتر
 ایزوپروپیل الکل ۹۹ ٪
8
8
The firmware
The firmware
pocket_morse_decoder_complete.ino: every timing is a named constant at the top of the sketch. Board in the Arduino IDE: Arduino Pro or Pro Mini, ATmega328P (3.3V, 8 MHz).
pocket_morse_decoder_complete.inoarduino
9
9
Set the fuses and upload
Set the fuses and upload
Do not use Burn Bootloader: the Pro board setting expects a crystal, and this board has none. Hold an ISP programmer's 2x3 pins on J1 and set the internal 8 MHz clock: avrdude -c usbasp -p m328p -U lfuse:w:0xE2:m -U hfuse:w:0xD9:m -U efuse:w:0xFF:m. Then, in the Arduino IDE, use Sketch > Upload Using Programmer.
ابزارهای مورد نیاز:
 پروگرامر AVR ISPرایانه با Arduino IDE
10
10
Print the back shell
Print the back shell
An open-front tray, 92.6 x 66.6 x 8.3 mm, with four standoffs for M2 screws, a notch and floor opening to slide the cell out and an opening under J1. PLA, 0.2 mm layers, 20 % infill, printed on its floor.
11
11
Fit the shell
Fit the shell
The standoffs hold the board 6.7 mm above the floor: measure your cell holder with a cell in it before you print. Check the holder's open end faces the board's bottom edge, where the shell's cell notch is. Slide in a CR2032 and screw the board into the shell with four M2 x 8 self-tapping screws.
مواد مورد نیاز این مرحله:
 فیلامنت PLA1 قطعه
 پیچ خودکار4 قطعه
 باتری سکهای CR20321 قطعه
ابزارهای مورد نیاز:
 چاپگر سهبعدی رشتهای (FDM)
 کولیس ورنیه
 مجموعهٔ پیچگوشتی دقیق
12
12
Troubleshooting
Troubleshooting
Pocket Morse decoder troubleshooting.
Flow
Loading...
13
13
History and honest limits
History and honest limits
The letters and figures follow **Dave Nathanson**'s (KG6ZJO) complete chart of 2011, shared as copyleft. Where the signs sit is ours; their codes are ITU-R M.1677-1's. The board, sizes, parts and timings are ours, drawn with Youblob's Draw PCB: its ERC and DRC pass with no errors and every LED's wiring, code and label was checked against the firmware by script, but it has not been built, flashed or tested.
مواد
12- 1 قطعهجایگزین
- 1 قطعهجایگزین
- 59 قطعهجایگزین
- 10 قطعهجایگزین
- 3 قطعهجایگزین
- جایگزین
- جایگزین
- 1 قطعهجایگزین
- 1 قطعهجایگزین
- 1 قطعهجایگزین
- 4 قطعهجایگزین
- 1 قطعهجایگزین
ابزارهای لازم
12- جایگزین
- جایگزین
- 2 vendors sell this, none ship to you yetجایگزین
- جایگزین
- جایگزین
- جایگزین
- جایگزین
- جایگزین
- جایگزین
- جایگزین
- جایگزین
- جایگزین
فایلهای طراحی
1این نقشه میسازد

نقشههای مرتبط
این نقشهها دانش مشترکی دارند — تکنیکها، مواد یا اصول


CC0 مالکیت عمومی
این نقشه تحت مجوز CC0 منتشر شده است. شما آزاد هستید آن را کپی، ویرایش، توزیع و برای هر هدفی بدون نیاز به اجازه استفاده کنید.
با خرید محصولات از طریق نقشه از سازنده حمایت کنید و او کمیسیون سازنده تعیین شده توسط فروشندگان، دریافت میکند یا یک نسخه جدید از این نقشه ایجاد کنید و آن را به عنوان اتصال در نقشه خود قرار دهید تا درآمد به اشتراک گذاشته شود.