Making Roman Millefiori Glass — Fusing Mosaic Cane Slices into a Patterned Dish
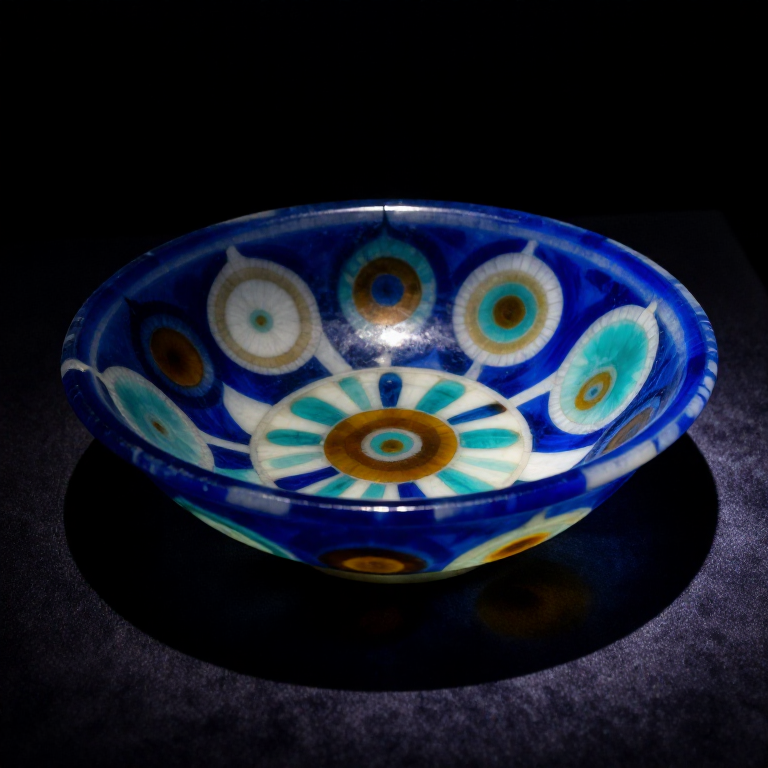
Millefiori — Italian for 'a thousand flowers' — is a glass technique perfected in ancient Rome during the 1st century BCE to 1st century CE. The process involves bundling rods of different-coloured glass together, heating until they fuse into a single multi-coloured cane, then drawing the bundle thin so the cross-section shrinks but retains its pattern. Slices of these patterned canes are arranged in a mold and fused together in a kiln to form bowls, dishes, and decorative panels. Each slice reveals an intricate flower-like pattern in miniature — hence the name.
The technique has its origins in earlier Mesopotamian and Egyptian mosaic glass, but Roman workshops elevated it to an extraordinary level of refinement. Surviving Roman millefiori bowls show patterns of astonishing precision: concentric rings of cobalt blue, opaque white, turquoise, and amber arranged in star and rosette patterns only a few millimetres across. The technique declined after the Roman period but was revived in Murano, Venice, during the Renaissance, where it continues to this day.
Making millefiori is slow, precise work. The cane-making stage requires careful bundling and drawing of coloured rods at exactly the right temperature — too hot and the colours blur together; too cool and the bundle cracks. The final fusing stage uses the same frit-casting principle as earlier cast glass bowls but with patterned slices instead of plain frit.
Leiðbeiningar
Select coloured glass rods
Select coloured glass rods
Gather soda-lime glass rods in at least three contrasting colours — traditionally cobalt blue, opaque white, and turquoise, with amber or red for accent. All rods must be the same glass type (soda-lime) with compatible coefficients of thermal expansion, or the finished piece will crack during cooling. Ancient Roman glassmakers achieved their colours with metal oxide additives: cobalt for blue, tin oxide for opaque white, copper for turquoise, iron for amber. Use rods roughly 8–10 mm in diameter and 20–30 cm long. You need approximately 8–12 rods per millefiori cane.
Efni fyrir þetta skref:
 Glass Rod (soda-lime, coloured)12 piece
Cut the glass rods to equal length
Cut the glass rods to equal length
Score each glass rod with a glass cutter or sharp file at the desired length (about 15 cm) and snap cleanly. All rods in a single bundle must be the same length — uneven ends create air pockets and pattern distortion when the bundle is heated. File or grind the snapped ends flat if they are uneven. Wear safety goggles — glass shards fly when scoring and snapping.
Nauðsynleg verkfæri:
 Safety Goggles
Arrange rods into a pattern bundle
Arrange rods into a pattern bundle
Arrange the cut rods into a bundle that, when viewed end-on, forms the desired cross-section pattern. A classic Roman rosette pattern uses one rod in the centre (e.g. amber), surrounded by a ring of 6 rods of a second colour (e.g. white), surrounded by an outer ring of 12 rods of a third colour (e.g. cobalt blue). The pattern you arrange now is the pattern that every slice of the finished cane will display. Hold the bundle together with thin stainless steel wire wrapped tightly at both ends. Ensure all rods are flush at both ends of the bundle.
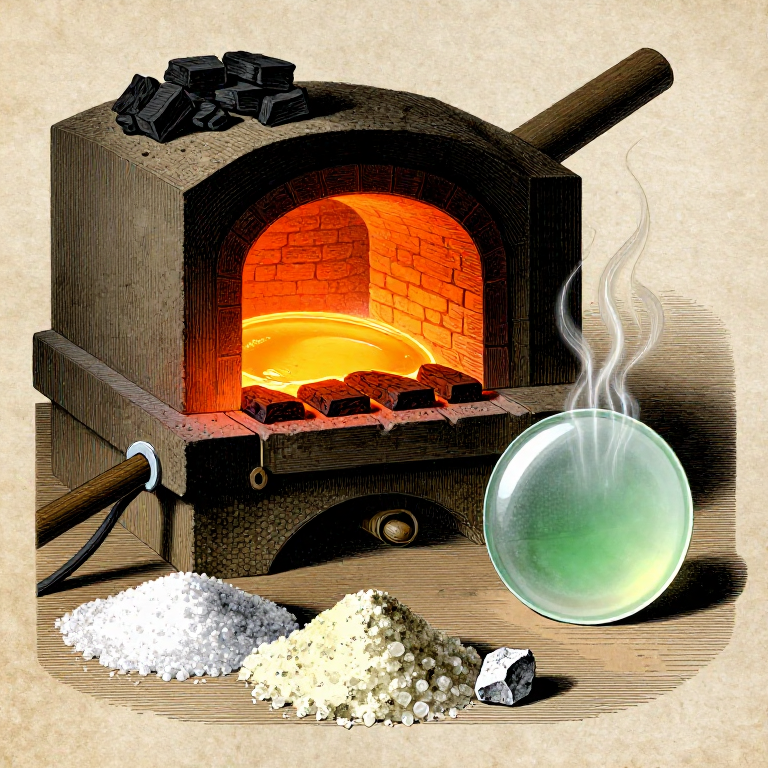
Heat the bundle in a glory hole furnace
Heat the bundle in a glory hole furnace
Place the bundled rods into a small glory hole furnace or kiln pre-heated to approximately 700–750 °C. The glass must reach a temperature where it is soft enough to fuse the individual rods together but not so hot that the colours bleed and blur. At 700 °C soda-lime glass is viscous — it flows very slowly, which preserves the sharp colour boundaries. Rotate the bundle slowly to heat it evenly. After 10–15 minutes the individual rods will have softened and stuck together into a single composite mass. The cross-section pattern should still be clearly defined.
Efni fyrir þetta skref:
 Charcoal5 kg
Nauðsynleg verkfæri:
 Kiln
KilnDraw the fused bundle into a thin cane
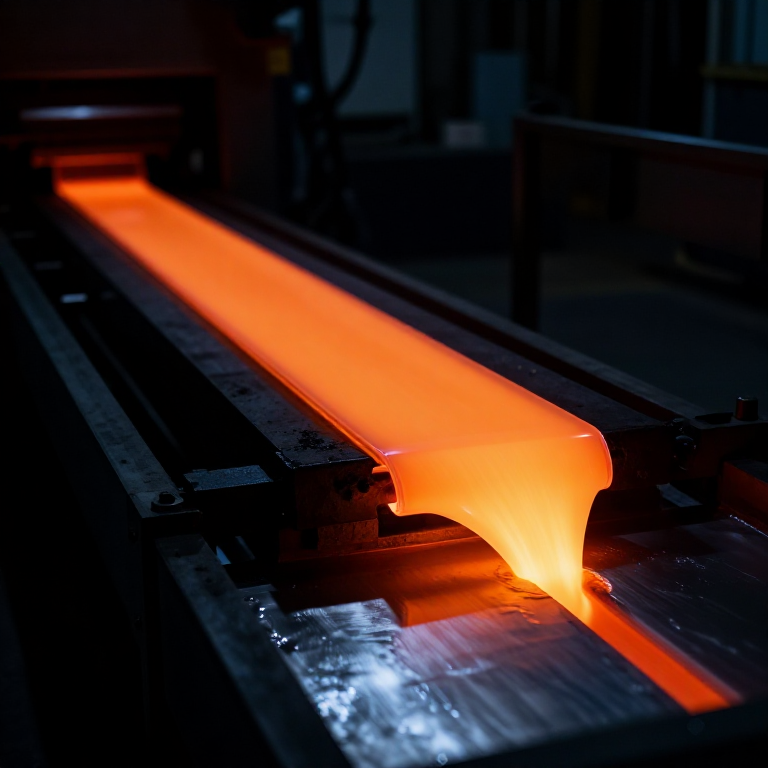
Draw the fused bundle into a thin cane
While the bundle is still soft (about 700 °C), grip both ends with metal tools and draw — pull steadily apart in a straight line. The glass stretches like taffy, becoming thinner as you pull. The cross-section pattern shrinks proportionally but retains its shape — a 3 cm diameter bundle drawn to 8 mm diameter produces a cane where each colour element is now only 2–3 mm across. Pull steadily and evenly — jerky movements create uneven thickness. The drawn cane cools and stiffens as it thins. Work quickly; you have about 30 seconds before the glass is too stiff to draw.
Nauðsynleg verkfæri:
 Crucible Tongs (long-handled)
Allow the drawn cane to cool
Allow the drawn cane to cool
Lay the drawn cane on a flat, heat-resistant surface (firebrick or steel) and allow it to cool to room temperature. Do not quench in water — the thermal shock will shatter it. The cane is under mild internal stress but the thin cross-section cools fast enough that formal annealing is usually not necessary. Once cool, the cane is a rigid rod with the millefiori pattern locked inside it. You can make several canes with different patterns to create variety in the final piece.
Score and cut cane slices
Score and cut cane slices
Score the cooled cane with a glass cutter at regular intervals — about 3–4 mm apart — and snap each slice off cleanly. Each slice is a thin disc showing the full millefiori pattern in cross-section. You need enough slices to cover the interior of your mold — approximately 40–60 slices for a 12 cm bowl. Discard any slices that break unevenly or have blurred patterns. Good slices show crisp colour boundaries and a clean circular outline.
Nauðsynleg verkfæri:
Safety GogglesPrepare a shallow clay mold
Prepare a shallow clay mold
Shape a shallow bowl mold from refractory clay mixed with coarse sand (3:1 ratio), following the same process as for cast glass. The mold interior defines the exterior of the finished bowl. Make walls about 2 cm thick. Fire the mold to bisque hardness (900–1000 °C) and dust the interior with calcium carbonate (whiting) as a release agent. The mold diameter should be about 14–15 cm for a small millefiori dish.
Efni fyrir þetta skref:
 Refractory Clay1 kg
 Calcium Carbonate (Whiting)50 g
Arrange the cane slices in the mold
Arrange the cane slices in the mold
Place the millefiori cane slices face-down in the mold — the flat, patterned face of each slice should rest against the mold floor. Arrange them tightly together with minimal gaps. You can create geometric layouts: concentric rings, straight rows, or random scatter — Roman craftsmen used all three. Fill any gaps between round slices with small chips of a background colour (typically dark blue or black glass frit) to create a continuous surface after fusing.
Efni fyrir þetta skref:
 Glass Frit100 g
Back-fill with plain glass frit
Back-fill with plain glass frit
Sprinkle a layer of plain soda-lime glass frit (crushed to 2–5 mm grain size) over the arranged cane slices to form the back wall of the bowl. This backing layer should be about 5–6 mm deep. Use a compatible clear or lightly tinted glass so it does not obscure the millefiori pattern from behind. Tap the mold gently to settle the frit between and around the cane slices.
Efni fyrir þetta skref:
Glass Frit300 gFuse the slices in the kiln
Fuse the slices in the kiln
Place the filled mold in the kiln and raise the temperature slowly — 100 °C per hour to 500 °C, hold 30 minutes, then continue to 790–810 °C. Millefiori requires a slightly lower fusing temperature than plain frit casting — you want the slices and backing frit to fuse together but not flow so much that the patterns blur. At 790 °C the glass is soft enough to bond but viscous enough to preserve the sharp colour boundaries in each cane slice. Hold at peak temperature for 45–60 minutes — check through the spy hole for a smooth, glossy surface.
Anneal the fused piece
Anneal the fused piece
Reduce the kiln temperature to 550 °C over 1 hour and hold for 2 hours to relieve internal stresses. The junction between different-coloured glasses creates additional stress points due to very slight differences in thermal expansion, making annealing even more critical for millefiori than for plain cast glass. After the hold, cool the kiln naturally with the door closed — allow at least 10–12 hours to reach room temperature. Do not open the kiln above 50 °C.
Remove the dish from the mold
Remove the dish from the mold
Lift the cooled glass piece from the clay mold. The whiting release agent should allow clean separation. The underside (which faced the mold) is the display surface — it shows the millefiori pattern as a mosaic of coloured discs set in the background glass. The top surface (where the backing frit was) is rough and needs grinding.
Grind and polish the back surface
Grind and polish the back surface
Grind the rough back surface of the dish on wet sandstone to make it flat and even. Then grind the rim smooth and level. The display side (millefiori pattern) should already have a smooth, glossy surface from the mold contact. If it needs improvement, polish with progressively finer wet abrasive — but work carefully to avoid grinding through the thin cane slices. A well-fused millefiori dish shows each flower pattern as a distinct, sharp-edged medallion set in the background glass, with the colours vivid and unblurred.
Efni fyrir þetta skref:
 Fine Sand (silica)100 g
Nauðsynleg verkfæri:
 Sandstone (Abrasive)
Inspect the finished millefiori piece
Inspect the finished millefiori piece
Examine the finished dish in strong light. Each millefiori cane slice should show its pattern clearly — concentric rings of colour with sharp boundaries. The background glass between slices should be smooth and continuous with no unfused gaps. Small bubbles at the slice edges are normal in traditional work. Cracks between slices indicate either insufficient fusing temperature or inadequate annealing — the piece should be re-annealed if cracks are found. A successful Roman millefiori dish is a small masterpiece of patience and precision — each tiny flower pattern contains the same complexity as the original cane bundle, shrunk to a few millimetres across.
Efni
6- 12 pieceStaðgengill
- 1 kgStaðgengill
- Staðgengill
- 400 gStaðgengill
- 100 gStaðgengill
Efni úr tengdum teikningum
Tengd Blueprint
Þessi blueprint deila þekkingu — tækni, efni eða meginreglur
Related blueprints
Other builds that share materials, tools, or techniques with this one.

CC0 opinbert ríki
Þessi teikning er gefin út undir CC0. Þér er frjálst að afrita, breyta, dreifa og nota þetta verk í hvaða tilgangi sem er, án þess að biðja um leyfi.
Studdu smiðinn með því að kaupa vörur í gegnum teikningu hans þar sem hann fær þóknun smiða sem seljendur ákvarða, eða búðu til nýja endurskoðun á þessari teikningu og tengdu hana sem tengingu í þinni eigin teikningu til að deila tekjum.