Samvinna
LIST
FEGURÐ OG VELLÍÐAN
HANDVERK
MENNING OG SAGA
SKEMMTUN
UMHVERFI
MATUR OG DRYKKUR
ÖFUGVERKFRÆÐI
VÍSINDI
ÍÞRÓTTIR
TÆKNI
KLÆÐANLEG TÆKNI
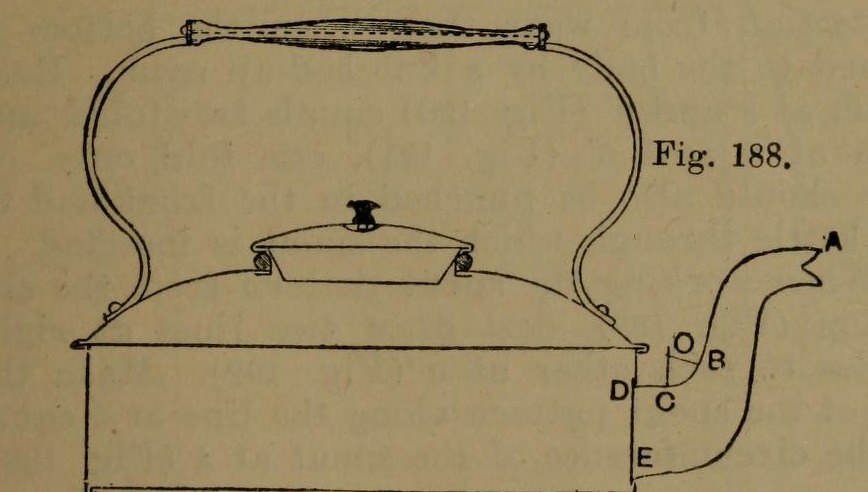


Stovetop Kettle: a Square Copper Kettle (Hasluck, 1907)
A tinsmith's square kettle in sheet copper, 9 x 9 in and 3 5/8 in deep: a box body with folded corner seams, a hollowed top pened on, a brazed and bent spout, a small cover, and a wooden handle on brass uprights.
Hasluck prefers copper; tinplate also works and is a separate route.
Source: Paul N. Hasluck, Tinplate Work (1907), pp. 91-98. Unknown: copper gauge, solder. Picture: Figs. 188-189 of the book.
Lengra kominn
Unknown
Leiðbeiningar
1
1
Cut the patterns
Cut the patterns
For a body 9 x 9 x 3 5/8 in, cut two ends 9 1/2 x 4 in and two sides 9 1/4 x 4 in, notched for box seams at the corners (Figs. 190-191), with allowances to fold at top and bottom. Punch the spout hole in the front. Cut the bottom 9 1/2 in square, notched for a 1/4 in edge. Set out the top as a 10 1/2 in square with curved allowances for hollowing and a 4 in circle for the cover hole (Fig. 193); set out the spout from the elevation (Fig. 192), the cover and its cone-shaped rim (Figs. 194-195).
Efni fyrir þetta skref:
 Koparplata1 body, bottom, top, spout, cover
Nauðsynleg verkfæri:
 Passari
 Rissnál
 Plötuklippur
2
2
Braze and shape the spout
Braze and shape the spout
Thin the long edges by hammering. Set in the throat with a stretching hammer on a beak iron, bend the spout round until the edges overlap, bind it with wire, lay spelter and borax along the inside of the seam and braze it; then close and braze the under seam. Fill it with lead and bend the neck with a round-faced hammer on the hollowing block; file off spare spelter and smooth it. Run out the lead, throw off a seating round the large end, trim the top with snips and tin the inside.
Efni fyrir þetta skref:
 Óþekktur málmur1 spelter
 Tin1 tinning
Nauðsynleg verkfæri:
 Sléttihamar
 Hæll
 Járnvír
 Bóraxduft
 Harðlóðunarbrennari
 Blý
 Gatasleif
 Harðviðarkubbur
 MálmþjölPlötuklippur
3
3
Fold and seam the body
Fold and seam the body
Fold the top edges square, the front and back outwards and the sides likewise; fold the bottom edges right over inwards to take the bottom (Fig. 188). Hook each side's end over the front's and work the corner seam on a straight-edged tool (Figs. 198-199). Turn up the bottom's 1/4 in edge, push it edge-down into the bottom folds, and solder the bottom and seams.
Efni fyrir þetta skref:
 Tin-blý lóðmálmur1 stykki
Nauðsynleg verkfæri:
 TrésleggjaHæll
 Rafmagnslóðbolti
 Lóðfeiti
4
4
Hollow the top and make the cover
Hollow the top and make the cover
Hollow the top on the block: sink the four sides a little, hollow the corners with a bullet-faced hammer, flatten each side along the block edge, even the shoulder and smooth it all over. Pare the edges, mark the flange with an edging machine, set it down square with a hatchet stake and mallet, and take up an edge to fit over the body. Cut the cover hole with circular snips and fit a narrow wired rim, worked over inside. Make the cover: solder its cone rim to fit the wired rim, throw off a flange, hollow the cover disc and seam it on, and fix the knob.
Efni fyrir þetta skref:
Járnvír1 rimTin-blý lóðmálmur1 stykkiÓþekktur málmur1 cover knobNauðsynleg verkfæri:
SléttihamarHarðviðarkubburHællTrésleggjaPlötuklippurRafmagnslóðboltiLóðfeiti5
5
Handle, top and spout
Handle, top and spout
Cut two handle uprights from stout brass or copper band (Fig. 196), drill them for rivets and for the spindle that carries the wooden handle, and bend them to shape. Rivet them to the top and solder over the rivet heads inside. Pene the top down onto the body and solder along each edge. Push the spout through its hole from inside until its large end butts against the front, and solder it strongly from inside.
Efni fyrir þetta skref:
 Messingplata1 handle uprights
 Messingstöng1 spindle
 Skaft1 wood
 Koparhnoð1 number not givenTin-blý lóðmálmur1 stykki
Nauðsynleg verkfæri:
 Handbor
 HnoðhamarTrésleggjaRafmagnslóðboltiLóðfeiti
Efni
9- 1 body, bottom, top, spout, coverStaðgengill
- 1 cover knobStaðgengill
- 1 tinningStaðgengill
- 3 stykkiStaðgengill
- 1 rimStaðgengill
- 1 handle uprightsStaðgengill
- 1 spindleStaðgengill
- 1 woodStaðgengill
- 1 number not givenStaðgengill
Nauðsynleg verkfæri
17- Staðgengill
- Staðgengill
- Staðgengill
- Staðgengill
- Staðgengill
- Staðgengill
- Staðgengill
- Staðgengill
- Staðgengill
- Staðgengill
- Staðgengill
- Staðgengill
- Staðgengill
- Staðgengill
- Staðgengill
- Staðgengill
- Staðgengill
Efni úr tengdum teikningum


Þessi teikning býr til

CC0 opinbert ríki
Þessi teikning er gefin út undir CC0. Þér er frjálst að afrita, breyta, dreifa og nota þetta verk í hvaða tilgangi sem er, án þess að biðja um leyfi.
Studdu smiðinn með því að kaupa vörur í gegnum teikningu hans þar sem hann fær þóknun smiða sem seljendur ákvarða, eða búðu til nýja endurskoðun á þessari teikningu og tengdu hana sem tengingu í þinni eigin teikningu til að deila tekjum.