Samvinna
LIST
FEGURÐ OG VELLÍÐAN
HANDVERK
MENNING OG SAGA
SKEMMTUN
UMHVERFI
MATUR OG DRYKKUR
ÖFUGVERKFRÆÐI
VÍSINDI
ÍÞRÓTTIR
TÆKNI
KLÆÐANLEG TÆKNI
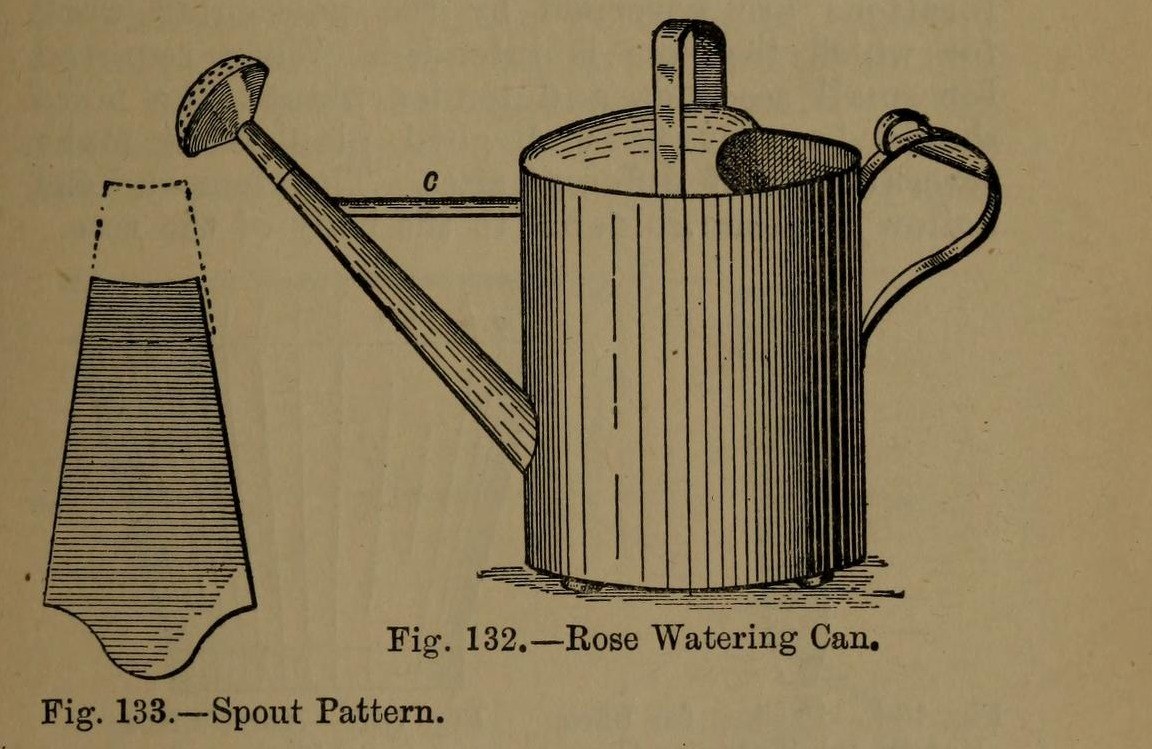


Watering Can: the Tinplate Rose Watering-Can (Hasluck, 1907)
A tinsmith's garden watering can: a round body from one sheet 2 ft 1 in x 8 1/2 in, a two-piece spout with a perforated rose, a hollowed top with a cross handle, and a back handle with a thumb ring. Tinplate or galvanised iron.
Variable: the rose. Its pattern diameter is the rose diameter x 4 / 3; finer holes for seedlings.
Source: Paul N. Hasluck, Tinplate Work (1907), pp. 54-57. Unknown: solder. Picture: Figs. 132-135 of the book.
Miðlungs
Unknown
Leiðbeiningar
1
1
Make the body and bottom
Make the body and bottom
Cut a sheet 2 ft 1 in by 8 1/2 in. Wire one edge, sink it in the crease iron, round it and groove the seam; solder the seam inside. Cut the spout hole opposite the seam, 2 1/2 in from the bottom. Edge the bottom to fit, beat it up and solder it from inside.
Efni fyrir þetta skref:
 Blikkplata1 body, bottom
 Járnvír1 edge
 Tin-blý lóðmálmur1 stykki
Nauðsynleg verkfæri:
 Plötuklippur
 Hæll
 Trésleggja
 Rafmagnslóðbolti
 Lóðfeiti
2
2
Make and fit the spout
Make and fit the spout
Cut the spout in two pieces (Fig. 133), bend them to shape and solder the seams. Solder the larger piece into the body. Make it longer for plants out of reach, with an elbow for plants up high. Make the stay: a taper strip as long as the gap between can and spout, bent to a half-round section and soldered in.
Efni fyrir þetta skref:
Blikkplata1 spout, stayTin-blý lóðmálmur1 stykkiNauðsynleg verkfæri:
PlötuklippurHællRafmagnslóðboltiLóðfeiti3
3
Make the rose
Make the rose
Set out the rose body (Fig. 135): its diameter is the rose diameter x 4 / 3, so a 3 in rose needs a 4 in pattern, with lines a b at right angles. Bend it over a funnel stake and solder the seam. Hollow a disc for the front, with edges for capping on. Inside the hollow, mark circles and pierce them at intervals with a bradawl over a hard wood block; very fine for seedlings. Solder front and stem to the rose body. Several roses of different sizes are useful.
Efni fyrir þetta skref:
Blikkplata1 roseTin-blý lóðmálmur1 stykkiNauðsynleg verkfæri:
 PassariPlötuklippurHæll
 Sléttihamar
 Sýll
 HarðviðarkubburRafmagnslóðboltiLóðfeiti
4
4
Fit the top and handles
Fit the top and handles
Hollow the top (Fig. 134), fit it to the body, wire its inner arc and solder it on. Cross handle: a strip about 1 3/4 in wide, wired with No. 12 B.W.G., bent to shape; cut two holes in the top with a small sharp chisel and solder the ends inside and on top. Back handle (Fig. 136): wire and bend it, solder a small boss under its upper part, and solder it opposite the spout with a thumb ring at the top. Solder three small hollowed studs under the bottom.
Efni fyrir þetta skref:
Blikkplata1 top, handles, studsJárnvír1 No. 12 B.W.G.Tin-blý lóðmálmur1 stykkiNauðsynleg verkfæri:
PlötuklippurSléttihamar StálmeitillRafmagnslóðboltiLóðfeiti
5
5
Clean and paint
Clean and paint
Clean with turpentine and whiting. Give two good coats of paint: red inside and green outside suit it.
Efni fyrir þetta skref:
 Olíumálning2 coats
Nauðsynleg verkfæri:
 Terpentína
 Kalsíumkarbónat (kalkhvíta)
Efni
4- 1 top, handles, studsStaðgengill
- 1 No. 12 B.W.G.Staðgengill
- 4 stykkiStaðgengill
- 2 coatsStaðgengill
Nauðsynleg verkfæri
12- Staðgengill
- Staðgengill
- Staðgengill
- Staðgengill
- Staðgengill
- Staðgengill
- Staðgengill
- Staðgengill
- Staðgengill
- Staðgengill
- Staðgengill
- Staðgengill
Efni úr tengdum teikningum



Þessi teikning býr til

CC0 opinbert ríki
Þessi teikning er gefin út undir CC0. Þér er frjálst að afrita, breyta, dreifa og nota þetta verk í hvaða tilgangi sem er, án þess að biðja um leyfi.
Studdu smiðinn með því að kaupa vörur í gegnum teikningu hans þar sem hann fær þóknun smiða sem seljendur ákvarða, eða búðu til nýja endurskoðun á þessari teikningu og tengdu hana sem tengingu í þinni eigin teikningu til að deila tekjum.