Collaborazione
ARTE
BELLEZZA E BENESSERE
MESTIERE
CULTURA E STORIA
DIVERTIMENTO
AMBIENTE
CIBO E BEVANDE
INGEGNERIA INVERSA
SCIENZE
SPORT
TECNOLOGIA
INDOSSABILI
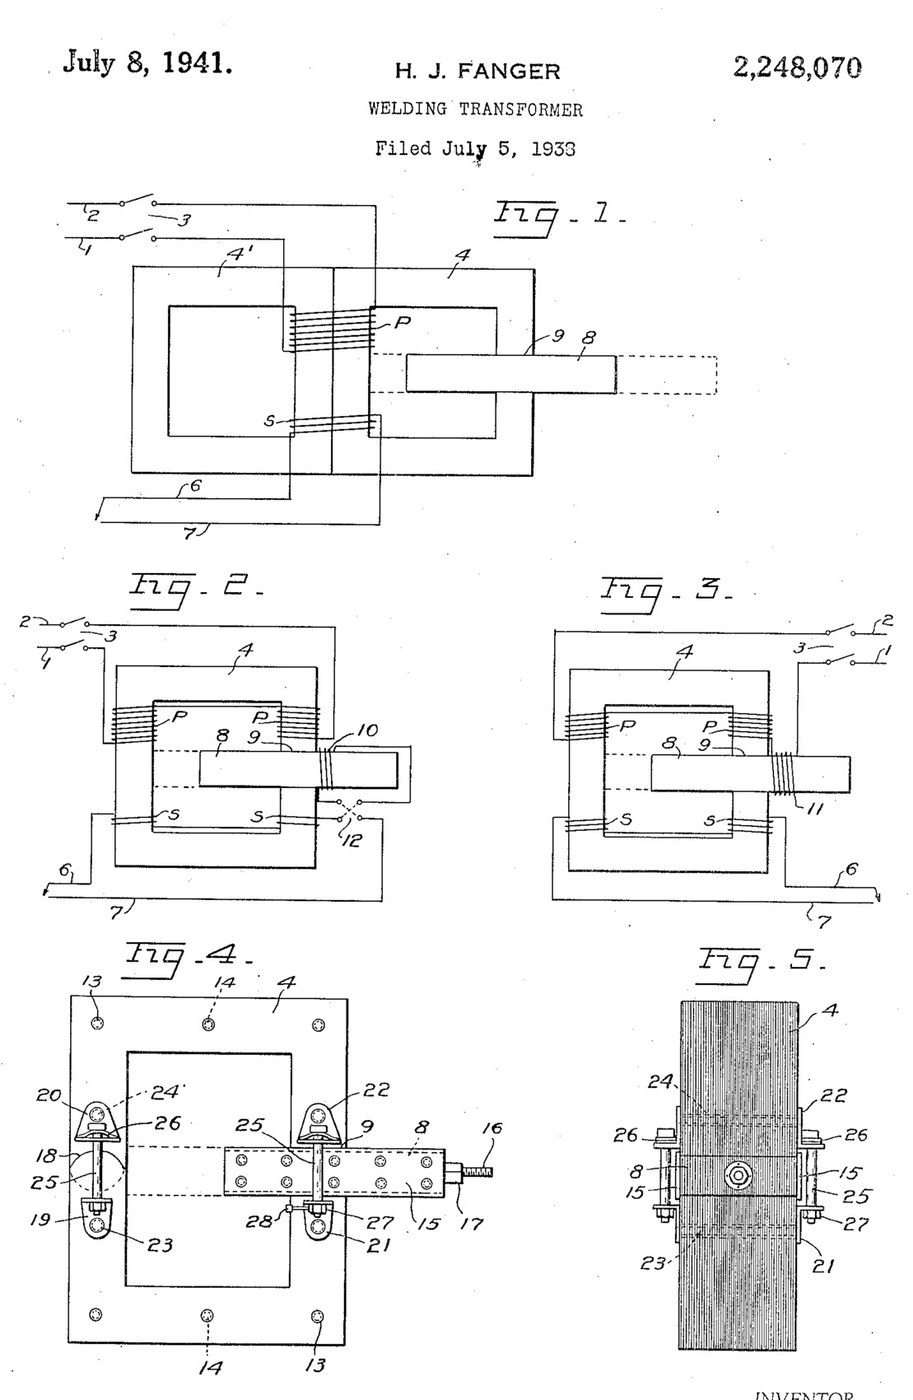


Arc Welder: AC Transformer with a Sliding Shunt Core (Fanger, US 2,248,070)
An AC arc welder is a step-down transformer whose current can be turned up and down. H. J. Fanger (US 2,248,070, 1941) cuts a gap through one leg of a laminated ring core and slides a laminated iron shunt bar through it: pushed in, it carries flux past the secondary and lowers the welding current; pulled out, the current rises.
For arc welding he gives about 60 to 68 volts open circuit, 15 to 200 amps, dropping to 38 or 40 volts at the working arc, with a small coil on the shunt bar in series with the secondary.
Source: H. J. Fanger, "Welding Transformer", US Patent 2,248,070 (filed 1938, granted 1941). Picture: its Figs. 1-5.
Avanzato
Unknown
Istruzioni
1
1
Read Fanger
Read Fanger
"With arc welding, infinite control of the volume of the secondary current, between maximum and minimum is obtained by adjustment of the slidable shunt core without altering the welding characteristics of the current, also better ignition of the arc is had at a given voltage, and greater stability of the arc".
2
2
Stack the core
Stack the core
Build a single rectangular ring core of insulated iron laminations, held together with brass (or insulated) bolts or rivets in insulating tubes (Fig. 4). Cut a gap straight through one leg, accurately machined and finished, and make a circular joint through the opposite leg with the segments staggered to overlap in successive laminations. Core size, lamination iron and thickness are not given (ours: the tools).
Materiali per questo passaggio:
 Metallo sconosciuto1 iron laminations
 Assortimento di bulloni a testa esagonale1 brass bolts
 Materiale isolante sconosciuto1 insulating tubes
Strumenti necessari:
 Cesoie da lattoniere
 Trapano a colonna
 Serie di punte da trapano
 Lime (lima a mano)
 Dimensioni sconosciute
3
3
Make the shunt bar
Make the shunt bar
Make the sliding shunt section of the same laminated iron, a snug fit in the gap with its laminations edge-to-edge with the core's, and long enough to fill the gap at every position. Sheath both sides with a slightly wider plate of Bakelite that overlaps the edges of the gap to guide it. Fit a threaded rod on its outer end, working in a nut fixed to the section (or move it by hand, with calibration marks along one edge).
Materiali per questo passaggio:
Metallo sconosciuto1 shunt laminations Bachelite2 side platesAssortimento di bulloni a testa esagonale1 brass bolts
 Barra filettata1 pezzo
 Dado esagonale1 pezzo
Strumenti necessari:
Trapano a colonnaSerie di punte da trapanoLime (lima a mano)4
4
Wind the coils
Wind the coils
Wind the primary and secondary windings on both legs of the core (Fig. 2), in series or in parallel to suit the line voltage and the current wanted. Wind a small auxiliary coil round the shunt bar's path, fixed so the bar slides through it, and connect it in series with the secondary through a reversing switch (some jobs weld better with the current through it one way). Turns and wire sizes are not given.
Materiali per questo passaggio:
 Filo di rame1 insulation and size not given
Strumenti necessari:
Dimensioni sconosciute5
5
Spring the joints
Spring the joints
On both sides of the gap and of the circular joint fit pairs of confronting angle plates, held by brass bolts in insulating sleeves and drawn together by spring bolts whose heads rest on slightly arched spring plates, so the joints close snugly on the sliding bar. A small lever on the gap-joint nut gives a half turn to release the bar for moving. The angle-plate material is not given.
Materiali per questo passaggio:
 Materiale sconosciuto4 angle platesAssortimento di bulloni a testa esagonale1 brass and spring boltsMateriale isolante sconosciuto1 sleeves
 Nastro di acciaio armonico1 arched spring platesDado esagonale4 pezzi
Strumenti necessari:
Trapano a colonnaSerie di punte da trapano Chiave a rullino
6
6
Connect and set
Connect and set
Connect the primary to the line through a line switch, and the secondary leads to the electrode holder and the work. Pull the shunt bar out for more current, push it in for less: Fanger gives about 60-68 volts open circuit and 15-200 amps, dropping to 38-40 volts at the arc.
Materiali per questo passaggio:
 Interruttore di accensione/spegnimento1 line switch
Strumenti necessari:
Chiave a rullinoMateriali
10- 1 shunt laminationsSegnaposto
- 1 brass and spring boltsSegnaposto
- 1 sleevesSegnaposto
- 2 side platesSegnaposto
- 1 pezzoSegnaposto
- 5 pezziSegnaposto
- 1 insulation and size not givenSegnaposto
- 4 angle platesSegnaposto
- 1 arched spring platesSegnaposto
- 1 line switchSegnaposto
Questo progetto realizza

CC0 Pubblico dominio
Questo progetto è rilasciato sotto CC0. Sei libero di copiare, modificare, distribuire e utilizzare quest'opera per qualsiasi scopo, senza chiedere permesso.
Supporta il Maker acquistando prodotti tramite il suo progetto dove guadagna una Commissione Maker stabilita dai venditori, oppure crea una nuova iterazione di questo progetto e includilo come collegamento nel tuo progetto per condividere i ricavi.