Collaborazione
ARTE
BELLEZZA E BENESSERE
MESTIERE
CULTURA E STORIA
DIVERTIMENTO
AMBIENTE
CIBO E BEVANDE
INGEGNERIA INVERSA
SCIENZE
SPORT
TECNOLOGIA
INDOSSABILI
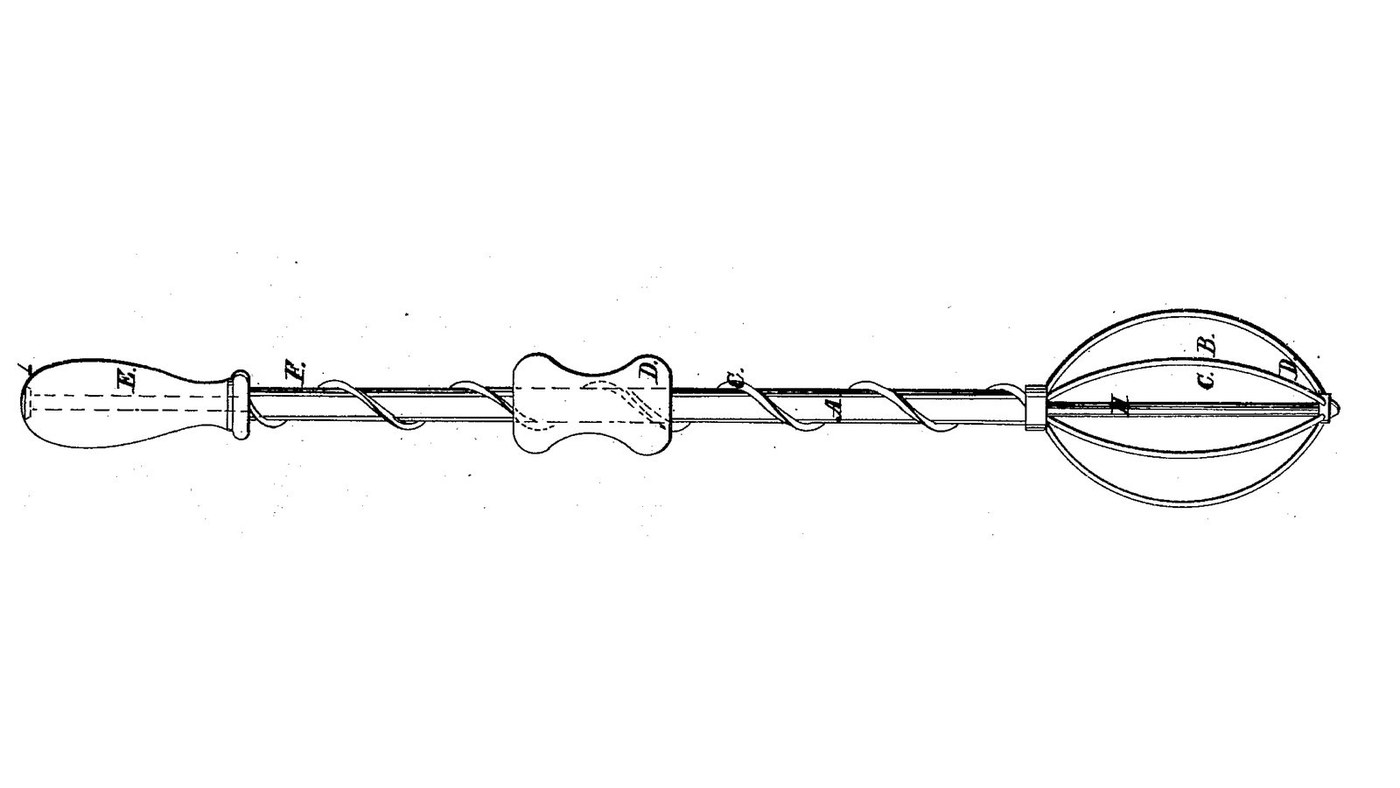


Screw-and-Nut Egg Beater: Slide a Nut Along a Spiral on the Shaft and the Wire Beater Spins Back and Forth
Frederick Ashley of New York received US 28,047, dated 1 May 1860, for an egg beater. A shaft with a spiral thread wound round it ends in a cage of beating wires. Hold the handle in one hand and slide the nut up and down the thread with the other: the shaft spins one way, then the other, and the wires beat the eggs. He adds that it can churn cream to butter or stir ice cream as it freezes.
The patent gives no sizes; every size here is ours.
Principiante
About 3 hours, plus printing
Istruzioni
1
1
A push becomes a spin
A push becomes a spin
Caricamento del notebook Jupyter…
2
2
A hand-worked egg beater, the year before
A hand-worked egg beater, the year before
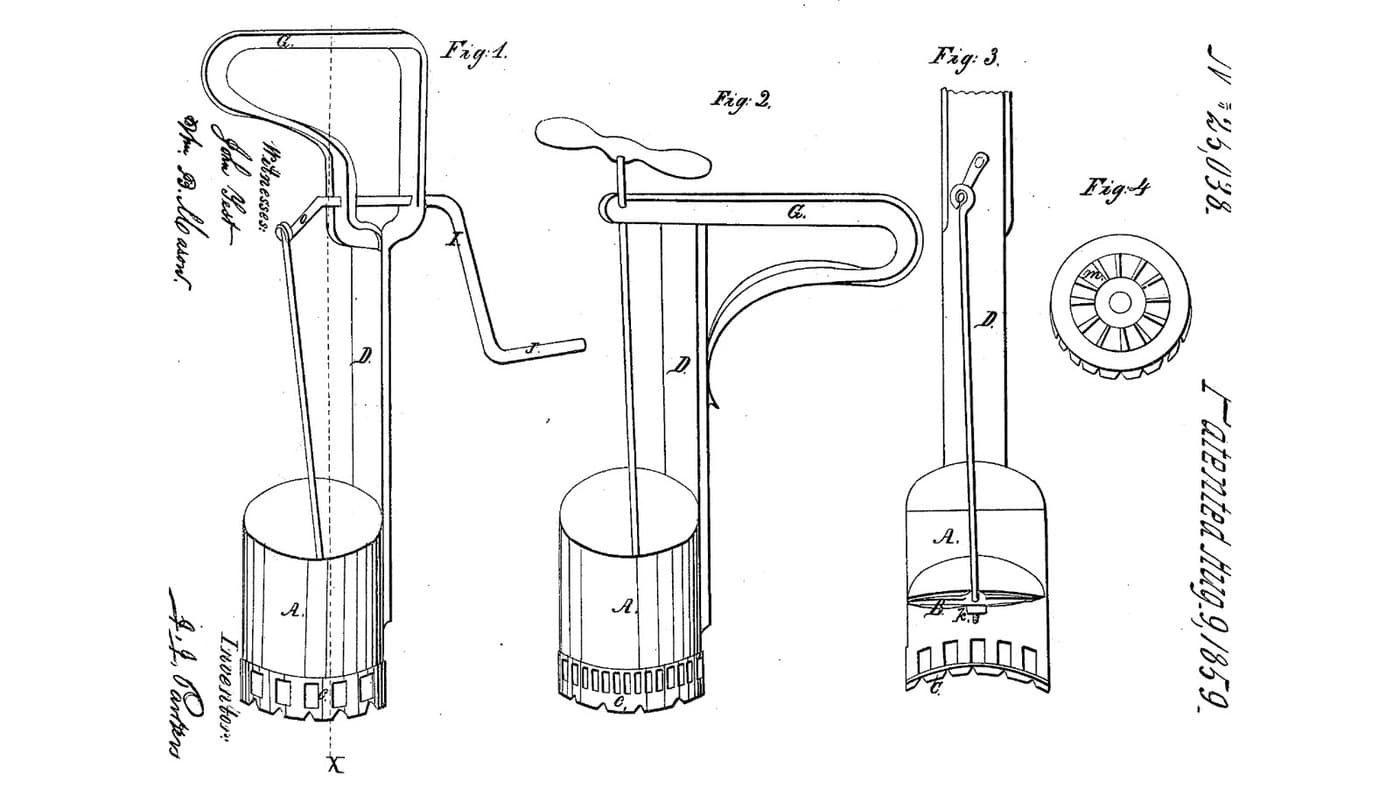
Parker pumps the eggs through a grate. Ashley spins a cage of wires through them.
3
3
Read US 28,047
Read US 28,047
"The lower end of the shaft A is placed in the dish or vessel containing the eggs to be beaten; the handle E is taken hold of by one hand of the operator, and the nut D by the other. The nut D is then moved up and down alternately, giving to the beating wires B a rapid motion forward and back, until the eggs are thoroughly “beat” or broken and mixed."
4
4
Print the nut D
Print the nut D
Nut 32 mm across and 40 long, bored 8.8 mm, with a helical slot at 80 mm pitch for the 3 mm thread. PETG, 0.2 mm layers, 100 % infill.
5
5
Print the wire hub
Print the wire hub
Hub 20 mm across and 15 long, bored 8.4 mm, with six holes for the wire bows. PETG, 0.2 mm layers, 100 % infill.
6
6
Print the foot cap
Print the foot cap
Cap 16 mm across and 10 tall, bored 8.4 mm, 4 deep, with six holes for the wire bows' lower ends. PETG, 0.2 mm layers, 100 % infill.
7
7
Shaft A and thread C
Shaft A and thread C
Cut 330 mm of 8 mm stainless rod and round its ends with the file. Wind 3 mm stainless wire tightly round it, two full turns spread evenly from 120 to 280 mm above its foot (80 mm a turn), and bend each end of the wire into a small hole drilled in the rod so it cannot slip.
Materiali per questo passaggio:
 Barra di acciaio inossidabile1 pezzo
 Filo di acciaio inox1 pezzo
Strumenti necessari:
 Seghetto per metalli
 Lime (lima a mano)
 Morsa da banco
 Pinze a becchi tondi
 Trapano a batteria
 Serie di punte da trapano
8
8
Beating wires B
Beating wires B
Bend six bows of 1.6 mm stainless wire, each reaching 35 mm out from the shaft and 80 mm long. Push the hub onto the shaft 80 mm above its foot and the cap onto its foot, and set each bow's ends in the hub's and cap's holes, 60 degrees apart; pin the hub and cap to the rod each with a short piece of wire through a drilled hole.
Materiali per questo passaggio:
Filo di acciaio inox1 pezzo Filamento PETG1 pezzo
Strumenti necessari:
 Stampante 3D a filamento (FDM)Pinze a becchi tondiTrapano a batteriaSerie di punte da trapano
9
9
Nut D, collar and handle E
Nut D, collar and handle E
Thread the nut onto the shaft from the top, turning it to follow the wire. Fit a shaft collar 300 mm above the foot, and a hardwood handle 30 mm across and 95 long bored 8.6 mm on the top above it, so the shaft turns freely in the handle.
Materiali per questo passaggio:
 Shaft Collar1 pezzo
 Tasselli di legno duro1 pezzo
Strumenti necessari:
Trapano a batteriaSerie di punte da trapano Carta abrasiva
10
10
The build in 3D
The build in 3D
FreeCAD model of this build: the shaft A with the wire thread C, the nut D on it, the collar and handle E, and the six bows of the beating wires B between the hub and the foot cap.
11
11
Beat eggs
Beat eggs
Break four eggs into a bowl. Stand the beater's foot in them, hold the handle in one hand and slide the nut up and down the thread with the other, timing it, until the yolks and whites are evenly mixed.
Materiali per questo passaggio:
 Uovo4 pezzi
Strumenti necessari:
 Ciotola di vetro
 Cronometro
12
12
Troubleshooting
Troubleshooting
Screw egg beater troubleshooting.
Flow
Loading...
13
13
History and honest limits
History and honest limits
**Frederick Ashley** of New York, US 28,047, 1 May 1860, "Egg-Beater". He claimed the beating wires with the screw-threaded shaft and nut, and noted it could be applied to churning cream or freezing ice cream, or fixed to a churn with its beaters in two sections turning contrary ways. Every size here is ours, and our nut and hub are printed.
Materiali
6- Segnaposto
- 2 pezziSegnaposto
- 1 pezzoSegnaposto
- 1 pezzoSegnaposto
- 1 pezzoSegnaposto
- 4 pezziSegnaposto
Strumenti richiesti
10- Segnaposto
- Segnaposto
- Segnaposto
- Segnaposto
- 1 vendor sell this, none ship to you yetSegnaposto
- Segnaposto
- Segnaposto
- Segnaposto
- Segnaposto
- Segnaposto
File di progetto
4Questo progetto realizza

Blueprint correlati
Questi blueprint condividono conoscenze — tecniche, materiali o principi

CC0 Pubblico dominio
Questo progetto è rilasciato sotto CC0. Sei libero di copiare, modificare, distribuire e utilizzare quest'opera per qualsiasi scopo, senza chiedere permesso.
Supporta il Maker acquistando prodotti tramite il suo progetto dove guadagna una Commissione Maker stabilita dai venditori, oppure crea una nuova iterazione di questo progetto e includilo come collegamento nel tuo progetto per condividere i ricavi.