
Collaborazione
ARTE
BELLEZZA E BENESSERE
MESTIERE
CULTURA E STORIA
DIVERTIMENTO
AMBIENTE
CIBO E BEVANDE
INGEGNERIA INVERSA
SCIENZE
SPORT
TECNOLOGIA
INDOSSABILI
Battery Holder: Four C Cells in Two Sprung Compartments with a Z-Shaped Retainer (Lund 1979)
English
Ed

Creato da

Ed

28. ottobre 2026FI
12
0
0
0
0

Battery Holder: Four C Cells in Two Sprung Compartments with a Z-Shaped Retainer (Lund 1979)

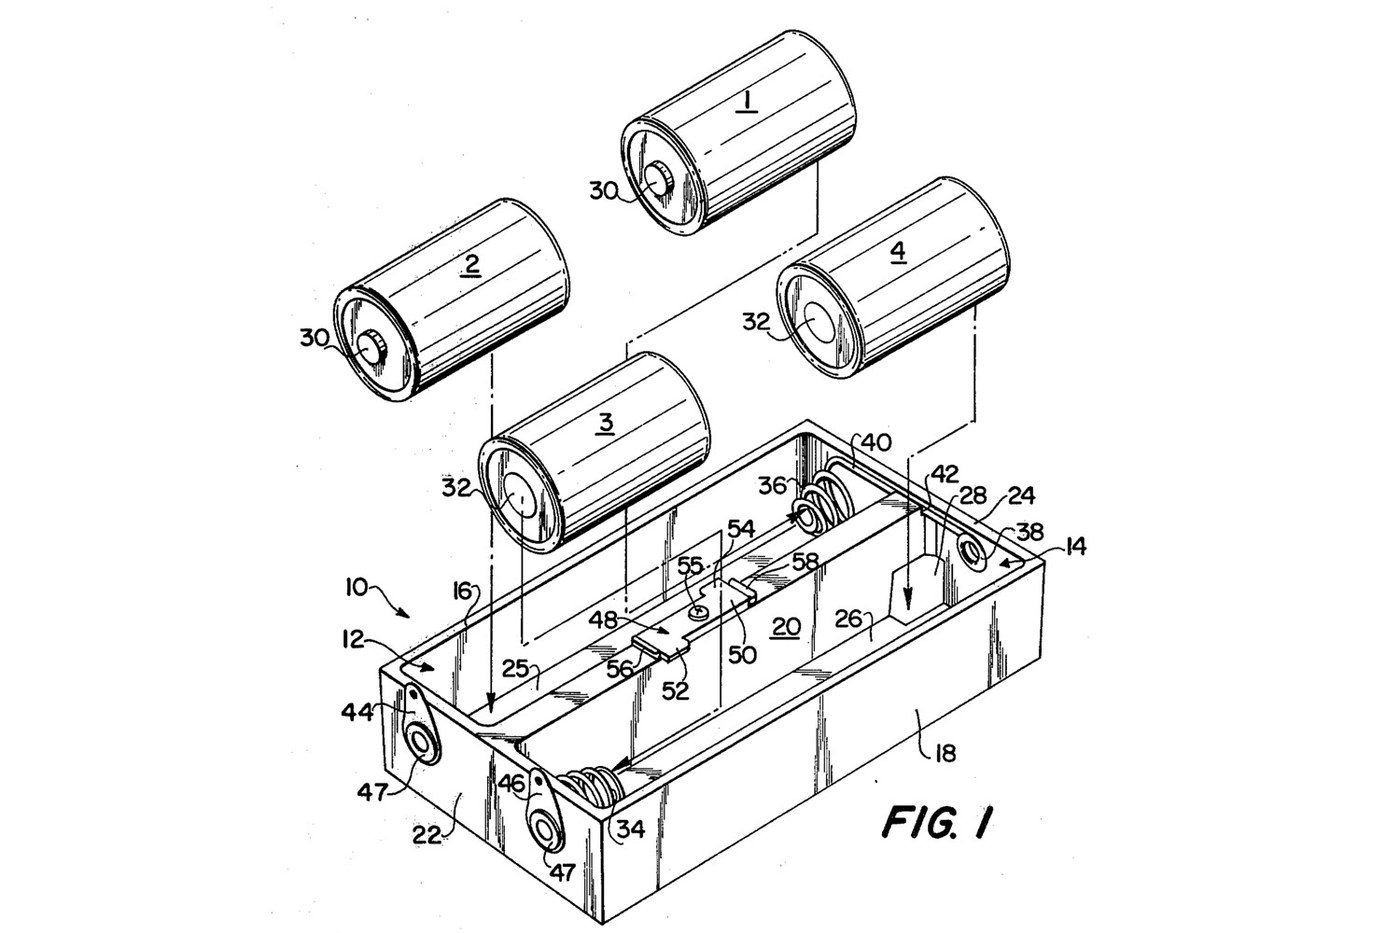
A tray for four C cells in series, made for an instrument that gets knocked about. Each compartment holds two cells end to end, pressed together by a cone-shaped coil spring. The cells can shift a little under a blow and spring back without losing contact. A small Z-shaped retainer holds down one cell in each row and still lets every cell be taken out. Source: John Lund, US 4,161,568 (Schonstedt Instrument Co., 1979), with all sizes. Unknown: the plastic, the metals and the spring wire size. Lund names none of them, and nothing makes a self-tapping screw yet, so these are linked to unknown heads. The tools are ours. Picture: the patent's Fig. 1.
Intermedio
1 day

Istruzioni

1

Mould the tray

Mould a tray 4.325 × 2.500 × 0.875 in (109.9 × 63.5 × 22.2 mm) with two parallel open-top compartments, each 4.125 in long, 1.025 in wide and 0.800 in deep inside (104.8 × 26.0 × 20.3 mm). The middle wall is 0.300 in (7.6 mm) thick, with a notch at one end. Mould two small abutments on the middle wall, 1.000 in (25.4 mm) apart. Unknown: the plastic.

Materiali per questo passaggio:

Materiale isolante sconosciutoMateriale isolante sconosciuto1 as required

Strumenti necessari:
Stampo a compressioneStampo a compressione
Calibro a corsoioCalibro a corsoio
2

Wind the two spring contacts

Wind two cone-shaped coil springs: 0.562 in (14.3 mm) outside diameter at the large end, 0.312 in (7.9 mm) inside at the small end, 1/2 in (12.7 mm) long free, closing to 1/8 in (3.2 mm). Each has three active turns, and the end turns are wound flat. Leave one spring with a long straight tail. Unknown: the metal and the wire size.

Materiali per questo passaggio:

Metallo sconosciutoMetallo sconosciuto1 as required

Strumenti necessari:

Pinze a becchi tondiPinze a becchi tondi
Pinze a becchi piattiPinze a becchi piatti
Calibro a corsoioCalibro a corsoio
3

Fit the contacts and terminals

Put one spring at the far end of the first compartment, with its straight tail, and the other at the near end of the second. Set an eyelet contact in the end wall opposite each spring. Run the tail through the notch in the middle wall to the eyelet contact at the far end of the second compartment. Fix two terminals to the near end wall with eyelets, each holding its contact.

Materiali per questo passaggio:

Metallo sconosciutoMetallo sconosciuto1 as required

Strumenti necessari:

Cesoie da lattoniereCesoie da lattoniere
Pinze a becchi piattiPinze a becchi piatti
Lime a manoLime a mano
4

Make and fix the retainer

Cut a flat Z-shaped retainer of plastic, 0.062 in (1.6 mm) thick and 0.980 in (24.9 mm) long. It is 0.430 in (10.9 mm) wide at each branched end. Each branch sticks out 0.130 in (3.3 mm) from the stem and runs 0.365 in (9.3 mm) along it. Screw it with a single self-tapping screw through the middle of the stem onto the top of the middle wall, between the abutments, so it cannot turn. Each branch reaches over one compartment.

Materiali per questo passaggio:

Materiale isolante sconosciutoMateriale isolante sconosciuto1 as required

Vite autofilettanteVite autofilettante1 pc

Strumenti necessari:

Cesoie da lattoniereCesoie da lattoniere
Lime a manoLime a mano
Set di cacciavitiSet di cacciaviti
Calibro a corsoioCalibro a corsoio
5

Wire it

Solder lead wires to the two terminals. With the cells in, the four make one series supply between these terminals.

Materiali per questo passaggio:

Filo per cablaggioFilo per cablaggio1 as required
Filo per saldaturaFilo per saldatura1 as required

Strumenti necessari:

Saldatore a stagnoSaldatore a stagno
6

Load the cells

Put cell 1 into the free end of the first compartment, slide it along under the retainer until it meets the spring, then drop cell 2 in behind it, pressing the spring a little. Load the second compartment from its other end the same way. To unload, lift out the two free cells, then slide the held cells along into their places and lift them out. Ours: check the voltage across the terminals with a meter.

Strumenti necessari:

MultimetroMultimetro

Materiali

5

Strumenti richiesti

9

Questo progetto realizza

CC0 Pubblico dominio

Questo progetto è rilasciato sotto CC0. Sei libero di copiare, modificare, distribuire e utilizzare quest'opera per qualsiasi scopo, senza chiedere permesso.

Supporta il Maker acquistando prodotti tramite il suo progetto dove guadagna una Commissione Maker stabilita dai venditori, oppure crea una nuova iterazione di questo progetto e includilo come collegamento nel tuo progetto per condividere i ricavi.

Commenti

(0)

Accedi per partecipare alla discussione

Caricamento commenti...