
Collaborazione
ARTE
BELLEZZA E BENESSERE
MESTIERE
CULTURA E STORIA
DIVERTIMENTO
AMBIENTE
CIBO E BEVANDE
INGEGNERIA INVERSA
SCIENZE
SPORT
TECNOLOGIA
INDOSSABILI
Push Button: Normally Open Momentary Switch with a Cushioned Contact (De Reamer, GE 1939)
English
Ed

Creato da

Ed

28. ottobre 2026FI
13
0
0
0
0

Push Button: Normally Open Momentary Switch with a Cushioned Contact (De Reamer, GE 1939)

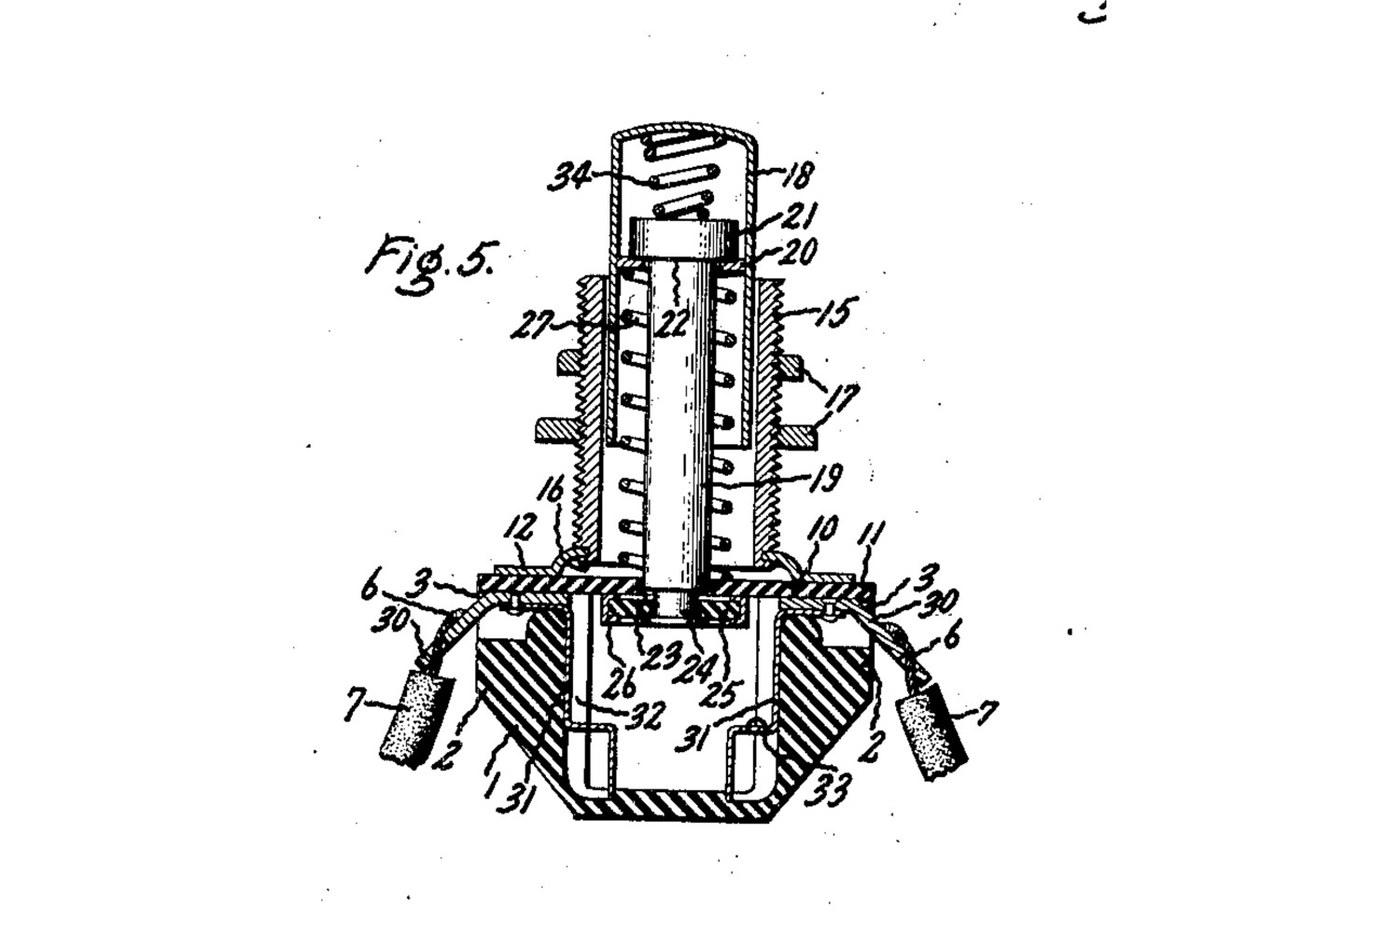
A panel push button that closes a circuit only while you press it. A spring holds the button out, and a metal rim on the end of its rod sits clear of two contacts. Press it and the rim bridges both contacts. A second spring inside the button lets the rod give, so the contacts never take more than that spring's force. Source: Frank C. De Reamer, US 2,166,803 (General Electric, 1939), Fig. 5. Unknown: the insulating material, the metals and every size. De Reamer gives none of them, so they are linked to unknown heads. The tools are ours. Picture: the patent's Fig. 5.
Avanzato
2 days

Istruzioni

1

Mould the housing

Mould a cup-shaped housing of insulating material, with a boss on each of two opposite sides, a recess in the top of each boss, a groove inside below each boss, and a bead round the top. Unknown: the material, the sizes and the moulding.

Materiali per questo passaggio:

Materiale isolante sconosciutoMateriale isolante sconosciuto1 as required

Strumenti necessari:
Stampo a compressioneStampo a compressione
Dimensioni sconosciuteDimensioni sconosciute
2

Make the terminals and contacts

Bend two angled metal strips. The upper end of each sits in a boss recess, and the lower end is a solder lug. Fix each upper end to a contact that fits the groove inside the housing, stepped at its bottom end. Unknown: the metal.

Materiali per questo passaggio:

Metallo sconosciutoMetallo sconosciuto1 as required

Strumenti necessari:

Cesoie da lattoniereCesoie da lattoniere
Pinze a becchi piattiPinze a becchi piatti
Dimensioni sconosciuteDimensioni sconosciute
3

Make the sleeve, plate and cover

Turn a threaded sleeve and cut its thread. Spin its lower end over onto a metal plate with tangs. Cut a cover of insulating sheet with ears that reach over the bosses and a hole in the middle to guide the rod.

Materiali per questo passaggio:

Metallo sconosciutoMetallo sconosciuto1 as required
Materiale isolante sconosciutoMateriale isolante sconosciuto1 as required

Strumenti necessari:

Tornio per metalliTornio per metalli
Set di utensili da tornio (HSS)Set di utensili da tornio (HSS)
PortafilieraPortafiliera
Cesoie da lattoniereCesoie da lattoniere
Calibro a corsoioCalibro a corsoio
Dimensioni sconosciuteDimensioni sconosciute
4

Make the push button

Make a drawn metal tube closed at the top, and a rod with a head. Put a small coil spring in the top of the tube, then the rod's head. Wedge a washer into the tube under the head. Leave clearance so the rod can swivel a little. Turn the rod's lower end down to a smaller diameter. Unknown: the metal.

Materiali per questo passaggio:

Metallo sconosciutoMetallo sconosciuto1 as required
Set di molle di compressioneSet di molle di compressione1 spring

Strumenti necessari:

Tornio per metalliTornio per metalli
Set di utensili da tornio (HSS)Set di utensili da tornio (HSS)
Calibro a corsoioCalibro a corsoio
Dimensioni sconosciuteDimensioni sconosciute
5

Assemble

Set the terminals in their recesses and the contacts in their grooves. Slide the button into the sleeve, with a coil spring round the rod between the cover and the wedged washer. Pass the rod's end through the cover's hole. Put on it a loose insulating washer with a metal rim round its edge. Hammer the rod's end over into a flange. Lay the cover on the housing, so its ears clamp the terminals, and bend the plate's tangs over the bead.

Materiali per questo passaggio:

Materiale isolante sconosciutoMateriale isolante sconosciuto1 as required
Metallo sconosciutoMetallo sconosciuto1 as required
Set di molle di compressioneSet di molle di compressione1 spring

Strumenti necessari:

Morsa da bancoMorsa da banco
Martello a penna sfericaMartello a penna sferica
Pinze a becchi piattiPinze a becchi piatti
Occhiali di sicurezzaOcchiali di sicurezza
6

Mount and wire it

Put the sleeve through a hole in the panel and clamp the panel between two nuts on the thread. Solder the bared wire ends to the two lugs.

Materiali per questo passaggio:

Dado esagonaleDado esagonale2 pcs
Filo per saldaturaFilo per saldatura1 as required

Strumenti necessari:

Saldatore a stagnoSaldatore a stagno
Pinze a becchi piattiPinze a becchi piatti
7

Check it

At rest, the rim sits against the underside of the cover and the circuit is open. Pressed, the rim meets the stepped ends of both contacts and closes it. The checking is ours: the meter reads open, then closed while pressed.

Strumenti necessari:

MultimetroMultimetro

Materiali

5

Strumenti richiesti

13

Questo progetto realizza

CC0 Pubblico dominio

Questo progetto è rilasciato sotto CC0. Sei libero di copiare, modificare, distribuire e utilizzare quest'opera per qualsiasi scopo, senza chiedere permesso.

Supporta il Maker acquistando prodotti tramite il suo progetto dove guadagna una Commissione Maker stabilita dai venditori, oppure crea una nuova iterazione di questo progetto e includilo come collegamento nel tuo progetto per condividere i ricavi.

Commenti

(0)

Accedi per partecipare alla discussione

Caricamento commenti...