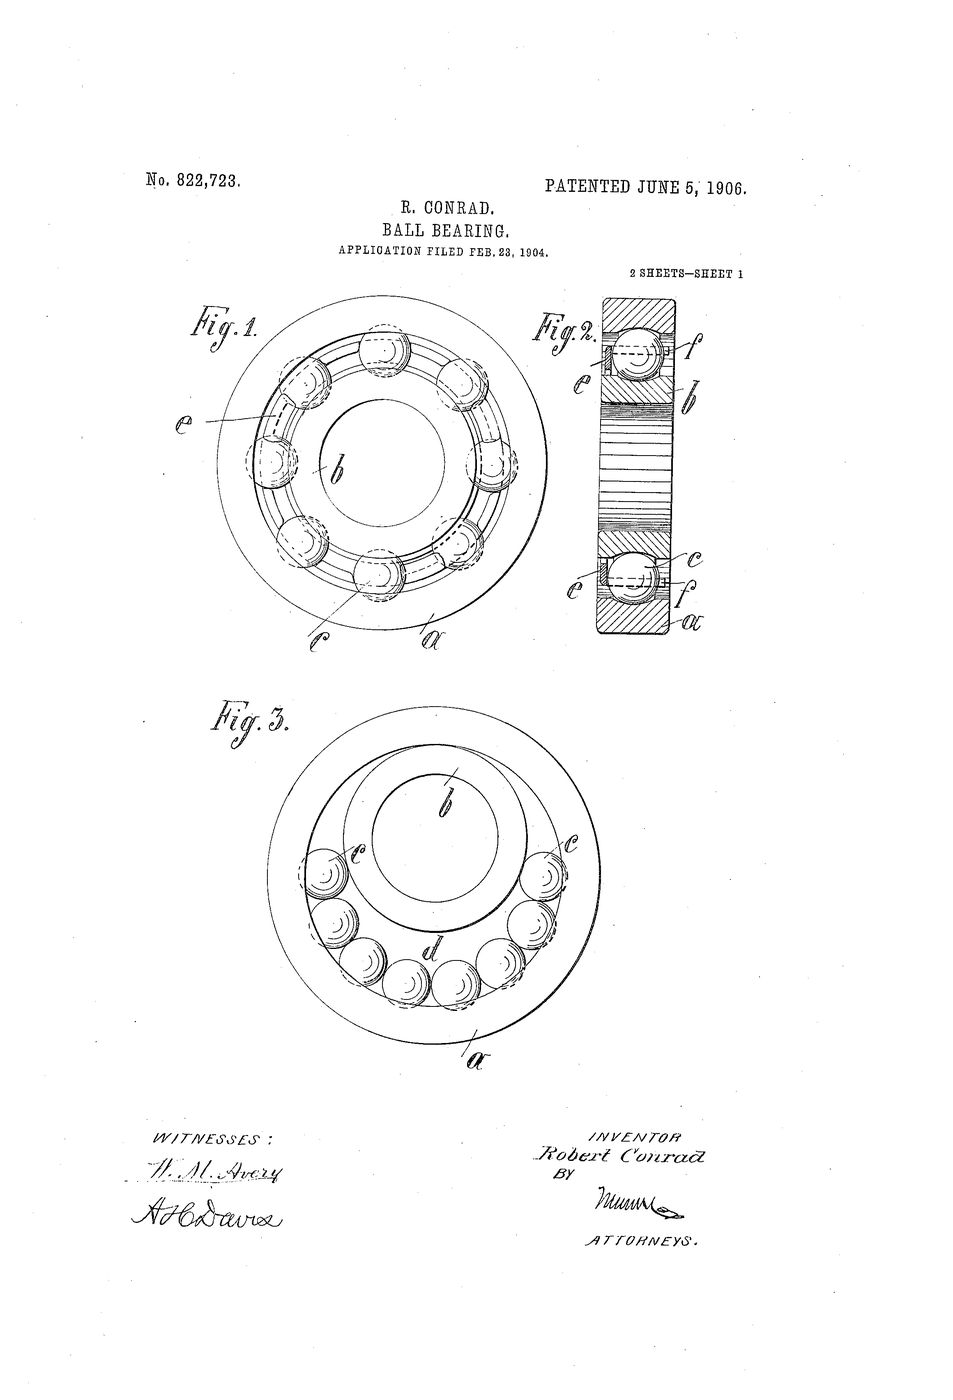


Ball Bearing
Balls between two rings make a beautiful low-friction bearing — a point of rolling contact instead of a smear of sliding metal. There is just one practical problem that stumped early makers: how do you get the balls in? If the two rings are grooved deeply enough to hold the balls, they are too deep to feed the balls past.
Conrad's patent solves the assembly, and that is what made the deep-groove ball bearing manufacturable. Push the inner ring hard to one side so the two rings touch on one edge and gape open on the other. Feed a fistful of balls through the crescent-shaped gap. Then centre the inner ring and spread the balls evenly around with a cage.
The result is a single sealed unit — inner ring, outer ring, balls and cage, that cannot fall apart, carries load in every radial direction and some thrust too, and needs no adjustment.
US Patent 822,723, "Ball-bearing", granted 5 June 1906 (filed 23 February 1904) to Robert Conrad.
Istruzioni
Read the claim: it is about assembly
Read the claim: it is about assembly
Conrad's ball-bearing patent is really about how the balls get into a deep-grooved bearing. Note that the difficulty is assembly, not the idea of rolling balls.
Coast-test a plain bushing for a baseline
Coast-test a plain bushing for a baseline
Spin a wheel on a plain dowel axle and time the coast-down. Record it — the sliding-friction baseline the bearing must beat.
Materiali per questo passaggio:
 Pannello di compensato1 foglio
 Tondino di legno (spina)1 pezzo
Strumenti necessari:
 Cronometro
Make two rings with matching grooves
Make two rings with matching grooves
Cut an outer ring and a smaller inner ring, each with a groove so a ball sits half in each. Deep grooves hold the balls — and block them from entering.
Materiali per questo passaggio:
Pannello di compensato1 foglioStrumenti necessari:
 Set di lime ad ago
Try to feed balls with the rings centred
Try to feed balls with the rings centred
Hold the inner ring dead-centre in the outer and try to slip balls into the grooves. They will not go — the gap is even and too small all the way round. This is the problem.
Materiali per questo passaggio:
 Cuscinetti a sfere in acciaio1 set
Shove the inner ring hard to one side
Shove the inner ring hard to one side
Push the inner ring against one side of the outer. Now the rings touch on that side and open a crescent-shaped gap on the opposite side. That crescent is Conrad's doorway.
Fill balls through the crescent
Fill balls through the crescent
Drop balls one by one into the wide crescent gap until you cannot fit any more. Count them. You can only load a partial ring of balls this way — remember that number.
Re-centre the inner ring
Re-centre the inner ring
Slide the inner ring back to the middle. The balls distribute around and the bearing locks together — it can no longer come apart. Assembly done.
Space the balls with a cage
Space the balls with a cage
Fit a light ring (the cage) that holds each ball a fixed distance from its neighbours. Without a cage the balls crowd to one side and rub each other.
Coast-test the finished bearing
Coast-test the finished bearing
Mount the wheel on the ball bearing, spin it, time the coast. Much longer than the plain bushing in step 2. Record the ratio.
Compare with a real ball bearing
Compare with a real ball bearing
Spin a real steel ball bearing by hand next to your model. Same anatomy — two rings, balls, cage — just made to the micron. Yours shows the principle; the steel one shows the precision.
Strumenti necessari:
 Cuscinetto a sfere
Push the bearing sideways
Push the bearing sideways
Load it along the axle. A deep-groove ball bearing takes some thrust as well as radial load — the groove catches the balls both ways. Note it is less than a tapered bearing manages.
Feel the point contact
Feel the point contact
A ball touches each ring at a single point; a roller touches along a line. Point contact means the lowest friction — and the lowest load capacity. That trade defines where each bearing is used.
Strumenti necessari:
 Calibro a corsoio
History & Context — the patent that was really a factory trick
History & Context — the patent that was really a factory trick
The patent. US 822,723, "Ball-bearing", filed 23 February 1904 and granted 5 June 1906 to Robert Conrad. Google Patents shows the date 1904 first — that is the filing date; the printed sheet says "Patented June 5, 1906". The rolling ball as a bearing element is ancient — Leonardo sketched them, and grooved ball races existed before Conrad. What Conrad patented is the thing that turned a nice idea into a mass-produced component: a way to get the balls into a deep groove.
Why assembly was the real obstacle. A shallow groove lets you load plenty of balls but barely holds them; a deep groove holds the balls securely against radial and axial loads but, held concentric, leaves no gap wide enough to feed a ball through (step 4). Conrad's method breaks the deadlock: push the inner ring fully to one side so the rings kiss on one edge and yawn open on the other, feed the balls through that crescent, then re-centre and cage them (steps 5 to 8). It is pure geometry, done in a moment on the factory floor, and it is why this is called the Conrad assembly to this day. The price is that you can only fit a partial ring of balls — which is exactly why a Conrad bearing has a cage holding, typically, seven or eight balls rather than a groove packed full.
What the deep-groove ball bearing is good at, and not. Because each ball touches each ring at a single point, friction is extraordinarily low — which is why these bearings spin so freely (steps 9 and 12). That same point contact limits how much load they can carry before the steel bruises, so for heavy or shock loads engineers reach for roller bearings, and for combined heavy radial-and-thrust loads, for the tapered roller bearing. The deep-groove ball bearing wins where speed and low friction matter more than brute capacity — which is an enormous range of machines.
Where you meet it. It is the single most common bearing in the world: in electric motors, bicycle and skateboard wheels, fans, pumps, appliances, hard drives, and the hubs and headsets of the very safety bicycle whose chain the previous blueprint improved. A sealed, self-contained unit you press onto a shaft and forget — and the reason it can be a sealed self-contained unit at all is the crescent-gap trick you performed in step 5.
Materiali
3- 1 foglioSegnaposto
- 1 pezzoSegnaposto
- Segnaposto
Strumenti richiesti
4- Segnaposto
- Segnaposto
- 2 vendors sell this, none ship to you yetSegnaposto
- Segnaposto
Blueprint correlati
Questi blueprint condividono conoscenze — tecniche, materiali o principi


CC0 Pubblico dominio
Questo progetto è rilasciato sotto CC0. Sei libero di copiare, modificare, distribuire e utilizzare quest'opera per qualsiasi scopo, senza chiedere permesso.
Supporta il Maker acquistando prodotti tramite il suo progetto dove guadagna una Commissione Maker stabilita dai venditori, oppure crea una nuova iterazione di questo progetto e includilo come collegamento nel tuo progetto per condividere i ricavi.