Collaborazione
ARTE
BELLEZZA E BENESSERE
MESTIERE
CULTURA E STORIA
DIVERTIMENTO
AMBIENTE
CIBO E BEVANDE
INGEGNERIA INVERSA
SCIENZE
SPORT
TECNOLOGIA
INDOSSABILI
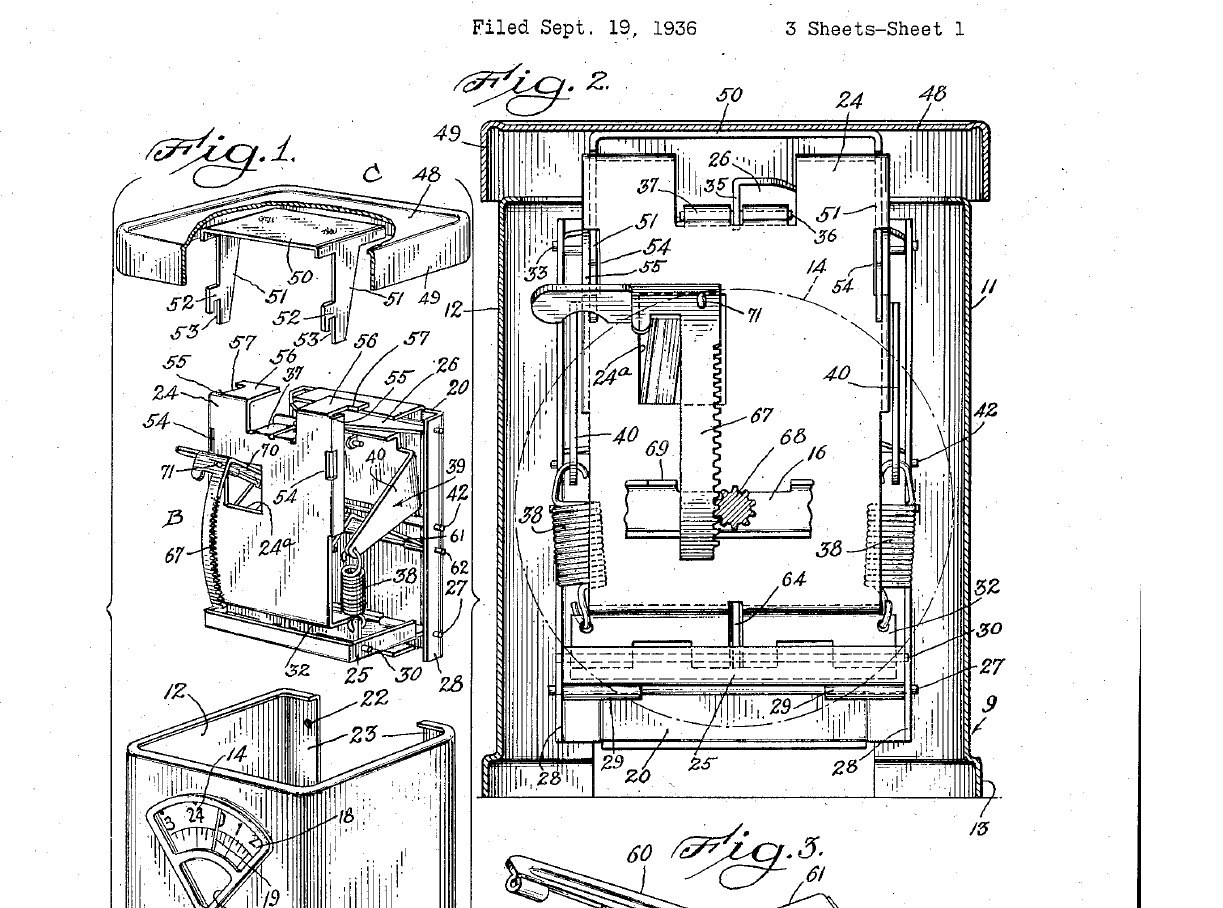


Mechanical Kitchen Scale: Sheet-Metal Case, Guided Plate and Two Springs to a Dial (Hansen, 1939)
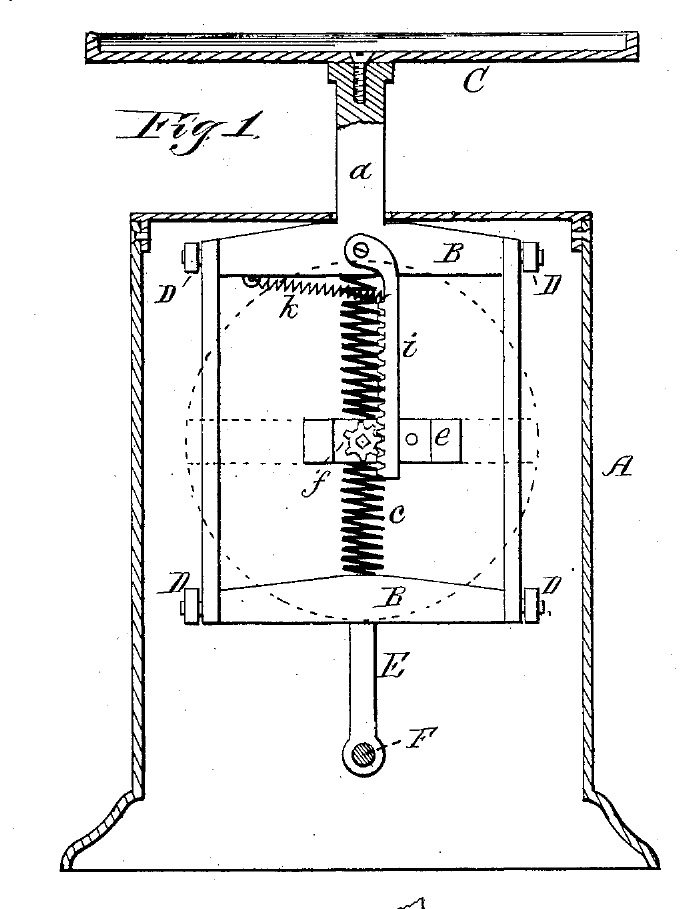
The everyday kitchen spring scale, built almost entirely from sheet metal. The platform hangs from a plate that two pivoted links keep moving straight up and down, the way Roberval's frame keeps a pan level. Two springs carry the load, and a rack turns the numbered dial behind a small window.
Result: a household scale that reads the true weight even when the food is put on one edge of the platform, because the dial is driven from the point midway between the two springs. It goes together from three units: case, weighing works and platform.
Source: M. H. Hansen (Hanson Scale Co.), US Patent 2,145,480 (1939). Unknown: the sheet metal and its sizes, the springs, the capacity and how the dial is marked. Picture: patent drawing.
Avanzato
3 days
Istruzioni
1
1
Make the case and fit the dial
Make the case and fit the dial
Bend sheet metal into a U: a front wall and two side walls, the lower edges flared outward to stand steady, open at the top and back, with inturned flanges on the back edges. Cut a sector-shaped window in the front and glaze it. Fix a bracket across the side walls, and run the dial shaft from the front wall to the bracket. On the shaft goes the round dial, numbered on its face, and a pinion behind it. Fit a fixed pointer at the window. Not given: the metal, gauge and sizes, and how the dial is numbered.
Materiali per questo passaggio:
 Metallo sconosciuto1 foglio
 Lastra di vetro1 window
 Quadrante e lancetta della bilancia1 pezzo
 Pignone dentato1 pezzo
Strumenti necessari:
 Cesoie da lattoniere
 Set di pinze
 Dimensioni sconosciute
2
2
Build the guided plate on two springs
Build the guided plate on two springs
On a flat rear plate, pin two horizontal links: a lower rectangular one and an upper triangular one. Pin their front ends to an upright plate, which can now only move straight up and down. Hang the upright plate from two tension springs at its lower corners. Hook their tops to the arms of a U-shaped bracket pivoted on the rear plate. A bolt through the rear plate, with a compression spring and a nut, swings the bracket to set the zero.
Materiali per questo passaggio:
Metallo sconosciuto1 foglio Spilli1 set
 Molla di trazione2 pezzi
 Set di molle di compressione1 one spring
 Viti da metallo1 zero bolt
 Dado esagonale1 pezzo
Strumenti necessari:
Cesoie da lattoniereSet di pinzeDimensioni sconosciute3
3
Drive the dial from the middle
Drive the dial from the middle
Pivot an arm on the rear plate and join it by a short link to the upright plate at the pin midway between the two springs. If food sits off-centre, the platform tips and one spring stretches more, but the middle point moves by the average, so the arm gives the true weight. Pass the arm through a hole in the upright plate. Pin it to a curved rack cut in one piece with its extension, so a loose arm cannot skew the rack. The rack will mesh with the dial pinion.
Materiali per questo passaggio:
Metallo sconosciuto1 foglioSpilli1 setStrumenti necessari:
Cesoie da lattoniereSet di pinze4
4
Make the platform
Make the platform
Cut a rectangular sheet-metal platform with a flange turned down all round. Make the flange clear the case walls, so a tipped platform cannot rub and dirt stays out. Rivet a U-shaped bracket under it. Its two arms end in slotted hooks that drop into openings in the upright plate, held by its flanges so the platform cannot tilt on it.
Materiali per questo passaggio:
Metallo sconosciuto1 foglio Rivetti in acciaio1 a few
Strumenti necessari:
Cesoie da lattoniereSet di pinze5
5
Assemble and set the zero
Assemble and set the zero
Lower the weighing works into the case through the open top: the rack drops into mesh with the dial pinion. Screw the rear plate to the case flanges. Hook the platform on. With the platform empty, turn the zero nut until the zero on the dial stands at the pointer. Turn it again later if the springs stretch. Ours: check the reading with a known weight.
Materiali per questo passaggio:
Viti da metallo1 rear plate screwsStrumenti necessari:
 Set di cacciaviti
 Peso
Materiali
10- 1 foglioSegnaposto
- 1 windowSegnaposto
- Segnaposto
- 1 pezzoSegnaposto
- 2 setSegnaposto
- 2 pezziSegnaposto
- 1 one springSegnaposto
- 1 rear plate screwsSegnaposto
- 1 pezzoSegnaposto
- 1 a fewSegnaposto
Materiali dei progetti collegati
Questo progetto realizza
Blueprint correlati
Questi blueprint condividono conoscenze — tecniche, materiali o principi
CC0 Pubblico dominio
Questo progetto è rilasciato sotto CC0. Sei libero di copiare, modificare, distribuire e utilizzare quest'opera per qualsiasi scopo, senza chiedere permesso.
Supporta il Maker acquistando prodotti tramite il suo progetto dove guadagna una Commissione Maker stabilita dai venditori, oppure crea una nuova iterazione di questo progetto e includilo come collegamento nel tuo progetto per condividere i ricavi.