Collaborazione
ARTE
BELLEZZA E BENESSERE
MESTIERE
CULTURA E STORIA
DIVERTIMENTO
AMBIENTE
CIBO E BEVANDE
INGEGNERIA INVERSA
SCIENZE
SPORT
TECNOLOGIA
INDOSSABILI
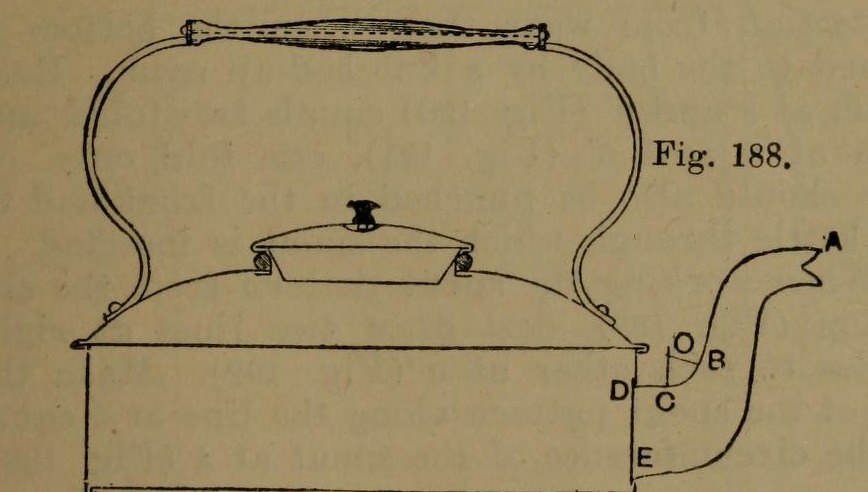


Stovetop Kettle: a Square Copper Kettle (Hasluck, 1907)
A tinsmith's square kettle in sheet copper, 9 x 9 in and 3 5/8 in deep: a box body with folded corner seams, a hollowed top pened on, a brazed and bent spout, a small cover, and a wooden handle on brass uprights.
Hasluck prefers copper; tinplate also works and is a separate route.
Source: Paul N. Hasluck, Tinplate Work (1907), pp. 91-98. Unknown: copper gauge, solder. Picture: Figs. 188-189 of the book.
Avanzato
Unknown
Istruzioni
1
1
Cut the patterns
Cut the patterns
For a body 9 x 9 x 3 5/8 in, cut two ends 9 1/2 x 4 in and two sides 9 1/4 x 4 in, notched for box seams at the corners (Figs. 190-191), with allowances to fold at top and bottom. Punch the spout hole in the front. Cut the bottom 9 1/2 in square, notched for a 1/4 in edge. Set out the top as a 10 1/2 in square with curved allowances for hollowing and a 4 in circle for the cover hole (Fig. 193); set out the spout from the elevation (Fig. 192), the cover and its cone-shaped rim (Figs. 194-195).
Materiali per questo passaggio:
 Lamiera di rame1 body, bottom, top, spout, cover
Strumenti necessari:
 Compasso a punte fisse
 Punta da tracciare
 Cesoie da lattoniere
2
2
Braze and shape the spout
Braze and shape the spout
Thin the long edges by hammering. Set in the throat with a stretching hammer on a beak iron, bend the spout round until the edges overlap, bind it with wire, lay spelter and borax along the inside of the seam and braze it; then close and braze the under seam. Fill it with lead and bend the neck with a round-faced hammer on the hollowing block; file off spare spelter and smooth it. Run out the lead, throw off a seating round the large end, trim the top with snips and tin the inside.
Materiali per questo passaggio:
 Metallo sconosciuto1 spelter
 Stagno1 tinning
Strumenti necessari:
 Martello da spianare
 Picchetto
 Filo di ferro
 Borace in polvere
 Cannello per brasatura
 Piombo
 Schiumarola forata
 Blocco di legno duro
 Lima per metalliCesoie da lattoniere
3
3
Fold and seam the body
Fold and seam the body
Fold the top edges square, the front and back outwards and the sides likewise; fold the bottom edges right over inwards to take the bottom (Fig. 188). Hook each side's end over the front's and work the corner seam on a straight-edged tool (Figs. 198-199). Turn up the bottom's 1/4 in edge, push it edge-down into the bottom folds, and solder the bottom and seams.
Materiali per questo passaggio:
 Lega saldante stagno-piombo1 pezzo
Strumenti necessari:
 Mazzuolo di legnoPicchetto
 Saldatore elettrico
 Flussante
4
4
Hollow the top and make the cover
Hollow the top and make the cover
Hollow the top on the block: sink the four sides a little, hollow the corners with a bullet-faced hammer, flatten each side along the block edge, even the shoulder and smooth it all over. Pare the edges, mark the flange with an edging machine, set it down square with a hatchet stake and mallet, and take up an edge to fit over the body. Cut the cover hole with circular snips and fit a narrow wired rim, worked over inside. Make the cover: solder its cone rim to fit the wired rim, throw off a flange, hollow the cover disc and seam it on, and fix the knob.
Materiali per questo passaggio:
Filo di ferro1 rimLega saldante stagno-piombo1 pezzoMetallo sconosciuto1 cover knobStrumenti necessari:
Martello da spianareBlocco di legno duroPicchettoMazzuolo di legnoCesoie da lattoniereSaldatore elettricoFlussante5
5
Handle, top and spout
Handle, top and spout
Cut two handle uprights from stout brass or copper band (Fig. 196), drill them for rivets and for the spindle that carries the wooden handle, and bend them to shape. Rivet them to the top and solder over the rivet heads inside. Pene the top down onto the body and solder along each edge. Push the spout through its hole from inside until its large end butts against the front, and solder it strongly from inside.
Materiali per questo passaggio:
 Lamiera di ottone1 handle uprights
 Barra di ottone1 spindle
 Manico1 wood
 Rivetti di rame1 number not givenLega saldante stagno-piombo1 pezzo
Strumenti necessari:
 Trapano a mano
 Martello da ribattereMazzuolo di legnoSaldatore elettricoFlussante
Materiali
9- 1 body, bottom, top, spout, coverSegnaposto
- 1 cover knobSegnaposto
- 1 tinningSegnaposto
- 3 pezziSegnaposto
- 1 rimSegnaposto
- 1 handle uprightsSegnaposto
- 1 spindleSegnaposto
- 1 woodSegnaposto
- 1 number not givenSegnaposto
Strumenti richiesti
17- Segnaposto
- Segnaposto
- Segnaposto
- Segnaposto
- Segnaposto
- Segnaposto
- Segnaposto
- Segnaposto
- Segnaposto
- Segnaposto
- Segnaposto
- Segnaposto
- Segnaposto
- Segnaposto
- Segnaposto
- Segnaposto
- Segnaposto
Materiali dei progetti collegati


Questo progetto realizza

CC0 Pubblico dominio
Questo progetto è rilasciato sotto CC0. Sei libero di copiare, modificare, distribuire e utilizzare quest'opera per qualsiasi scopo, senza chiedere permesso.
Supporta il Maker acquistando prodotti tramite il suo progetto dove guadagna una Commissione Maker stabilita dai venditori, oppure crea una nuova iterazione di questo progetto e includilo come collegamento nel tuo progetto per condividere i ricavi.