Collaborazione
ARTE
BELLEZZA E BENESSERE
MESTIERE
CULTURA E STORIA
DIVERTIMENTO
AMBIENTE
CIBO E BEVANDE
INGEGNERIA INVERSA
SCIENZE
SPORT
TECNOLOGIA
INDOSSABILI
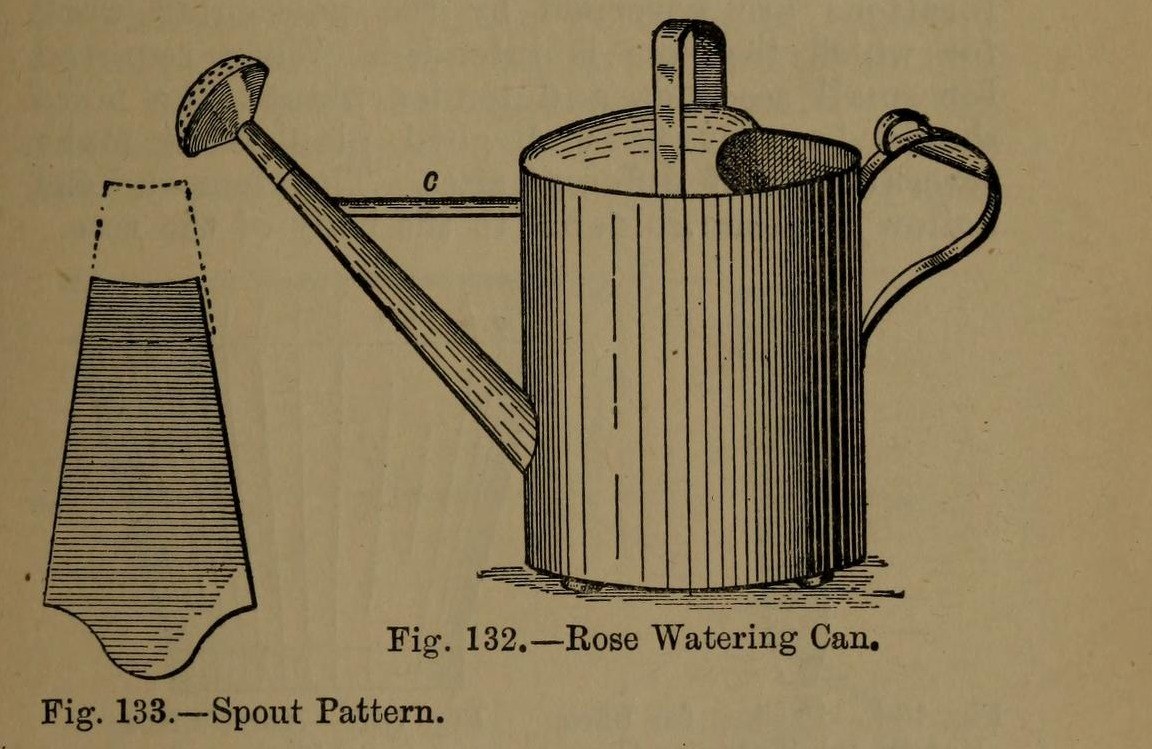


Watering Can: the Tinplate Rose Watering-Can (Hasluck, 1907)
A tinsmith's garden watering can: a round body from one sheet 2 ft 1 in x 8 1/2 in, a two-piece spout with a perforated rose, a hollowed top with a cross handle, and a back handle with a thumb ring. Tinplate or galvanised iron.
Variable: the rose. Its pattern diameter is the rose diameter x 4 / 3; finer holes for seedlings.
Source: Paul N. Hasluck, Tinplate Work (1907), pp. 54-57. Unknown: solder. Picture: Figs. 132-135 of the book.
Intermedio
Unknown
Istruzioni
1
1
Make the body and bottom
Make the body and bottom
Cut a sheet 2 ft 1 in by 8 1/2 in. Wire one edge, sink it in the crease iron, round it and groove the seam; solder the seam inside. Cut the spout hole opposite the seam, 2 1/2 in from the bottom. Edge the bottom to fit, beat it up and solder it from inside.
Materiali per questo passaggio:
 Lamiera di latta1 body, bottom
 Filo di ferro1 edge
 Lega saldante stagno-piombo1 pezzo
Strumenti necessari:
 Cesoie da lattoniere
 Picchetto
 Mazzuolo di legno
 Saldatore elettrico
 Flussante
2
2
Make and fit the spout
Make and fit the spout
Cut the spout in two pieces (Fig. 133), bend them to shape and solder the seams. Solder the larger piece into the body. Make it longer for plants out of reach, with an elbow for plants up high. Make the stay: a taper strip as long as the gap between can and spout, bent to a half-round section and soldered in.
Materiali per questo passaggio:
Lamiera di latta1 spout, stayLega saldante stagno-piombo1 pezzoStrumenti necessari:
Cesoie da lattonierePicchettoSaldatore elettricoFlussante3
3
Make the rose
Make the rose
Set out the rose body (Fig. 135): its diameter is the rose diameter x 4 / 3, so a 3 in rose needs a 4 in pattern, with lines a b at right angles. Bend it over a funnel stake and solder the seam. Hollow a disc for the front, with edges for capping on. Inside the hollow, mark circles and pierce them at intervals with a bradawl over a hard wood block; very fine for seedlings. Solder front and stem to the rose body. Several roses of different sizes are useful.
Materiali per questo passaggio:
Lamiera di latta1 roseLega saldante stagno-piombo1 pezzoStrumenti necessari:
 Compasso a punte fisseCesoie da lattonierePicchetto
 Martello da spianare
 Punteruolo
 Blocco di legno duroSaldatore elettricoFlussante
4
4
Fit the top and handles
Fit the top and handles
Hollow the top (Fig. 134), fit it to the body, wire its inner arc and solder it on. Cross handle: a strip about 1 3/4 in wide, wired with No. 12 B.W.G., bent to shape; cut two holes in the top with a small sharp chisel and solder the ends inside and on top. Back handle (Fig. 136): wire and bend it, solder a small boss under its upper part, and solder it opposite the spout with a thumb ring at the top. Solder three small hollowed studs under the bottom.
Materiali per questo passaggio:
Lamiera di latta1 top, handles, studsFilo di ferro1 No. 12 B.W.G.Lega saldante stagno-piombo1 pezzoStrumenti necessari:
Cesoie da lattoniereMartello da spianare Scalpello d'acciaioSaldatore elettricoFlussante
5
5
Clean and paint
Clean and paint
Clean with turpentine and whiting. Give two good coats of paint: red inside and green outside suit it.
Materiali per questo passaggio:
 Colore a olio2 coats
Strumenti necessari:
 Trementina
 Carbonato di calcio (bianco di Spagna)
Materiali
4- 1 top, handles, studsSegnaposto
- 1 No. 12 B.W.G.Segnaposto
- 4 pezziSegnaposto
- 2 coatsSegnaposto
Strumenti richiesti
12- Segnaposto
- Segnaposto
- Segnaposto
- Segnaposto
- Segnaposto
- Segnaposto
- Segnaposto
- Segnaposto
- Segnaposto
- Segnaposto
- Segnaposto
- Segnaposto
Materiali dei progetti collegati



Questo progetto realizza

CC0 Pubblico dominio
Questo progetto è rilasciato sotto CC0. Sei libero di copiare, modificare, distribuire e utilizzare quest'opera per qualsiasi scopo, senza chiedere permesso.
Supporta il Maker acquistando prodotti tramite il suo progetto dove guadagna una Commissione Maker stabilita dai venditori, oppure crea una nuova iterazione di questo progetto e includilo come collegamento nel tuo progetto per condividere i ricavi.