コラボレーション
アート
美容とウェルネス
工芸
文化と歴史
エンターテインメント
環境
食品と飲料
リバースエンジニアリング
科学
スポーツ
テクノロジー
ウェアラブル
English


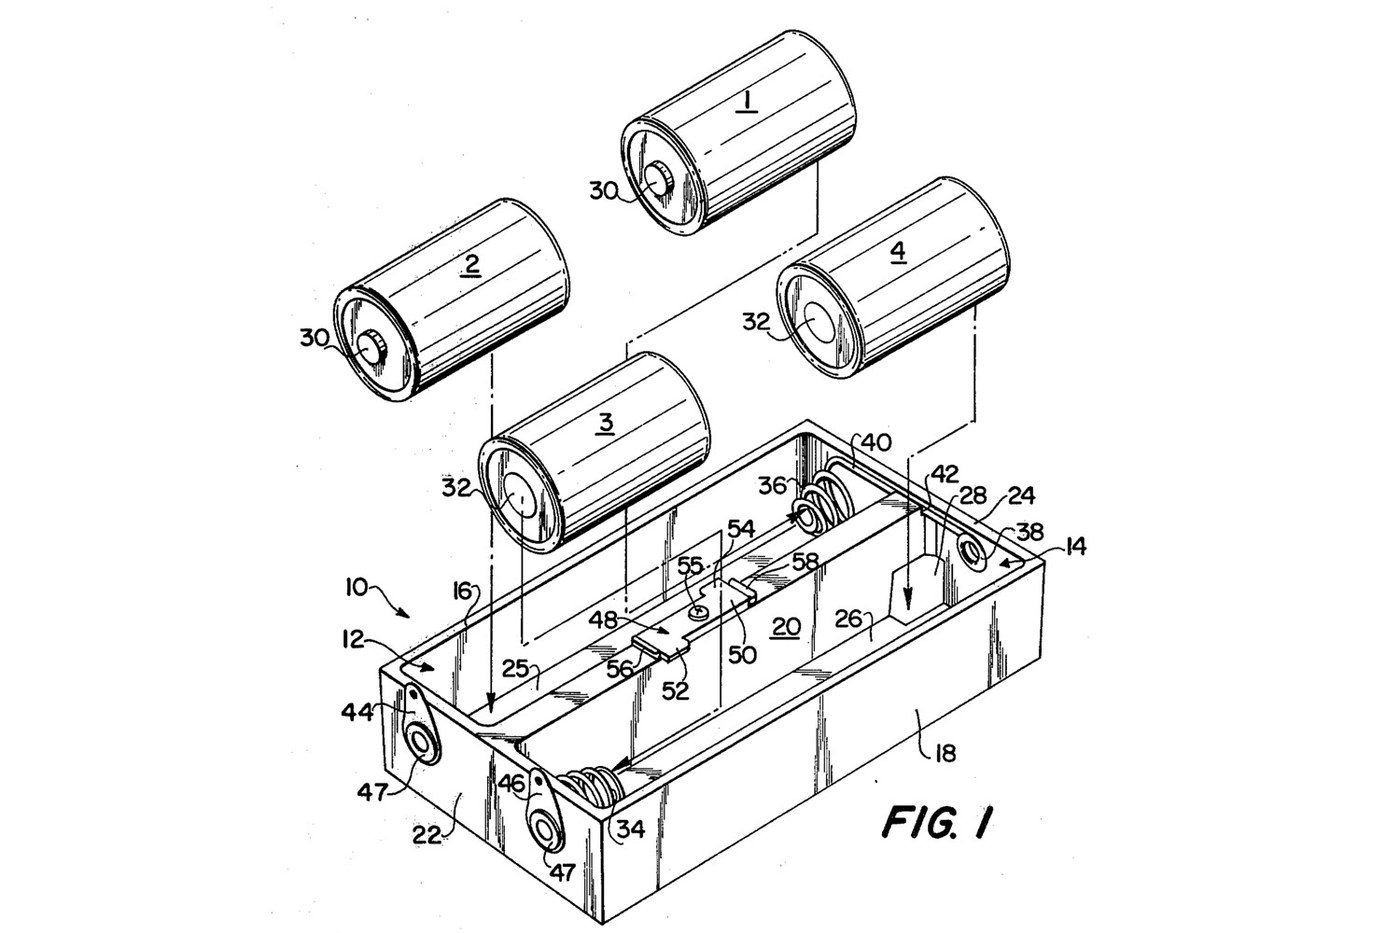
Battery Holder: Four C Cells in Two Sprung Compartments with a Z-Shaped Retainer (Lund 1979)
A tray for four C cells in series, made for an instrument that gets knocked about. Each compartment holds two cells end to end, pressed together by a cone-shaped coil spring. The cells can shift a little under a blow and spring back without losing contact. A small Z-shaped retainer holds down one cell in each row and still lets every cell be taken out.
Source: John Lund, US 4,161,568 (Schonstedt Instrument Co., 1979), with all sizes. Unknown: the plastic, the metals and the spring wire size. Lund names none of them, and nothing makes a self-tapping screw yet, so these are linked to unknown heads. The tools are ours. Picture: the patent's Fig. 1.
中級者
1 day
手順
1
1
Mould the tray
Mould the tray
Mould a tray 4.325 × 2.500 × 0.875 in (109.9 × 63.5 × 22.2 mm) with two parallel open-top compartments, each 4.125 in long, 1.025 in wide and 0.800 in deep inside (104.8 × 26.0 × 20.3 mm). The middle wall is 0.300 in (7.6 mm) thick, with a notch at one end. Mould two small abutments on the middle wall, 1.000 in (25.4 mm) apart. Unknown: the plastic.
このステップの材料:
 不明な絶縁材料1 as required
必要な工具:
 圧縮成形金型
 ノギス
2
2
Wind the two spring contacts
Wind the two spring contacts
Wind two cone-shaped coil springs: 0.562 in (14.3 mm) outside diameter at the large end, 0.312 in (7.9 mm) inside at the small end, 1/2 in (12.7 mm) long free, closing to 1/8 in (3.2 mm). Each has three active turns, and the end turns are wound flat. Leave one spring with a long straight tail. Unknown: the metal and the wire size.
このステップの材料:
 不明な金属1 as required
必要な工具:
 丸口ペンチ
 平やっとこノギス
3
3
Fit the contacts and terminals
Fit the contacts and terminals
Put one spring at the far end of the first compartment, with its straight tail, and the other at the near end of the second. Set an eyelet contact in the end wall opposite each spring. Run the tail through the notch in the middle wall to the eyelet contact at the far end of the second compartment. Fix two terminals to the near end wall with eyelets, each holding its contact.
このステップの材料:
不明な金属1 as required必要な工具:
 金切りばさみ平やっとこ
 手やすり
4
4
Make and fix the retainer
Make and fix the retainer
Cut a flat Z-shaped retainer of plastic, 0.062 in (1.6 mm) thick and 0.980 in (24.9 mm) long. It is 0.430 in (10.9 mm) wide at each branched end. Each branch sticks out 0.130 in (3.3 mm) from the stem and runs 0.365 in (9.3 mm) along it. Screw it with a single self-tapping screw through the middle of the stem onto the top of the middle wall, between the abutments, so it cannot turn. Each branch reaches over one compartment.
このステップの材料:
不明な絶縁材料1 as required タッピンねじ1 pc
必要な工具:
金切りばさみ手やすり ドライバーセットノギス
5
5
Wire it
Wire it
Solder lead wires to the two terminals. With the cells in, the four make one series supply between these terminals.
このステップの材料:
 接続用電線1 as required
 はんだ線1 as required
必要な工具:
 はんだごて
6
6
Load the cells
Load the cells
Put cell 1 into the free end of the first compartment, slide it along under the retainer until it meets the spring, then drop cell 2 in behind it, pressing the spring a little. Load the second compartment from its other end the same way. To unload, lift out the two free cells, then slide the held cells along into their places and lift them out. Ours: check the voltage across the terminals with a meter.
必要な工具:
 マルチメーター
材料
5- 1 as requiredプレースホルダー
- 1 as requiredプレースホルダー
- 1 pcプレースホルダー
- 1 as requiredプレースホルダー
- 1 as requiredプレースホルダー
この設計図で作るもの

関連ブループリント
これらのブループリントは知識を共有しています — 技術、材料、原理

CC0 パブリックドメイン
このブループリントはCC0で公開されています。許可を求めずに、自由にコピー、修正、配布、あらゆる目的で使用できます。
メイカーを応援するには、ブループリント経由で製品を購入してください。メイカーには メイカーコミッション がベンダーにより設定されています。または、このブループリントの新しいイテレーションを作成し、自分のブループリントにコネクションとして含めて収益を共有できます。