コラボレーション
アート
美容とウェルネス
工芸
文化と歴史
エンターテインメント
環境
食品と飲料
リバースエンジニアリング
科学
スポーツ
テクノロジー
ウェアラブル
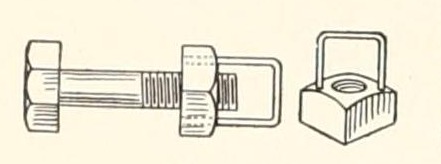


Wing Nut from an Ordinary Nut and a Riveted Wire Staple (Boy Mechanic, 1915)
A thumb-turned nut of any size you need: drill through two opposite corners of an ordinary nut and rivet in a wire staple that stands up as a handle, high enough to clear the bolt end.
初心者
Twenty minutes each
手順
1
1
Read the Boy Mechanic
Read the Boy Mechanic
"A hole was drilled through opposite corners of each nut and a staple made of wire riveted in the holes."
2
2
Drill the corners
Drill the corners
Hold the nut in a vise and drill a small hole through each of two opposite corners, parallel to the bolt hole. (His sketch shows a square nut; using a hex nut is ours.)
このステップの材料:
 六角ナット1 個
必要な工具:
 万力(ベンチバイス)
 ハンドドリル
3
3
Bend the staple
Bend the staple
Bend a piece of stiff wire into a U-shaped staple whose legs fit the holes and whose loop stands high enough to clear the end of the bolt.
このステップの材料:
 鉄の針金1 個
必要な工具:
 平やっとこ
 金切りのこ(ハクソー)
4
4
Rivet it
Rivet it
Push the staple legs through the holes and rivet the ends over on the underside of the nut.
必要な工具:
 ハンマー万力(ベンチバイス)
5
5
Troubleshooting
Troubleshooting
Wing nut troubleshooting.
Flow
Loading...
6
6
History and honest limits
History and honest limits
From **The Boy Mechanic, Book 2** (Popular Mechanics, 1915), p. 182, by Clarence L. Orcutt (checked on the archive.org scan boymechanicbook200chic2). No sizes are given; the tools are ours.
この設計図で作るもの
関連ブループリント
これらのブループリントは知識を共有しています — 技術、材料、原理
CC0 パブリックドメイン
このブループリントはCC0で公開されています。許可を求めずに、自由にコピー、修正、配布、あらゆる目的で使用できます。
メイカーを応援するには、ブループリント経由で製品を購入してください。メイカーには メイカーコミッション がベンダーにより設定されています。または、このブループリントの新しいイテレーションを作成し、自分のブループリントにコネクションとして含めて収益を共有できます。