សិល្បៈ
សម្រស់ និង សុខុមាលភាព
សិប្បកម្ម
វប្បធម៌ និង ប្រវត្តិសាស្ត្រ
ការកម្សាន្ត
បរិស្ថាន
ម្ហូប និង ភេសជ្ជៈ
អនាគតបៃតង
វិស្វកម្មបញ្ច្រាស
វិទ្យាសាស្ត្រ
កីឡា
បច្ចេកវិទ្យា
ប្រដាប់ដែលស្លៀក

مترجم
BLUEPRINT NFT

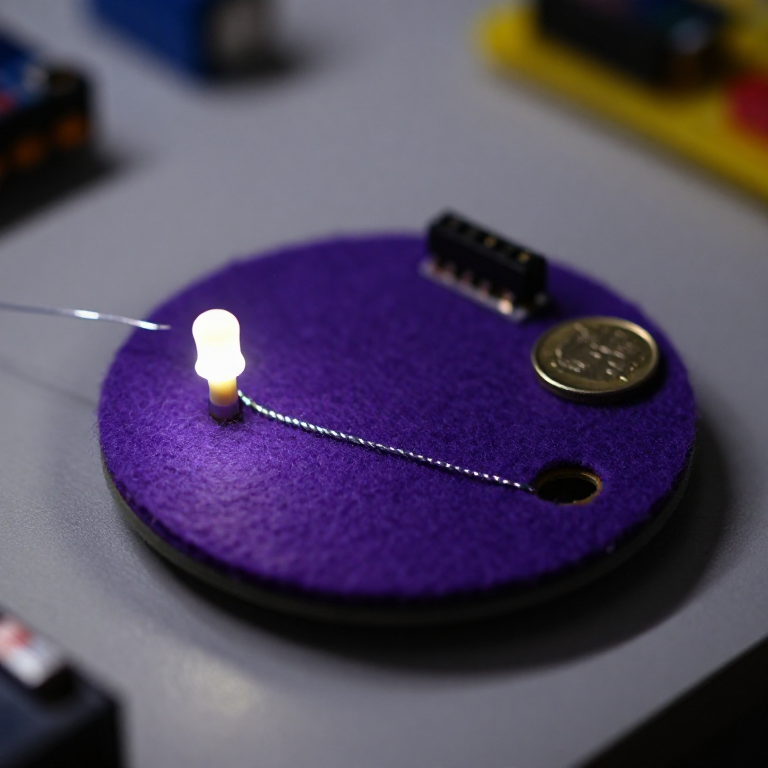
ពន្លឺងីក LED — គម្រោងលើកដំបូងរបស់អ្នក Arduino
គម្រោងអេឡិকត្រូនិចលើកដំបូងដែលបង្ហាញឆ្នាំបង្វិល! សាងសង់សៀគ្វី LED ដែលងីក ដោយប្រើ Arduino ក្តារលាក់ រេស៊ីស្តង់ និង LED តែមួយ។ ល្អឥតខ្ចោះសម្រាប់អ្នកចាប់ផ្តើមដំបូង — មិនចាំបាច់ថែម។
ការណែនាំ
1
1
စုဆည်းရန် သင်၏ အစိတ်အပိုင်းများ
စုဆည်းရန် သင်၏ အစိတ်အပိုင်းများ
အောက်တွင် စာရင်းပြုစုထားသော အစိတ်အပိုင်းများအားလုံးကို စုဆည်းပါ။ ကြေးဝါချိတ်ဆက်ရန် မလိုအပ်ပါ — အရာအားလုံးသည် breadboard သို့ ချိတ်ဆက်သည်။
Materials for this step:
 SparkFun Inventor's Kit - V3.21 kit
Arduino Uno R31 piece
5mm LED (any color)1 piece
 220 ohm Resistor (1/4W)1 piece
Breadboard1 piece
Jumper Wires (Male-to-Male)2 pieces
USB-B Cable1 piece
Tools needed:
Computer with Arduino IDE
2
2
ដ្យាក្រាម Circuit
ដ្យាក្រាម Circuit
សញ្ញាលំហូរពី Arduino Pin 13 → 저항 220Ω (R1) → LED (D1) → GND។ 저항កំដlimit លក្ខណៈចរន្តដើម្បីការពារ LED។
Materials for this step:
Arduino Uno R31 piece
5mm LED (any color)1 piece
220 ohm Resistor (1/4W)1 piece3
3
ភ្ជាប់វាឡើង
ភ្ជាប់វាឡើង
- ដាក់ LED ទៅក្នុង breadboard — ជើងវែង (anode +) នៅក្នុងជួរមួយ ជើងខ្លី (cathode −) នៅក្នុងជួរបន្ទាប់។
- ដាក់ជើងមួយនៃ 220Ω resistor ទៅក្នុងជួរដូចគ្នាទៅនឹង LED cathode។ ជើងផ្សេងទៀតនៅក្នុងជួរផ្សេង។
- Jumper wire ពី LED anode row → Arduino Pin 13។
- Jumper wire ពី resistor free row → Arduino GND។
Materials for this step:
5mm LED (any color)1 piece
220 ohm Resistor (1/4W)1 pieceBreadboard1 piece
Jumper Wires (Male-to-Male)2 pieces
4
4
បញ្ជូលកូដ Blink
បញ្ជូលកូដ Blink
ភ្ជាប់ Arduino តាម USB។ បើក Arduino IDE ជ្រើសរើស Tools → Board → Arduino Uno បិទភ្ជាប់កូដ ហើយចុច Upload។
blink.inoarduino
Materials for this step:
Arduino Uno R31 piece
USB-B Cable1 piece
Tools needed:
Computer with Arduino IDE
5
5
PCB ប្លង់គម្រោង (ឯកសារយោង)
PCB ប្លង់គម្រោង (ឯកសារយោង)
នេះបង្ហាញពីសៀគ្វីជាប្លង់គម្រោង PCB។ មិនចាំបាច់សម្រាប់គម្រោងនេះទេ — ក្តារ breadboard ដំណើរការល្អឥតខ្ចោះ — ប៉ុន្តែបង្ហាញថាវិលដូចគ្នានឹងមើលទៅដូចម្តេចប្រសិនបើផលិតជាក្តារពិតប្រាកដ។
6
6
សាកល្បង និងការពិសោធន៍
សាកល្បង និងការពិសោធន៍
LED ងើប? សូមស្វាគមន៍! អ្នកទើបតែសរសេរកម្មវិធីសម្ភារៈ។
ការដោះស្រាយបញ្ហា:
ការពិសោធន៍បន្ទាប់:
ការដោះស្រាយបញ្ហា:
- LED មិនឆេះទេ? ដាក់ LED ឡើងវិញ — ជើងវែងឆ្ពោះទៅ Pin 13។
- LED នៅបើក? ពិនិត្យមើលថាកូដបានផ្ទុកដោយជោគជ័យ។
- គ្មានអ្វីកើតឡើងទេ? ផ្ទៀងផ្ទាត់ថាការភ្ជាប់ខ្សែស្របគ្នាជាមួយដ្យាក្រាមក្នុងជំហានទី 2។
ការពិសោធន៍បន្ទាប់:
- ផ្លាស់ប្តូរតម្លៃ
delay()ដើម្បីគ្រប់គ្រងល្បឿនងើប - បន្ថែម LED ទីពីរលើ Pin 12
- ជំនួសដោយ RGB LED (មើល SIK Circuit 3)
សម្ភារៈ
7- $105.00
- កន្លែងទុក
Estimated Total
$105.00Related blueprints
Other builds that share materials, tools, or techniques with this one.

Using a Shift Register — SIK Circuit 14electronics/active
Blinking an LED with LilyPad Arduinoelectronics

Making Charcoal — The First Chemical Processmaterials

The Spinning Jenny — Multi-Spindle Yarn Productiontextiles

Starting Seeds Indoors — Raising Seedlings for a Head Start

Driving a Motor — SIK Circuit 12electronics/electromech
CC0 សាធារណៈ
ប្លង់នេះត្រូវបានចេញផ្សាយក្រោម CC0។ អ្នកមានសិទ្ធិចម្លង កែប្រែ ចែកចាយ និងប្រើប្រាស់ដោយមិនចាំបាច់សុំអនុញ្ញាត។
គាំទ្រអ្នកបង្កើតដោយទិញផលិតផលតាមរយៈប្លង់របស់ពួកគេ ដែលពួកគេទទួលបាន កម្រៃជើងសារអ្នកបង្កើត កំណត់ដោយអ្នកលក់ ឬបង្កើតកំណែថ្មីនៃប្លង់នេះ ហើយបញ្ចូលជាការតភ្ជាប់ក្នុងប្លង់របស់អ្នកដើម្បីចែករំលែកចំណូល។