កិច្ចសហប្រតិបត្តិការ
សិល្បៈ
សម្រស់ និង សុខុមាលភាព
សិប្បកម្ម
វប្បធម៌ និង ប្រវត្តិសាស្ត្រ
ការកម្សាន្ត
បរិស្ថាន
ម្ហូប និង ភេសជ្ជៈ
វិស្វកម្មបញ្ច្រាស
វិទ្យាសាស្ត្រ
កីឡា
បច្ចេកវិទ្យា
ប្រដាប់ដែលស្លៀក
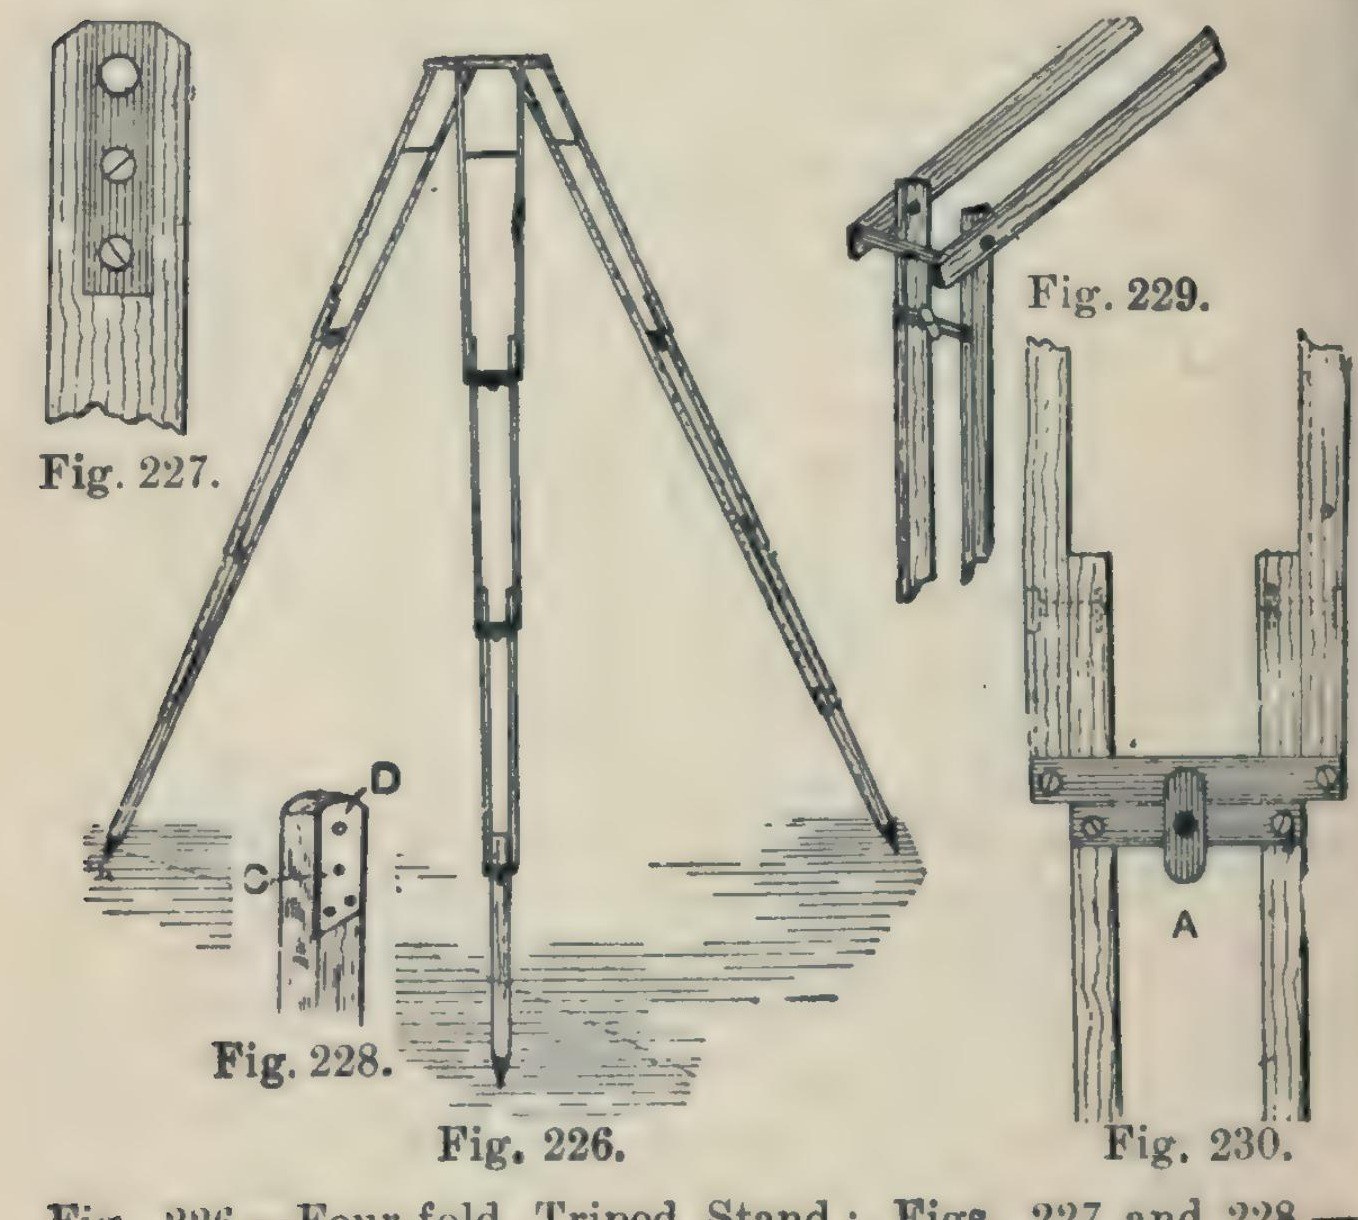


Camera Tripod: a Four-Fold Ash Tripod Stand (Hasluck, 1902)
A light, compact folding camera stand: three legs, each of seven ash laths riveted so it folds in four, locked open by brass buttons, on a triangular ash top with brass pins and a hole for the camera screw.
Hasluck says the same method makes stands that fold in three or two.
Source: Paul N. Hasluck, Photographic Cameras and Accessories (1902), pp. 153-157. Picture: Figs. 226-230 of the book.
មធ្យម
Unknown
ការណែនាំ
1
1
Cut the ash laths
Cut the ash laths
Cut laths of good ash, true and square or the stand won't be rigid, and round the edges slightly: six 17 1/4 x 5/8 x 3/8 in, six 16 x 5/8 x 3/8 in, six 15 1/2 x 5/8 x 3/8 in, and three 14 x 5/8 x 5/8 in.
សម្ភារៈសម្រាប់ជំហាននេះ៖
 ក្តារឈើអាស1 21 laths
ឧបករណ៍ដែលត្រូវការ៖
 រណារមានសន្លឹកខ្នង
 រនាតូច
2
2
Fit the top ends and stretcher
Fit the top ends and stretcher
On each 17 1/4 in lath let in flush a 1/16 in brass plate, 1 1/4 in long, with a 3/16 in hole 1/4 in from the top, held by two countersunk brass screws; bore the wood to match and take off the top corners. On one lath of each pair cut a groove inside, about 3/16 in deep and 3 1/2 in long, starting 2 in from the top, and hinge a 1/8 in brass rod stretcher in it on a pin. On the other lath cut a curved groove 1 1/2 in long, 3/16 in wide, with a small hole at the bottom where the rod catches.
សម្ភារៈសម្រាប់ជំហាននេះ៖
 សន្លឹកស្ពាន់លឿង1 1/16 in plates
 វីសឈើ1 small brass screws
 ដុំស្ពាន់លឿង1 1/8 in stretcher
ឧបករណ៍ដែលត្រូវការ៖
 ស៊ុមរណារកាត់ដែក និងស្លាបព្រិល
 ដែកឆាបលោហៈ
 ស្វានដៃ
 ដែកឆូតឈើ
 ទួណឺវីសមុខរាបស្មើ
3
3
Bore and rivet the legs
Bore and rivet the legs
Bore the rivet holes: in the long laths 1 3/4 in from the lower end, counterbored so the copper rivet head sits flush, then 1/8 in through; in the 16 in and 15 1/2 in laths 1/2 in and 1 3/4 in from the ends; in each 14 in piece 1/2 in from one end, and taper its other end for a pointed iron shoe or a steel point and ferrule. Rivet the 21 laths into three legs with 1/8 in copper rivets and washers: a 16 in lath inside each 17 1/4 in one, a 15 1/2 in lath inside that, the 14 in foot between the last pair. Rivets flush, just tight enough to fold but not loose.
សម្ភារៈសម្រាប់ជំហាននេះ៖
 គោលរីវេតស្ពាន់1 1/8 in, with washers
 លោហៈមិនស្គាល់3 iron shoes or steel points
ឧបករណ៍ដែលត្រូវការ៖
 ស្វាន់ដៃវិលមានក្បាលស្វានដៃ
 ញញួរគោលរីវេត
4
4
Add cross strips and lock buttons
Add cross strips and lock buttons
Screw 1/16 in brass strips across the bottom ends of each pair of laths (Fig. 229). Under them screw strips carrying a small brass button riveted at the centre; turned, the button hooks over the strip above and locks the joint open (Fig. 230).
សម្ភារៈសម្រាប់ជំហាននេះ៖
សន្លឹកស្ពាន់លឿង1 cross strips, buttonsវីសឈើ1 ដុំឧបករណ៍ដែលត្រូវការ៖
ស៊ុមរណារកាត់ដែក និងស្លាបព្រិលដែកឆាបលោហៈទួណឺវីសមុខរាបស្មើញញួរគោលរីវេត5
5
Make the top
Make the top
Plane ash to 1/2 in and draw an equilateral triangle with 8 1/2 in sides. Bisect the angles; 2 in from each corner draw a line at right angles, go 1/2 in in along the sides, and mark three rectangles 2 7/8 x 3/4 in; cut the outline (Fig. 231). Fix a 3/16 in brass rod, one end tapered, across each rectangle, bored 3/8 in from the outer edge and projecting about 1/2 in, for the legs to hang on. Bore a 1/4 in hole in the centre for the camera screw and glue felt on top.
សម្ភារៈសម្រាប់ជំហាននេះ៖
ក្តារឈើអាស1 topដុំស្ពាន់លឿង3 3/16 in pins សំពត់រោមចៀមសង្កត់1 ដុំ
 កាវសត្វ1 ដុំ
ឧបករណ៍ដែលត្រូវការ៖
រនាតូចរណារមានសន្លឹកខ្នងស្វាន់ដៃវិលមានក្បាលស្វានដៃ6
6
Finish
Finish
Glasspaper and varnish the wood, and lacquer the brass.
សម្ភារៈសម្រាប់ជំហាននេះ៖
 វ៉ានីសសែលឡាក់1 varnish
 សម្ភារៈមិនស្គាល់1 brass lacquer
ឧបករណ៍ដែលត្រូវការ៖
 ក្រដាសខាត់
សម្ភារៈ
10- 1 topកន្លែងទុក
- 1 cross strips, buttonsកន្លែងទុក
- 1 ដុំកន្លែងទុក
- 3 3/16 in pinsកន្លែងទុក
- 1 1/8 in, with washersកន្លែងទុក
- 3 iron shoes or steel pointsកន្លែងទុក
- 1 ដុំកន្លែងទុក
- 1 ដុំកន្លែងទុក
- 1 varnishកន្លែងទុក
- 1 brass lacquerកន្លែងទុក
ប្លង់នេះធ្វើ

CC0 សាធារណៈ
ប្លង់នេះត្រូវបានចេញផ្សាយក្រោម CC0។ អ្នកមានសិទ្ធិចម្លង កែប្រែ ចែកចាយ និងប្រើប្រាស់ដោយមិនចាំបាច់សុំអនុញ្ញាត។
គាំទ្រអ្នកបង្កើតដោយទិញផលិតផលតាមរយៈប្លង់របស់ពួកគេ ដែលពួកគេទទួលបាន កម្រៃជើងសារអ្នកបង្កើត កំណត់ដោយអ្នកលក់ ឬបង្កើតកំណែថ្មីនៃប្លង់នេះ ហើយបញ្ចូលជាការតភ្ជាប់ក្នុងប្លង់របស់អ្នកដើម្បីចែករំលែកចំណូល។