កិច្ចសហប្រតិបត្តិការ
សិល្បៈ
សម្រស់ និង សុខុមាលភាព
សិប្បកម្ម
វប្បធម៌ និង ប្រវត្តិសាស្ត្រ
ការកម្សាន្ត
បរិស្ថាន
ម្ហូប និង ភេសជ្ជៈ
វិស្វកម្មបញ្ច្រាស
វិទ្យាសាស្ត្រ
កីឡា
បច្ចេកវិទ្យា
ប្រដាប់ដែលស្លៀក
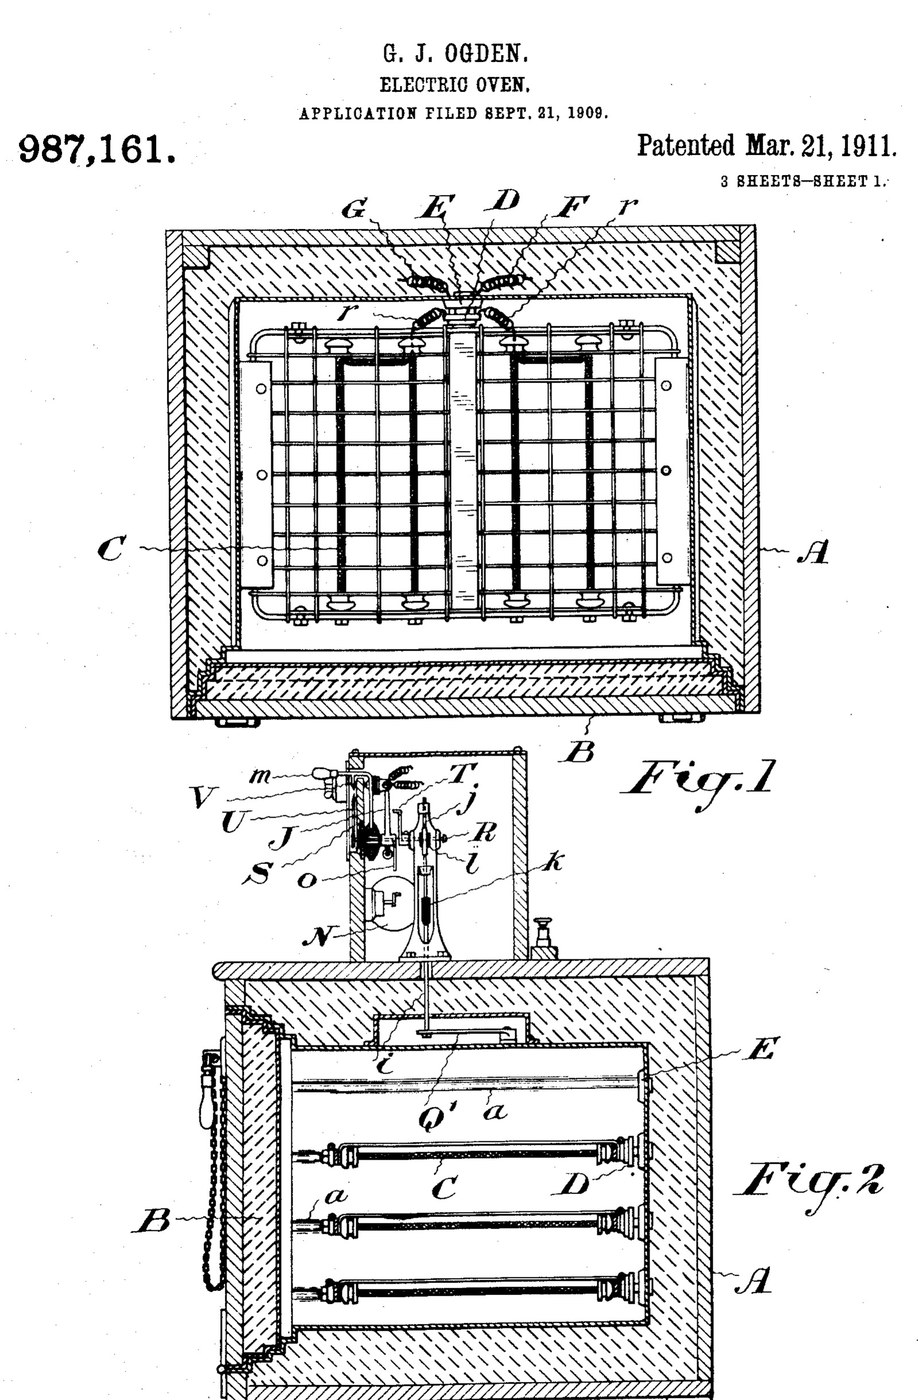


Oven: Insulated Electric Oven with Plug-In Grid Heaters and a Thermostat (Ogden, US 987,161, 1911)
An electric oven built to waste as little heat as possible: a double-walled, packed box with a packed door that seals like a strong-room door. Grid-shaped heating elements slide into grooves in the walls and plug into sockets at the back, and the food rests on them. A thermostat cuts the current when the set temperature is reached and switches it on again as the oven cools.
Result: an oven that bakes, roasts or dries at a set temperature with any number of heating grids.
Source: G. J. Ogden, US 987,161 (1911). Unknown: sizes, metals, packing and temperatures. Picture: the patent drawing.
កម្រិតខ្ពស់
Unknown
ការណែនាំ
1
1
Build the insulated casing and door
Build the insulated casing and door
Make the oven chamber as a double-walled casing with packing between the walls, and grooves on the inner side walls to take the heating grids. Fit a door that closes like a fire-proof vault door, also packed, so the casing seals closely. Ours: mild steel sheet. Not given: sizes, the packing.
សម្ភារៈសម្រាប់ជំហាននេះ៖
 សន្លឹកដែកថែបទន់1 inner and outer walls, door
 សម្ភារៈអ៊ីសូឡង់មិនស្គាល់1 packing
ឧបករណ៍ដែលត្រូវការ៖
 កន្ត្រៃកាត់សន្លឹកលោហៈ
 ម៉ាស៊ីនចោះឈរ
 វិមាត្រមិនស្គាល់
2
2
Make the plug-in heating grids
Make the plug-in heating grids
Make heating elements in the form of grids that slide into the grooves and on which the food can rest. Fix a porcelain plug to each, carrying spring fingers that push into a socket with matching spring fingers in the back wall. Wire the sockets so all the elements are in parallel; use as many as the temperature and amount of food need. Ours: nichrome wire. Not given: the element type.
សម្ភារៈសម្រាប់ជំហាននេះ៖
 ខ្សែនីក្រូម1 heating grids
 សម្ភារៈមិនស្គាល់1 porcelain plugs and sockets
 ខ្សែដែករនូត1 spring fingers
 ខ្សែតភ្ជាប់1 circuit wiring
ឧបករណ៍ដែលត្រូវការ៖
 ដែកផ្សារ
3
3
Fit the thermostat control
Fit the thermostat control
Put a thermostat that bends with heat inside the oven, working a contact finger that plays between two contacts a few degrees above and below the set temperature. A switch-changing device, a small rotary motor, throws the main switch off and on as the finger touches one contact or the other. Mount a setting arm with a pointer over a scale marked in degrees, and a second pointer driven by the thermostat. Add a hand switch to turn the current on or off independently, and a lamp with its own switch to light the oven. Ours: a bimetal strip, toggle switches. Not given: temperatures.
សម្ភារៈសម្រាប់ជំហាននេះ៖
 បន្ទះលោហៈពីរស្រទាប់1 thermostat
 ម៉ូទ័រអគ្គិសនី1 switch-changing motor
 កុងតាក់ដងបត់3 main, hand and lamp switches
 លោហៈមិនស្គាល់1 contacts, arm, scaleសម្ភារៈមិនស្គាល់1 incandescent oven lamp
ឧបករណ៍ដែលត្រូវការ៖
ដែកផ្សារ ទែម៉ូម៉ែត្រ
សម្ភារៈ
10- 1 inner and outer walls, doorកន្លែងទុក
- 1 packingកន្លែងទុក
- 1 heating gridsកន្លែងទុក
- 1 incandescent oven lampកន្លែងទុក
- 1 spring fingersកន្លែងទុក
- កន្លែងទុក
- 1 thermostatកន្លែងទុក
- 1 switch-changing motorកន្លែងទុក
- កន្លែងទុក
- 1 contacts, arm, scaleកន្លែងទុក
ឧបករណ៍ចាំបាច់
5- កន្លែងទុក
- កន្លែងទុក
- កន្លែងទុក
- 2 vendors sell this, none ship to you yetកន្លែងទុក
- កន្លែងទុក
សម្ភារៈប្លង់ដែលបានភ្ជាប់

ប្លង់នេះធ្វើ

CC0 សាធារណៈ
ប្លង់នេះត្រូវបានចេញផ្សាយក្រោម CC0។ អ្នកមានសិទ្ធិចម្លង កែប្រែ ចែកចាយ និងប្រើប្រាស់ដោយមិនចាំបាច់សុំអនុញ្ញាត។
គាំទ្រអ្នកបង្កើតដោយទិញផលិតផលតាមរយៈប្លង់របស់ពួកគេ ដែលពួកគេទទួលបាន កម្រៃជើងសារអ្នកបង្កើត កំណត់ដោយអ្នកលក់ ឬបង្កើតកំណែថ្មីនៃប្លង់នេះ ហើយបញ្ចូលជាការតភ្ជាប់ក្នុងប្លង់របស់អ្នកដើម្បីចែករំលែកចំណូល។