សិល្បៈ
សម្រស់ និង សុខុមាលភាព
សិប្បកម្ម
វប្បធម៌ និង ប្រវត្តិសាស្ត្រ
ការកម្សាន្ត
បរិស្ថាន
ម្ហូប និង ភេសជ្ជៈ
អនាគតបៃតង
វិស្វកម្មបញ្ច្រាស
វិទ្យាសាស្ត្រ
កីឡា
បច្ចេកវិទ្យា
ប្រដាប់ដែលស្លៀក
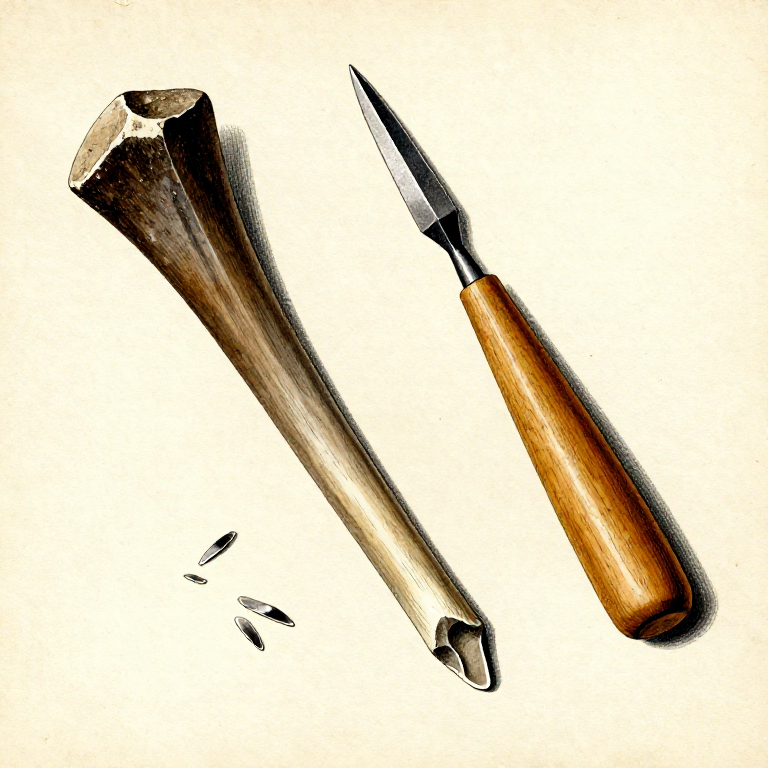
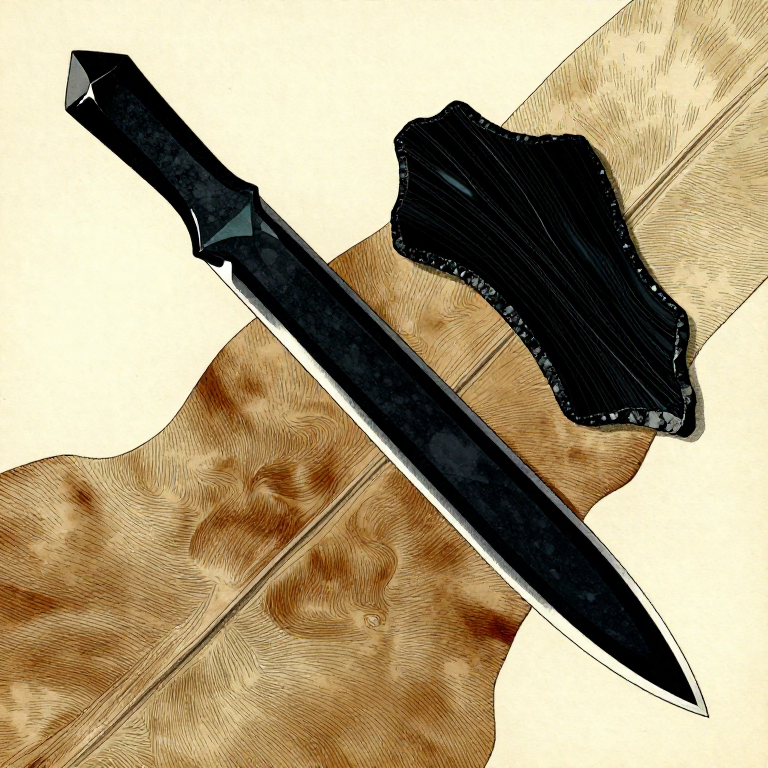
Making an Antler Pressure Flaker — Precision Flint-Knapping Tool
A pressure flaker is the precision tool of flint knapping — where a hammerstone removes large flakes by percussion, a pressure flaker removes small, controlled flakes by pressing against the stone edge. This allows the knapper to shape fine details: straight edges, notches for hafting, serrations, and the thin, even surfaces of advanced points and blades. The pressure flaker is typically made from an antler tine — the pointed tip of a deer or elk antler — which is hard enough to grip and push against flint but resilient enough not to shatter on contact. Antler has a unique combination of stiffness and toughness (collagen-mineralized composite) that makes it ideal for this controlled application of force. Every finely shaped stone tool in the archaeological record — from Solutrean laurel-leaf points to Clovis points — required a pressure flaker.
ចាប់ផ្តើម
1-2 hours
ការណែនាំ
1
1
Select an Antler Tine
Select an Antler Tine
Select an antler tine (the pointed branch tip) from a shed deer or elk antler, 10 to 15 cm long. Shed antlers found on the ground are ideal — they are naturally seasoned and strong. The tine must be solid, not spongy. Squeeze the tip: it should feel hard and dense, with no give. Elk antler tines are larger and more durable; deer tines are adequate for lighter work.
Materials for this step:
 Antler Baton1 piece
2
2
Cut the Tine from the Main Beam
Cut the Tine from the Main Beam
Cut the tine from the main antler beam using a flint blade and scoring technique. Score a deep groove around the circumference of the antler where the tine meets the beam, rotating the antler and cutting repeatedly in the same groove. Once scored deeply enough, snap the tine off by bending. Sawing with a flint blade is slow but effective.
3
3
Smooth the Cut End on Sandstone
Smooth the Cut End on Sandstone
Grind the cut end smooth and flat on wet sandstone. This is the palm rest — the end you press against with the heel of your hand when applying pressure. Remove all rough edges and sharp ridges from the cut. A flat, smooth palm rest distributes force comfortably and prevents the antler from digging into your hand during extended knapping sessions.
Tools needed:
 Sandstone (Abrasive)
4
4
Examine the Natural Point
Examine the Natural Point
Examine the natural point of the tine. It should be sturdy and slightly rounded, not needle-sharp. A needle-sharp point punctures into the stone edge rather than gripping and pushing a flake off. The ideal tip is like a blunt pencil point — rounded enough to grip the stone platform but pointed enough to concentrate force on a small area.
5
5
Blunt the Tip if Too Sharp
Blunt the Tip if Too Sharp
If the tip is too sharp and needle-like, blunt it slightly by grinding on sandstone. Remove just enough to create a small, rounded contact surface approximately 2 to 3 mm across. A rounded tip grips the stone edge by friction rather than piercing it, which gives the knapper better control over flake size and direction.
Tools needed:
Sandstone (Abrasive)6
6
Sharpen the Tip if Too Blunt
Sharpen the Tip if Too Blunt
If the tip is too blunt or flat, sharpen it slightly to a robust point on sandstone. The tip should come to a gentle point — not a flat face and not a needle. Rotate the tine against the sandstone to create a symmetrical, conical tip. Test by pressing against your thumbnail: the tip should indent the nail without slipping off.
Tools needed:
Sandstone (Abrasive)7
7
Optional: Haft into a Wooden Handle
Optional: Haft into a Wooden Handle
For better grip and leverage, haft the antler tine into a short wooden handle. Select a straight hardwood stick 10 to 15 cm long and drill or burn a socket into one end deep enough to seat the cut end of the tine. Fit the tine into the socket and bind with sinew or rawhide. A handle extends reach and provides a larger grip surface for sustained pressure work.
8
8
Prepare the Work Position
Prepare the Work Position
To use the pressure flaker, place the stone workpiece on a leather pad resting on your thigh. The leather protects your leg and prevents the stone from slipping. Hold the workpiece firmly with one hand, with the edge to be flaked extending slightly past the leather pad. The edge must be accessible to the flaker tip from below.
9
9
Apply the Pressure Flaker to the Stone Edge
Apply the Pressure Flaker to the Stone Edge
Press the antler tip against the platform edge of the stone at a downward angle, approximately 30 to 45 degrees from horizontal. The tip should contact the very edge of the stone, just behind the platform. Grip the flaker firmly in your dominant hand with the palm rest braced against the heel of your palm.
10
10
Detach a Flake by Steady Pressure
Detach a Flake by Steady Pressure
Apply steady inward and downward pressure until a small flake detaches from the opposite face of the stone. Do not strike or jab — the force must be slow, controlled, and continuous. You will feel the stone resist and then suddenly give as the flake pops off. The flake should be thin, flat, and extend across part of the stone face. If the tip slips without detaching a flake, the platform angle or tip placement needs adjustment.
Connected Blueprint Materials
ប្លង់ពាក់ព័ន្ធ
ប្លង់ទាំងនេះចែករំលែកចំណេះដឹង — បច្ចេកទេស សម្ភារៈ ឬគោលការណ៍
Related blueprints
Other builds that share materials, tools, or techniques with this one.

Making a Stone Chisel — Splitting and Grooving Toolstoneworking
Carving an Antler Comb — Mesolithic Personal Grooming and Textile Toolstoneworking
Making a Stone Hoe — The First Agricultural Toolstoneworking
Making a Hammerstone — The First Tool in Human Historystoneworking
Knapping an Obsidian Blade — Pressure-Flaked Volcanic Glassstoneworking
Making a Pump Drill — Flywheel-Powered Rotary Drillstoneworking
CC0 សាធារណៈ
ប្លង់នេះត្រូវបានចេញផ្សាយក្រោម CC0។ អ្នកមានសិទ្ធិចម្លង កែប្រែ ចែកចាយ និងប្រើប្រាស់ដោយមិនចាំបាច់សុំអនុញ្ញាត។
គាំទ្រអ្នកបង្កើតដោយទិញផលិតផលតាមរយៈប្លង់របស់ពួកគេ ដែលពួកគេទទួលបាន កម្រៃជើងសារអ្នកបង្កើត កំណត់ដោយអ្នកលក់ ឬបង្កើតកំណែថ្មីនៃប្លង់នេះ ហើយបញ្ចូលជាការតភ្ជាប់ក្នុងប្លង់របស់អ្នកដើម្បីចែករំលែកចំណូល។