សិល្បៈ
សម្រស់ និង សុខុមាលភាព
សិប្បកម្ម
វប្បធម៌ និង ប្រវត្តិសាស្ត្រ
ការកម្សាន្ត
បរិស្ថាន
ម្ហូប និង ភេសជ្ជៈ
វិស្វកម្មបញ្ច្រាស
វិទ្យាសាស្ត្រ
កីឡា
បច្ចេកវិទ្យា
ប្រដាប់ដែលស្លៀក
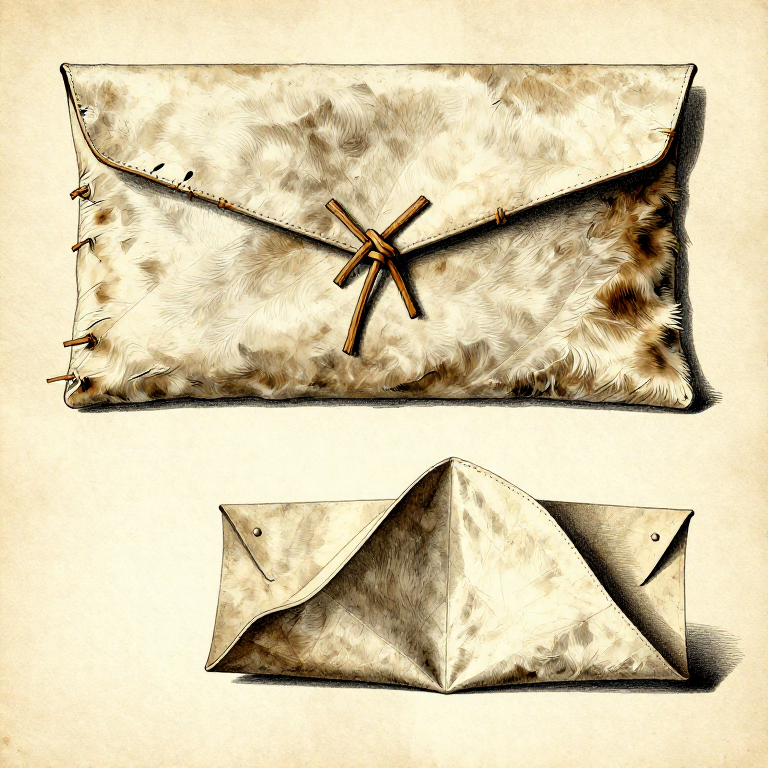
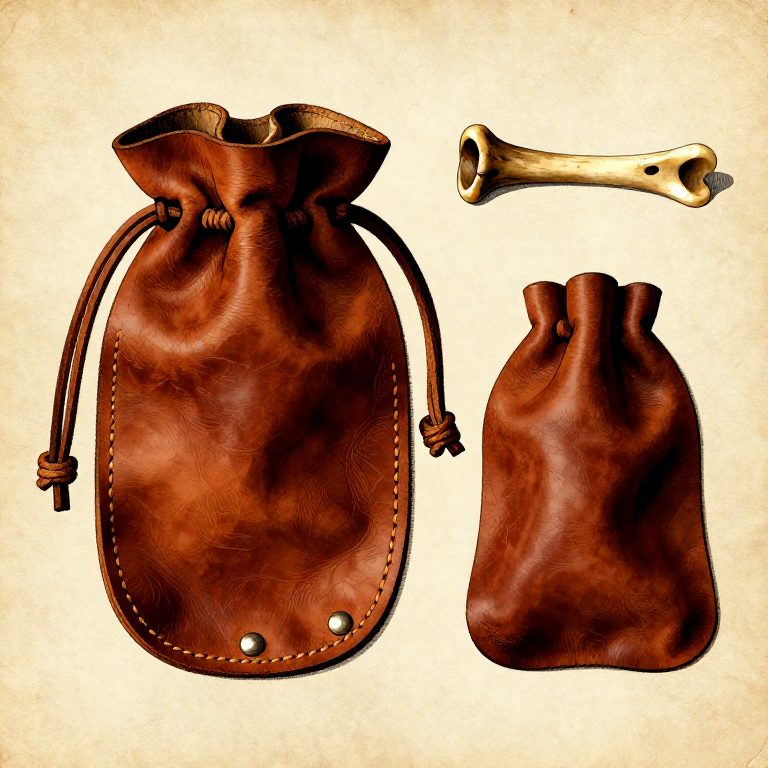
Making a Rawhide Parfleche — Folded Envelope Container from Untanned Hide
A parfleche is an envelope-shaped container made from a single sheet of rawhide, folded and laced shut. The name comes from French Canadian fur traders: 'parer' (to parry or deflect) + 'flèche' (arrow), because untanned rawhide is tough enough to deflect projectiles — rawhide has a tensile strength of approximately 20 to 40 megapascals, comparable to soft leather but far stiffer, making it an effective rigid armour and structural material. Parfleches were the primary storage containers of Plains peoples in North America for thousands of years, used to carry and store pemmican, dried berries, dried meat, clothing, and ceremonial items. The key material property is that raw, untanned hide becomes extremely stiff and rigid when it dries. Fresh rawhide is pliable and can be cut, scored, folded, and shaped easily. Once dried, it holds its shape permanently — creating a durable, weather-resistant, lightweight container that protects contents from moisture, insects, and physical damage. A properly made parfleche is waterproof, crushproof, and lasts for decades with minimal care. The construction is elegant in its simplicity: a single rectangular piece of fresh rawhide is laid flat, the contents are placed in the centre, the sides are folded inward, the top and bottom flaps fold over, and the whole package is laced shut with rawhide strips. As the hide dries and shrinks, it tightens around the contents, creating a drum-tight seal. This blueprint covers the complete process from preparing a flat piece of fresh rawhide through pattern cutting, folding, lacing, and drying.
មធ្យម
3-4 hours (plus drying time)
ការណែនាំ
1
1
Prepare a Flat Sheet of Fresh Rawhide
Prepare a Flat Sheet of Fresh Rawhide
Start with a piece of fresh, wet rawhide that has been defleshed (all meat and fat scraped from the flesh side) and dehaired (hair removed by soaking in a wood ash lye solution for 3 to 5 days, then scraping). The hide should be clean, uniformly thick (approximately 2 to 4 mm for a medium-sized deer hide), and free of cuts or thin spots. If starting with dried rawhide, soak it in clean water for 12 to 24 hours until it is fully rehydrated and as pliable as fresh hide. The hide must be wet and flexible for all cutting and folding — once it begins to dry, it stiffens rapidly and becomes impossible to fold cleanly.
Materials for this step:
 Raw Hide1 piece
2
2
Lay the Hide Flat and Mark the Pattern
Lay the Hide Flat and Mark the Pattern
Spread the wet rawhide flat on a clean, smooth surface — a flat stone slab or smooth log works well. Flesh side up (the smooth, grain side faces down). Using a bone awl or sharp stick, score the cutting pattern: a rectangle approximately 60 cm wide by 80 cm long for a medium parfleche (about 20 by 30 cm when folded). The shape is a rectangle with triangular or rounded flaps extending from each of the four sides. The centre rectangle (the base) should be approximately 20 cm by 30 cm. Each side flap extends 15 to 20 cm outward from the base edges, and the top and bottom flaps extend 15 to 20 cm above and below.
Tools needed:
 Bone Awl
 Flat Stone Slab
3
3
Cut the Pattern
Cut the Pattern
Using a sharp flint knife, cut along the scored pattern lines. Cut firmly and smoothly in a single pass — rawhide is tough and resists tearing, but ragged edges from multiple cuts will not fold cleanly. Cut the side flaps to a rounded or pointed shape (pointed flaps fold more neatly). Cut the top and bottom flaps as rectangles the full width of the base section. Remove any excess hide outside the pattern — these scraps can be cut into thin lacing strips in the next step.
Tools needed:
 Flint Knife
4
4
Cut Rawhide Lacing Strips
Cut Rawhide Lacing Strips
From the rawhide scraps, cut thin strips approximately 3 to 5 mm wide and as long as possible — at least 30 cm each. You need 4 to 6 strips for lacing the parfleche shut. Cut the strips in a spiral from a round scrap piece to maximize length from a small piece of hide. Keep the strips wet — they become brittle and snap when dry. These lacing strips shrink as they dry, which tightens the lacing and creates a drum-tight closure.
Tools needed:
Flint Knife5
5
Score the Fold Lines on the Flesh Side
Score the Fold Lines on the Flesh Side
On the flesh side (inner surface) of the hide, score shallow fold lines along each edge of the centre rectangle where the flaps will fold inward. Use the bone awl to press a firm groove — do not cut through, just compress the fibres along the fold line. Scoring on the flesh side creates a clean, sharp fold on the grain side. Score to approximately half the hide thickness. These score lines act as hinges that make the stiff rawhide fold predictably rather than buckling or cracking.
Tools needed:
Bone Awl6
6
Punch Lacing Holes
Punch Lacing Holes
Using the bone awl, punch pairs of small holes along the edges of each flap, approximately 1.5 to 2 cm from the edge and spaced 3 to 4 cm apart. Punch corresponding holes in the adjacent flaps so that when folded, the holes align for lacing. You need approximately 6 to 8 pairs of holes per side — enough to lace the flaps securely without weakening the hide with too many perforations. Punch from the flesh side outward for cleaner holes on the grain side.
Tools needed:
Bone Awl7
7
Fold the Side Flaps Inward
Fold the Side Flaps Inward
While the rawhide is still wet and pliable, fold both side flaps upward along the scored lines so they stand vertically, then press them inward over the centre base. The two side flaps should overlap slightly in the centre. Fold firmly along the score lines — press each fold flat with a smooth stone to set the crease. The grain (smooth) side of the hide faces outward on the finished parfleche, so the flesh side is the interior surface that contacts the contents.
8
8
Fold the Top and Bottom Flaps Over
Fold the Top and Bottom Flaps Over
Fold the bottom flap upward over the side flaps, then fold the top flap downward over everything. The top flap should overlap the bottom flap by at least 5 cm in the centre. This creates a four-layer closure at the centre of the parfleche — extremely strong and moisture-resistant. Press all layers firmly together. The overlapping flap arrangement means rain or snow runs off the outer surface without finding a direct seam to penetrate.
9
9
Lace the Parfleche Shut
Lace the Parfleche Shut
Thread wet rawhide lacing strips through the aligned holes, working from one end to the other in a simple whip stitch or cross-lace pattern. Pull each stitch firm but not so tight that the lacing cuts through the wet hide. The lacing must pass through all overlapping layers at each hole pair to lock the entire structure together. Tie off each lacing strip with a simple overhand knot, leaving a 3 cm tail. As the rawhide dries, both the body and the lacing shrink simultaneously, tightening the entire structure into a rigid, drum-tight package.
Materials for this step:
 Cordage2 metre
Tools needed:
Bone Awl10
10
Shape and Flatten While Drying
Shape and Flatten While Drying
Place the folded, laced parfleche on a flat surface and weight it with flat stones to maintain a clean, rectangular shape as it dries. Alternatively, press it between two flat boards. The drying process takes 24 to 48 hours in warm, dry conditions and up to 4 days in cool or humid weather. Do not dry in direct hot sunlight — rapid drying causes the rawhide to curl and warp unevenly. A shaded, well-ventilated location produces the most uniform drying.
Tools needed:
Flat Stone Slab11
11
Inspect the Finished Parfleche
Inspect the Finished Parfleche
Once fully dry, the parfleche should be rigid, hard, and slightly translucent where the rawhide is thinnest — a creamy off-white to pale yellow colour. Tap it with a knuckle; it should produce a hollow, drum-like sound indicating that the hide is fully cured. Check that all lacing is tight and no flaps have pulled loose. The finished parfleche is waterproof (rawhide does not absorb water once fully dried unless soaked for extended periods), crushproof, and resistant to insect damage due to the low moisture content.
12
12
Add a Carrying Strap (Optional)
Add a Carrying Strap (Optional)
Punch two pairs of holes on the back of the parfleche (the side that lies against the body when carried), spaced approximately 15 cm apart. Thread a length of cordage or a rawhide strip through the holes to create a carrying loop. The strap should be long enough to sling over one shoulder. For horse transport (as used by Plains peoples), two parfleches were typically hung on either side of a pack saddle, balanced by their carrying straps. For foot travel, a single strap slung diagonally across the back distributes the weight comfortably.
Materials for this step:
Cordage1 metreTools needed:
Bone AwlConnected Blueprint Materials
ប្លង់ពាក់ព័ន្ធ
ប្លង់ទាំងនេះចែករំលែកចំណេះដឹង — បច្ចេកទេស សម្ភារៈ ឬគោលការណ៍
Related blueprints
Other builds that share materials, tools, or techniques with this one.
Dyeing with Safflower — Two Colours from One Flowertextiles
Gore-Tex — The Breathable Waterproof Membrane from Expanded PTFEtextiles
Dyeing Red-Orange with Coreopsis — The Plains Flower That Dyes from Yellow to Rusttextiles

Making Bark Cloth (Tapa) — Beaten Inner Bark Fabrictextiles
Making a Leather Drawstring Pouch — Simple Gathered-Edge Containertextiles
Weaving a Rush Floor Mat — Simple Plaiting with Wetland Plantstextiles
CC0 សាធារណៈ
ប្លង់នេះត្រូវបានចេញផ្សាយក្រោម CC0។ អ្នកមានសិទ្ធិចម្លង កែប្រែ ចែកចាយ និងប្រើប្រាស់ដោយមិនចាំបាច់សុំអនុញ្ញាត។
គាំទ្រអ្នកបង្កើតដោយទិញផលិតផលតាមរយៈប្លង់របស់ពួកគេ ដែលពួកគេទទួលបាន កម្រៃជើងសារអ្នកបង្កើត កំណត់ដោយអ្នកលក់ ឬបង្កើតកំណែថ្មីនៃប្លង់នេះ ហើយបញ្ចូលជាការតភ្ជាប់ក្នុងប្លង់របស់អ្នកដើម្បីចែករំលែកចំណូល។