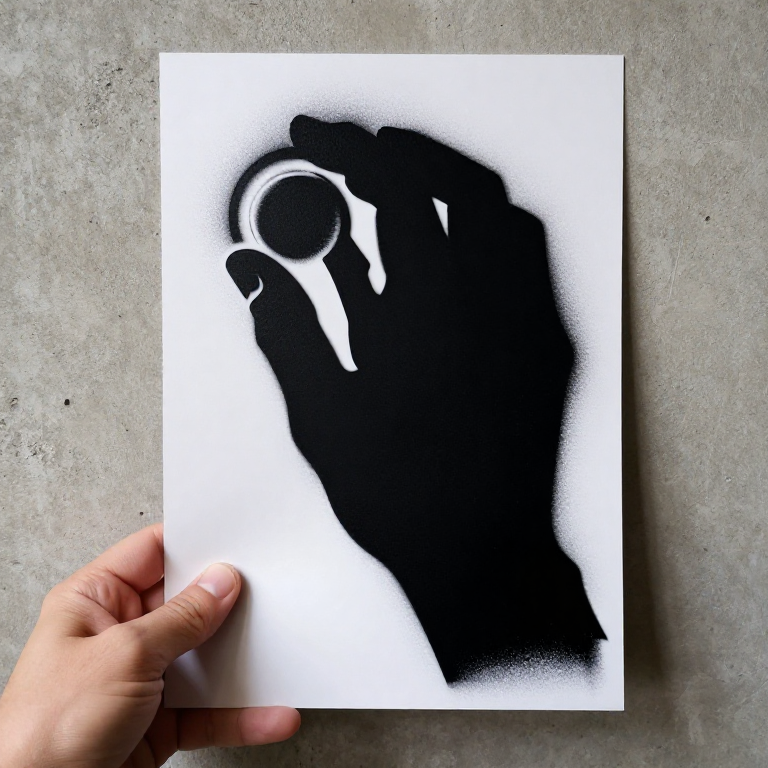


Stencil Street Art
A stencil turns an image into a repeatable stamp. Cut the shapes once and you can put the same picture on a canvas, a board, a shutter or a wall in seconds — which is precisely why stencil work became the technique of street art rather than freehand spraying.
The craft is all in the preparation. A photograph has continuous tone; a stencil has only holes and solid. You reduce the image to two or three flat tones, then solve the physical problem that follows: any shape enclosed entirely by a cut-out falls out of the sheet. The pupil of an eye, the middle of an O. You keep those islands by leaving bridges — thin ties of uncut material — and designing the bridges well is the whole skill.
Paint only what is yours. Your own canvas, board, fence, garage or a wall you have written permission for, or a legal wall where your council or a community project provides one. Painting someone else's property without permission is criminal damage, and this blueprint is not a route to it.
ការណែនាំ
Settle the surface and the permission
Settle the surface and the permission
Decide now what you are painting on and confirm you are allowed to paint it. Canvas, board and your own fence need no permission; anything else needs it in writing before you cut a single line.
Pick a high-contrast source image
Pick a high-contrast source image
Choose a photograph with strong directional light and clear dark and light masses. Flat, evenly lit images have no structure to reduce and collapse into a blob.
Posterise to two tones first
Posterise to two tones first
Reduce the image to pure black and white with a threshold adjustment, and slide the threshold until the subject is still readable. Two tones is one layer and one cut — start there before attempting three.
Print at final size
Print at final size
Print the reduced image at the size it will be sprayed, tiling across several sheets if needed. Scaling after cutting is not possible.
Find every island
Find every island
Go over the print and mark every black shape that is completely surrounded by white. Each of those will fall out of the sheet when you cut it, and each one needs a bridge.
Draw bridges along natural lines
Draw bridges along natural lines
Draw 3-5 mm ties connecting each island to the surrounding material, placing them where a line already exists in the image — a fold, a hair, an edge. Bridges are always visible in the result; the craft is making them look intentional.
Mount the design on stencil sheet
Mount the design on stencil sheet
Spray-mount or tape the print onto mylar or oiled card. Mylar survives dozens of sprays; paper stencil goes soft and furry after two.
សម្ភារៈសម្រាប់ជំហាននេះ៖
 សន្លឹកម៉ៃឡាធ្វើពុម្ពលាប1 សន្លឹក
Add registration marks before cutting
Add registration marks before cutting
Mark two crosses well outside the image area, in the same place on every layer. Without them, multi-layer work cannot be lined up on the wall.
Cut the small shapes first
Cut the small shapes first
Cut the interior detail before the big outlines, on a cutting mat, with a fresh blade. Once the large areas are open the sheet flexes and the fine work tears.
ឧបករណ៍ដែលត្រូវការ៖
 កាំបិតសិប្បកម្ម
 កម្រាលកាត់ដែលជាសះស្បើយខ្លួនឯង
Pull the knife toward you and rotate the sheet
Pull the knife toward you and rotate the sheet
Cut on a pull stroke with light pressure and turn the sheet rather than your wrist. Wrist-driven curves wander; rotated sheets give clean arcs.
Cut a second layer for the mid-tone
Cut a second layer for the mid-tone
For a three-tone piece cut a second sheet holding only the mid-tone shapes, aligned to the same registration marks. Sprayed in sequence light to dark, two layers give most of the depth people associate with stencil portraits.
Prepare and mask the surface
Prepare and mask the surface
Clean the surface and mask a generous margin round the stencil with paper and tape. Overspray travels much further than a first-time sprayer expects.
Wear a respirator and work in air
Wear a respirator and work in air
Spray outdoors or with real ventilation, wearing a respirator rated for organic vapour, not a dust mask. Solvent and propellant are the genuine hazard in this build.
ឧបករណ៍ដែលត្រូវការ៖
 ម៉ាស់ការពារផ្លូវដង្ហើមគ្របពាក់កណ្ដាលមុខ
 ស្រោមដៃនីទ្រីល
Hold the stencil flat against the surface
Hold the stencil flat against the surface
Tape all four edges down and press the middle flat. Any gap lets paint creep under the sheet and the edge goes fuzzy.
Spray light passes from 25 cm
Spray light passes from 25 cm
Hold the can 20-30 cm off and spray several thin passes, keeping the can moving and starting the stroke off the stencil. One heavy pass is what makes paint run under the edge — thin coats are the entire technique.
សម្ភារៈសម្រាប់ជំហាននេះ៖
 ថ្នាំលាបបាញ់1 ដុំ
Lift the stencil straight off
Lift the stencil straight off
Peel the sheet away perpendicular to the surface while the paint is still tacky, without sliding it. Dragging a wet stencil smears the whole image.
Register and spray the next layer
Register and spray the next layer
Let the first layer flash off, line the next sheet up on the registration marks and repeat. Rushing the wait lifts the first colour onto the back of the second stencil.
Clean the stencil for reuse
Clean the stencil for reuse
Wipe the mylar down before the paint cures. Build-up around the cut edges thickens them and softens every print after.
History & Context
History & Context
Older than any of it. The stencil is arguably the oldest image-making technique that survives: hand stencils on cave walls, made by blowing pigment around a hand held against the rock, are among the earliest surviving images anywhere. The principle has not changed — mask, apply, remove.
Pochoir. Stencil colouring was industrial long before it was subversive. European woodcuts were coloured through stencils from about 1450, and the French pochoir process was used commercially into the twentieth century for high-quality hand-coloured book and fashion plates.
Paris, 1981. Blek le Rat began painting stencilled rats on the streets of Paris in 1981 and is generally described as the father of stencil graffiti. He had seen New York wildstyle graffiti on a trip in 1971 and deliberately chose the stencil instead, on the grounds that it suited the classical architecture of Paris better than large freehand lettering. He was among the first to work at life size, which is what pulled the technique away from small tags and toward figures that read as people. He cut his stencils by hand. The pseudonym came from the comic character Blek le Roc, with 'rat' as an anagram of 'art' — and he described the rat as the only free animal in the city.
Why the technique spread. Speed and repeatability. A stencil that took a day to cut can be sprayed in fifteen seconds and used a hundred times, so an image can appear across a city in a single night by one person. That is a genuine property of the tool, and it cuts both ways: it is what made stencil art a recognisable movement, and it is also why the technique has a long association with property damage. The legal line is not a technical one — it is entirely about whose wall it is.
សម្ភារៈ
2- 1 សន្លឹកកន្លែងទុក
- 1 ដុំកន្លែងទុក
ឧបករណ៍ចាំបាច់
4- កន្លែងទុក
- កន្លែងទុក
- កន្លែងទុក
ប្លង់ពាក់ព័ន្ធ
ប្លង់ទាំងនេះចែករំលែកចំណេះដឹង — បច្ចេកទេស សម្ភារៈ ឬគោលការណ៍

CC0 សាធារណៈ
ប្លង់នេះត្រូវបានចេញផ្សាយក្រោម CC0។ អ្នកមានសិទ្ធិចម្លង កែប្រែ ចែកចាយ និងប្រើប្រាស់ដោយមិនចាំបាច់សុំអនុញ្ញាត។
គាំទ្រអ្នកបង្កើតដោយទិញផលិតផលតាមរយៈប្លង់របស់ពួកគេ ដែលពួកគេទទួលបាន កម្រៃជើងសារអ្នកបង្កើត កំណត់ដោយអ្នកលក់ ឬបង្កើតកំណែថ្មីនៃប្លង់នេះ ហើយបញ្ចូលជាការតភ្ជាប់ក្នុងប្លង់របស់អ្នកដើម្បីចែករំលែកចំណូល។