

The Arm as a Lever
Hold a 5 kg weight in your hand with your elbow bent. Your biceps is not pulling 5 kg. It is pulling something like seven times that, and it has been doing so for as long as you have been holding it.
The reason is where the muscle attaches. The elbow is the pivot; the weight sits about 35 cm away at your hand; and the biceps tendon inserts on the forearm only about 5 cm from the joint. The muscle is working on the short arm of a lever and the load is on the long one, so the muscle force must exceed the load in the same proportion.
In lever terms this is a third-class lever: pivot at one end, effort applied between the pivot and the load, load at the far end. Every third-class lever operates at a mechanical disadvantage, and most of the muscles in your body are third-class levers.
Which raises the obvious question: why would a body be built this way? Because the trade runs the other way round for speed. A small, fast contraction of the muscle produces a large, fast movement of the hand. The skeleton sacrifices force to buy range and velocity — and a hand that moves quickly turns out to be worth more than a hand that pulls hard.
Measure your own, and the ratio falls straight out.
ការណែនាំ
Measure the two lever arms on yourself
Measure the two lever arms on yourself
With the elbow bent at 90°, find the joint centre and measure to the centre of the palm — the load arm. Then find the biceps tendon just below the elbow crease and measure from the joint centre to it — the effort arm.
Record both.
Expect roughly 30-40 cm and 4-6 cm. Take the tendon measurement from a relaxed arm — a contracted biceps makes the tendon easy to find and hard to measure.
ឧបករណ៍ដែលត្រូវការ៖
 ខ្សែវាស់
 សៀវភៅកត់ត្រាទីវាលធន់គ្រប់អាកាសធាតុ
Predict the muscle force
Predict the muscle force
Take a known hand weight and compute the muscle force from effort = load x (load arm / effort arm).
Do it for 1 kg, 3 kg and 5 kg.
Expect a ratio of roughly 7:1, so a 5 kg dumbbell implies a biceps force on the order of 35 kg-force.
Write the prediction down before step 4 measures it. A prediction made after the measurement is not a prediction.
ឧបករណ៍ដែលត្រូវការ៖
 ម៉ាស៊ីនគិតលេខ
Build the model arm
Build the model arm
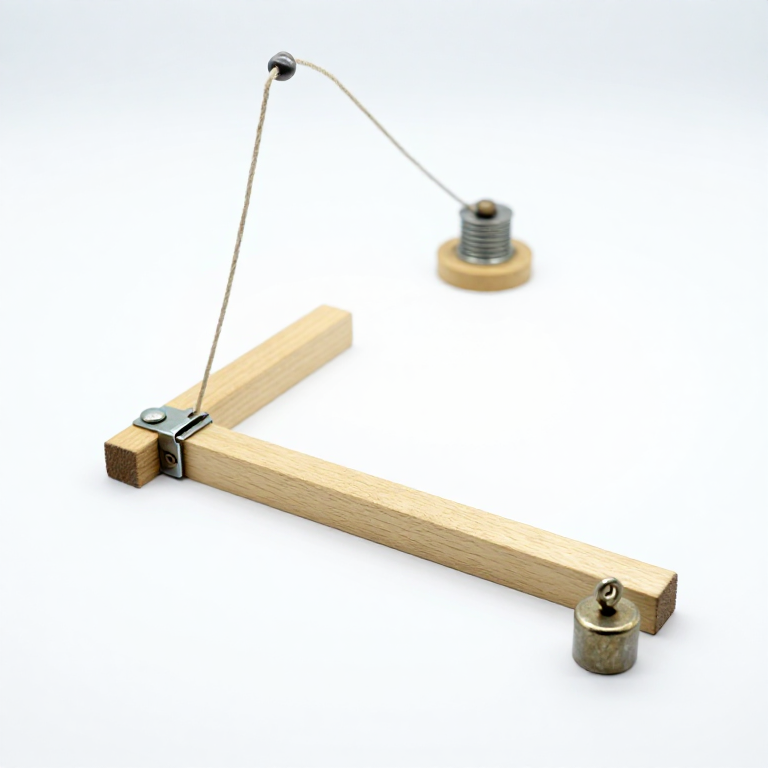
Hinge two lengths of timber. Fix an eye bolt on the forearm piece at the scaled effort distance and another at the scaled load distance, and run a cord from the effort point over a pulley to a spring scale, standing in for the muscle.
Match the ratios you measured, not the absolute sizes.
Geometric similarity is what makes a model valid — get the ratio right and the size does not matter.
សម្ភារៈសម្រាប់ជំហាននេះ៖
 ឈើស្រល់កាត់រួច1 ដុំ
 ដែកគោលមានភ្នែក2 ដុំ
ឧបករណ៍ដែលត្រូវការ៖
 រណារដៃ
 សំណុំរ៉ក
Measure the force and check the prediction
Measure the force and check the prediction
Hang known weights at the load point and read the spring scale at the effort point, with the forearm horizontal.
Plot measured effort against load.
Expect a straight line whose slope is your lever ratio, and expect it to sit slightly above the prediction — the forearm's own weight is a load you did not include.
Add the limb's own mass and the agreement improves, which is itself the lesson.
ឧបករណ៍ដែលត្រូវការ៖
 ឧបករណ៍វាស់កម្លាំង (ជញ្ជីងរ៉ឺស័រ)
 ក្រដាសក្រឡា
Measure what the disadvantage buys
Measure what the disadvantage buys
Mark the effort point and the load point. Move the forearm through a fixed angle and measure how far each point travelled, and time both.
Expect the hand to move about seven times further and seven times faster than the tendon.
The same ratio that costs you force gives you speed and range, exactly. That is not a coincidence — it is the same number, read the other way up, and it is why a thrown ball leaves the hand fast.
ឧបករណ៍ដែលត្រូវការ៖
 នាឡិកាបញ្ឈប់
Change the angle, and find where it gets hard
Change the angle, and find where it gets hard
Repeat the force measurement with the forearm at 30°, 60°, 90° and 120°.
Expect the required effort to vary considerably with angle, and to be lowest somewhere near the middle of the range.
Two things change at once: the effective lever arm depends on the angle between tendon and bone, and a muscle's own force capacity depends on its length.
This is why a curl has a sticking point, and why it is always at roughly the same place.
ឧបករណ៍ដែលត្រូវការ៖
 ឧបករណ៍វាស់មុំ
Compendium — why bodies are built at a disadvantage
Compendium — why bodies are built at a disadvantage
The three lever classes, and where the body puts them. A first-class lever has the pivot between effort and load — the head balancing on the atlas, with neck muscles behind and the face's weight in front. A second-class lever has the load between pivot and effort, and gives mechanical advantage — standing on tiptoe, with the toes as pivot, body weight at the ankle and the calf pulling at the heel. A third-class lever has the effort between pivot and load, always at a disadvantage — and it is overwhelmingly the commonest arrangement in vertebrates. Evolution did not fail to find the efficient option; it chose against it.
Speed and range are worth more than force, for an animal. A muscle can only shorten by a limited fraction of its length, and it is bulky. Attaching it close to the joint means a few centimetres of contraction sweeps the hand through a metre, quickly — which is what catching, throwing, striking and running actually require. An arrangement that gave the arm mechanical advantage would need either an enormous range of muscle shortening or a limb that moved very slowly. Predators and prey are both selected on velocity, not on how much they can hold still.
The consequence is that joint forces are enormous. Because the muscle is pulling seven times the load, and it pulls across the joint, the compressive force in the elbow is far larger than anything you are holding. The same reasoning applied to the hip and knee shows joint loads of several times body weight in ordinary walking, and much more in running. This is why joint replacement is a hard engineering problem: the loads are not the ones intuition suggests.
Where the ratio varies, performance follows. Tendon insertion distances differ measurably between people, and a slightly more distal insertion means a better lever arm and more force for the same muscle — a real, non-trainable component of strength. Animals show the pattern strongly: a mole's forelimb has short, powerfully-levered digging muscles, while a horse's leg is built for enormous stride speed at the cost of force. The skeleton is a gear ratio, and different animals are geared differently.
Honest limits of the model. The biceps is not the only elbow flexor — brachialis and brachioradialis contribute, and their lever arms differ, so a single-cord model overstates the biceps' share. Muscles pull along curved paths over changing geometry, so the effective lever arm is a function of angle rather than a constant. And a real tendon is elastic, which stores and returns energy in ways a cord does not. The 7:1 figure is the right order of magnitude and the right idea; it is not a clinical measurement of anybody's arm.
សម្ភារៈ
2- 1 ដុំកន្លែងទុក
- 2 ដុំកន្លែងទុក
ឧបករណ៍ចាំបាច់
9- 1 vendor sell this, none ship to you yetកន្លែងទុក
- កន្លែងទុក
- កន្លែងទុក
- កន្លែងទុក
- កន្លែងទុក
- កន្លែងទុក
- កន្លែងទុក
- កន្លែងទុក
- កន្លែងទុក
សម្ភារៈប្លង់ដែលបានភ្ជាប់


ប្លង់ពាក់ព័ន្ធ
ប្លង់ទាំងនេះចែករំលែកចំណេះដឹង — បច្ចេកទេស សម្ភារៈ ឬគោលការណ៍

CC0 សាធារណៈ
ប្លង់នេះត្រូវបានចេញផ្សាយក្រោម CC0។ អ្នកមានសិទ្ធិចម្លង កែប្រែ ចែកចាយ និងប្រើប្រាស់ដោយមិនចាំបាច់សុំអនុញ្ញាត។
គាំទ្រអ្នកបង្កើតដោយទិញផលិតផលតាមរយៈប្លង់របស់ពួកគេ ដែលពួកគេទទួលបាន កម្រៃជើងសារអ្នកបង្កើត កំណត់ដោយអ្នកលក់ ឬបង្កើតកំណែថ្មីនៃប្លង់នេះ ហើយបញ្ចូលជាការតភ្ជាប់ក្នុងប្លង់របស់អ្នកដើម្បីចែករំលែកចំណូល។