예술
뷰티 및 웰니스
공예
문화 및 역사
엔터테인먼트
환경
음식 및 음료
역공학
과학
스포츠
기술
웨어러블
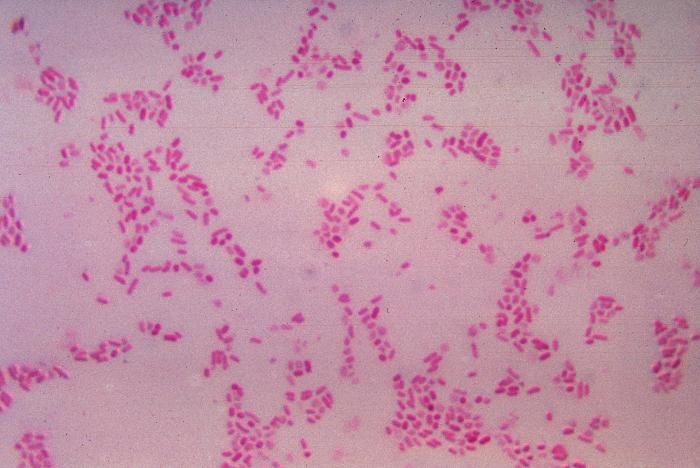


Staining: Making the Invisible Visible
The mounting rung ended on an awkward fact: a good mountant matches the refractive index of the tissue, and in doing so makes an unstained specimen almost invisible. You have removed the glare and the detail with it.
The fix arrived from an unexpected direction. The coal-tar dye industry of the 1860s and 70s — the same chemistry as the synthetic alizarin and Para red blueprints — produced hundreds of brilliant aniline dyes for textiles, and biologists discovered that they stained some cell structures and not others. Paul Ehrlich built a career on which dye went where, and in 1884 Hans Christian Gram found a sequence that split all bacteria into two groups by the structure of their cell walls.
A stain is not paint. It binds where the chemistry lets it bind, so WHERE it lands is itself the information.
중급
4 hours
안내
1
1
Start with one dye and understand why it binds
Start with one dye and understand why it binds
Make a dilute methylene blue solution and put a drop on a scraping of onion or a smear of yeast. Within a minute the nuclei are blue and the rest is pale.
Methylene blue is a cation — a positively charged dye — and it is drawn to anything negatively charged. Nucleic acids are strongly negative, so the nucleus takes it up first and hardest. That is the whole logic of staining: match the charge or the chemistry of the dye to the structure you want, and the specimen sorts itself out.
이 단계의 재료:
 메틸렌 블루10 ml
 양파1 개
양파1 개 빵 효모10 g
 현미경 슬라이드와 커버글라스20 개
필요한 도구:
 눈금 피펫 (모어)
 현미경
현미경2
2
Fix the smear before you stain it
Fix the smear before you stain it
Spread a thin smear, let it air-dry completely, then pass the slide briefly through a flame two or three times — warm, never hot.
Heat fixing does two things: it kills and sticks the material to the glass so it does not wash off during the staining steps, and it makes the cell membranes permeable so dye can get in. Overheat it and cells distort beyond recognition. The test is the back of your hand: the slide should feel warm, not painful.
필요한 도구:
현미경 슬라이드와 커버글라스3
3
Run a Gram stain, in order, with the clock
Run a Gram stain, in order, with the clock
Crystal violet for one minute; rinse. Iodine for one minute; rinse. Then the decolouriser — alcohol — for a few SECONDS only; rinse at once. Finally safranin for a minute; rinse and blot dry.
The iodine is not a stain, it is a mordant: it forms a large complex with the crystal violet that is trapped inside a thick cell wall. The decolourising step is the entire test and it is the one that goes wrong — a few seconds too long and everything washes out and reads as Gram-negative. Time it. Do not guess.
이 단계의 재료:
 크리스탈 바이올렛 염색액50 ml
 요오드 결정5 g
 사프라닌 염색액50 ml
 에탄올 - 실험실 등급, 95 %100 ml
필요한 도구:
 스톱워치
스톱워치 니트릴 장갑
 붕규산 비커
4
4
Read the result, and know what it means
Read the result, and know what it means
Purple cells are Gram-positive; pink or red cells are Gram-negative.
The difference is real structure, not a dye preference. A Gram-positive wall is a thick peptidoglycan mesh that holds the violet-iodine complex when the alcohol dehydrates and closes it. A Gram-negative wall is thin with an outer lipid membrane the alcohol dissolves, so the complex washes straight out and the safranin that follows is all you see. One minute of dye tells you something structural about an organism a thousand times too small to dissect.
필요한 도구:
현미경5
5
Always run a known control alongside
Always run a known control alongside
Stain a slide of something you KNOW is Gram-positive on the same slide or alongside, in the same staining run.
Without it an all-pink result is ambiguous: either the organisms are Gram-negative, or you over-decolourised everything. The control answers that immediately, and it costs one extra smear. This is the same discipline as the dark control in the SODIS blueprint and the co-spot in the chromatography one — a result without a reference is a colour, not a finding.
이 단계의 재료:
현미경 슬라이드와 커버글라스10 개필요한 도구:
현미경6
6
Counterstain, and use the whole palette
Counterstain, and use the whole palette
Try a two-dye scheme on plant sections: a dye that takes to lignified walls and a contrasting one for the cellulose, applied in sequence.
This is what haematoxylin and eosin do for animal tissue — one basic dye for the acidic nuclei, one acidic dye for the basic cytoplasm — and it is why almost every histology image you have ever seen is blue and pink. Two dyes that bind by opposite chemistry divide the specimen between them and nothing is left uncoloured.
이 단계의 재료:
사프라닌 염색액50 ml메틸렌 블루20 ml필요한 도구:
붕규산 비커스톱워치7
7
Dye uptake, time and the decolourising window
Dye uptake, time and the decolourising window
Jupyter 노트북 불러오는 중…
필요한 도구:
스톱워치8
8
Treat the dyes with respect
Treat the dyes with respect
Wear gloves, work over a tray, and keep the dyes off skin and clothing. Label every bottle with what it is and when you made it.
Aniline dyes stain hands for days and fabric permanently, and several of the historic ones are now known to be harmful in ways their Victorian users had no idea about — which is worth remembering as a general lesson about materials, not only these. Made-up stains also go off: crystal violet precipitates and methylene blue oxidises, and an old stain that no longer works looks exactly like a technique failure.
필요한 도구:
니트릴 장갑재료
8- 20 ml플레이스홀더
- 1 개플레이스홀더
- 10 g플레이스홀더
- 20 개플레이스홀더
- 50 ml플레이스홀더
- 5 g플레이스홀더
- 100 ml플레이스홀더
- 100 ml플레이스홀더
관련 블루프린트
이 블루프린트들은 지식을 공유합니다 — 기술, 재료 또는 원리


CC0 퍼블릭 도메인
이 블루프린트는 CC0로 공개되었습니다. 어떤 목적으로든 자유롭게 복사, 수정, 배포 및 사용할 수 있습니다.
제품 구매를 통해 메이커를 지원하세요. 판매자가 설정한 메이커 커미션 을 받거나, 이 블루프린트의 새로운 반복을 만들어 연결로 포함시킬 수 있습니다.