ศิลปะ
ความงามและสุขภาพ
งานฝีมือ
วัฒนธรรมและประวัติศาสตร์
ความบันเทิง
สิ่งแวดล้อม
อาหารและเครื่องดื่ม
วิศวกรรมย้อนรอย
วิทยาศาสตร์
กีฬา
เทคโนโลยี
อุปกรณ์สวมใส่
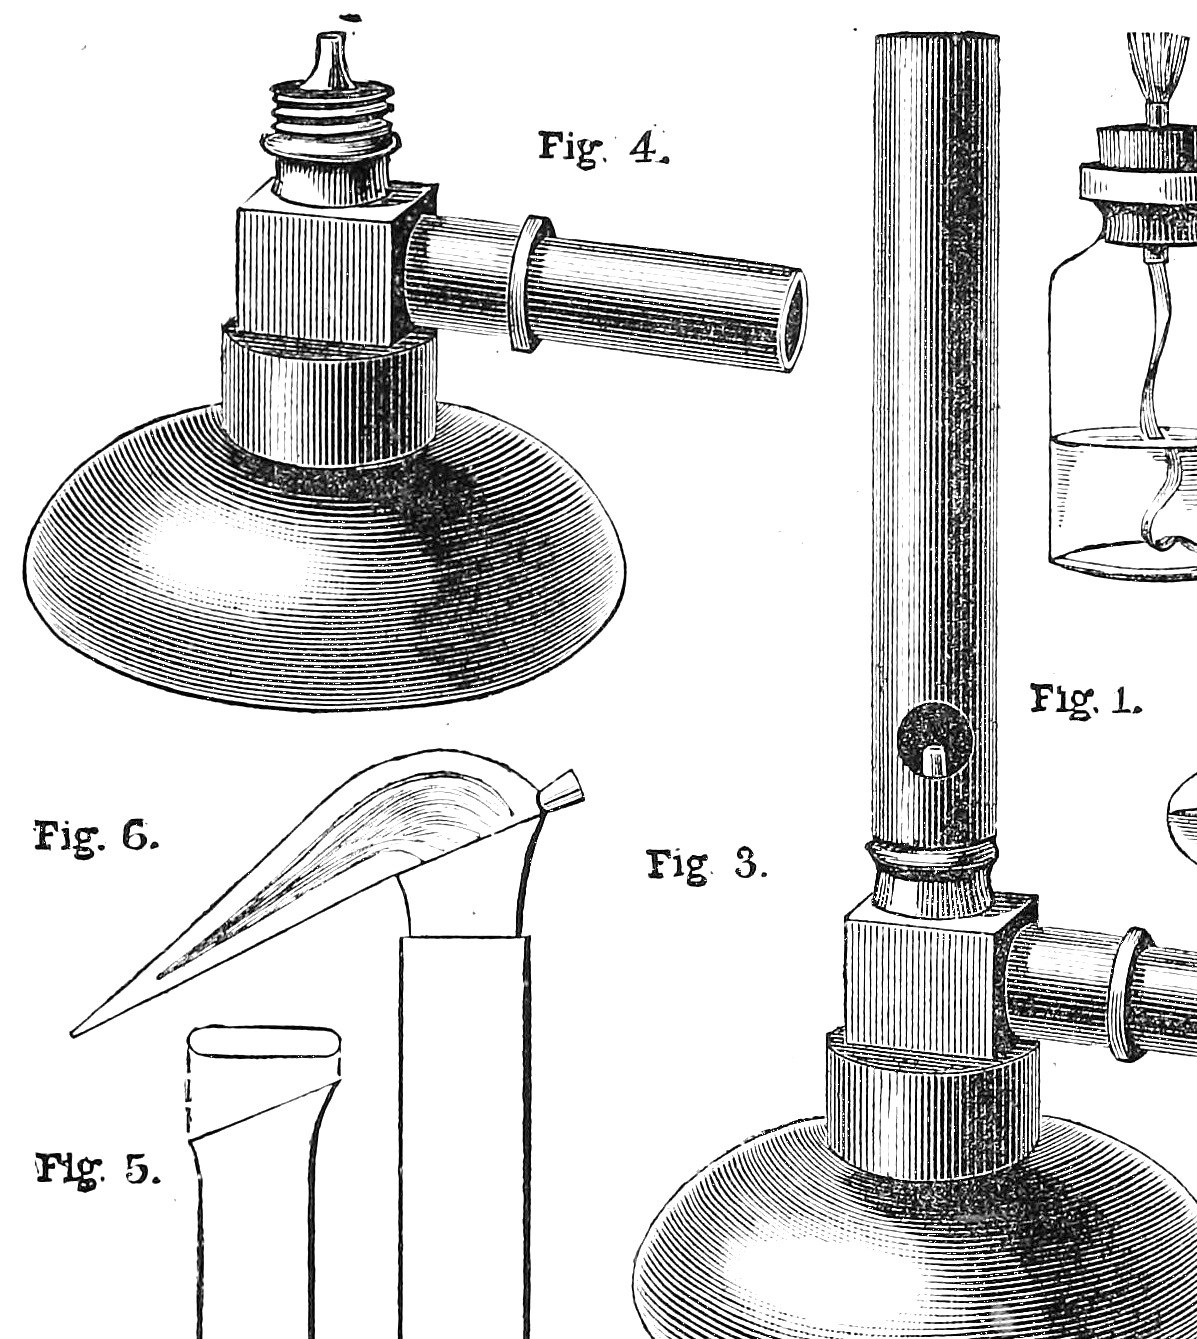


Gas Burner: a Home-Made Bunsen Burner from Brass Tube (Work, 1892)
A Bunsen burner: gas from a fine jet draws air in through two holes at the foot of an upright tube, and the mixture burns at the top with a hot blue flame that leaves no soot. H. B. Stocks (Work, 1892) makes one from a 3 1/2 in. brass tube 1/2 in. across, a short 3/8 in. tube for the gas, a brass boss and elbow from a gas bracket, and a bit of fine-bore tube from an old oil-can as the jet.
A sliding brass collar over the air-holes sets the flame.
Source: H. B. Stocks, How to Make a Cheap Spirit Lamp, Bunsen Burner, Blowpipes, etc., Work No. 167 (28 May 1892), p. 167. Picture: his Figs. 3-4.
ระดับกลาง
Unknown
คำแนะนำ
1
1
Read Stocks
Read Stocks
"To make a Bunsen burner the following materials will be necessary:—A piece of brass tube 3 1/2 in. long, 1/2 in. diameter (external); a piece of tube 3/8 in. in diameter, 1 1/2 in. long; a brass boss similar to those on an ordinary bracket, but without a tap; a brass elbow tube; also a piece of tubing with very fine bore (small bit of tube from an old oil-can will do)."
2
2
Solder the elbow on the boss
Solder the elbow on the boss
Solder the brass elbow-piece onto the brass boss, with the tube that has a screw cut for a gallery uppermost.
วัสดุสำหรับขั้นตอนนี้:
 ข้อต่อท่อเกลียว2 boss and elbow
 ตะกั่วบัดกรีดีบุก-ตะกั่ว1 joint
 ฟลักซ์1 joint
เครื่องมือที่ต้องใช้:
 หัวแร้งบัดกรี
3
3
Fit the jet
Fit the jet
Cut the fine-bore tube 3/4 in. to 1 in. long and solder it inside the vertical tube of the elbow-piece so it projects about 1/2 in. If it is too small for the hole, plug round it with a little sheet lead, keeping it perfectly vertical and in the centre of the outer tube, then solder. The metal of the oil-can tube is not given (unknown).
วัสดุสำหรับขั้นตอนนี้:
 โลหะที่ไม่ทราบ1 fine-bore tube
 แผ่นตะกั่ว1 packingตะกั่วบัดกรีดีบุก-ตะกั่ว1 joint
เครื่องมือที่ต้องใช้:
หัวแร้งบัดกรี กรรไกรตัดแผ่นโลหะ
4
4
Make the burner tube
Make the burner tube
Take the brass tube 3 1/2 in. long, 1/2 in. across. If it is not of very thick brass it will be a little too large: turn a piece of very thin sheet brass 1/2 in. by 1 1/4 in. into a cylinder and solder it inside one end. Tap that end inside to screw onto the male thread of the elbow-piece. At the same end drill two holes about 3/8 in. across, exactly opposite each other, their centres 5/8 in. from the end: the air-holes.
วัสดุสำหรับขั้นตอนนี้:
 ท่อทองเหลือง เส้นผ่านศูนย์กลางนอก 1/2 นิ้ว1 3 1/2 in.
 แผ่นทองเหลือง1 1/2 x 1 1/4 in.ตะกั่วบัดกรีดีบุก-ตะกั่ว1 joint
เครื่องมือที่ต้องใช้:
กรรไกรตัดแผ่นโลหะหัวแร้งบัดกรี ชุดต๊าปและดายทำเกลียว
 ด้ามจับต๊าปเกลียว
 สว่านมือ
5
5
Assemble and test
Assemble and test
Screw the burner tube onto the elbow-piece and screw the 3/8 in. tube, 1 1/2 in. long, into the side opening. Push the india-rubber tube from the gas supply onto the side tube and light. A purplish-blue flame means air and gas are in the right proportion. A yellow tip means too much gas: plug the hole in the jet slightly.
วัสดุสำหรับขั้นตอนนี้:
 ท่อทองเหลือง เส้นผ่านศูนย์กลางนอก 9.5 มม.1 1 1/2 in.
เครื่องมือที่ต้องใช้:
 ท่อยาง
6
6
Fit the air collar
Fit the air collar
If the gas burns with a green flame and a hissing noise, the air-holes are too large. Cut sheet brass about 3/4 in. wide and 1 3/4 in. long and drill two holes 3/8 in. across, 1/2 in. from each end (their centres 3/16 in. further in). Turn it into a tube and push it onto the burner tube over the air-holes. Turn it until the two sets of holes do not quite match, so the right amount of air reaches the burner.
วัสดุสำหรับขั้นตอนนี้:
แผ่นทองเหลือง1 3/4 x 1 3/4 in.เครื่องมือที่ต้องใช้:
กรรไกรตัดแผ่นโลหะสว่านมือวัสดุ
8- 2 boss and elbowตัวยึดตำแหน่ง
- 3 jointตัวยึดตำแหน่ง
- 1 jointตัวยึดตำแหน่ง
- 1 fine-bore tubeตัวยึดตำแหน่ง
- 1 packingตัวยึดตำแหน่ง
- 1 3 1/2 in.ตัวยึดตำแหน่ง
- 1 3/4 x 1 3/4 in.ตัวยึดตำแหน่ง
- 1 1 1/2 in.ตัวยึดตำแหน่ง
พิมพ์เขียวนี้สร้าง

CC0 สาธารณสมบัติ
พิมพ์เขียวนี้เผยแพร่ภายใต้ CC0 คุณสามารถคัดลอก แก้ไข แจกจ่าย และใช้งานผลงานนี้เพื่อวัตถุประสงค์ใดก็ได้ โดยไม่ต้องขออนุญาต
สนับสนุนเมกเกอร์โดยซื้อสินค้าผ่านพิมพ์เขียวของพวกเขา ซึ่งพวกเขาจะได้รับ ค่าคอมมิชชันเมกเกอร์ ที่ผู้ขายกำหนด หรือสร้างเวอร์ชันใหม่ของพิมพ์เขียวนี้และรวมเป็นการเชื่อมต่อในพิมพ์เขียวของคุณเพื่อแบ่งรายได้