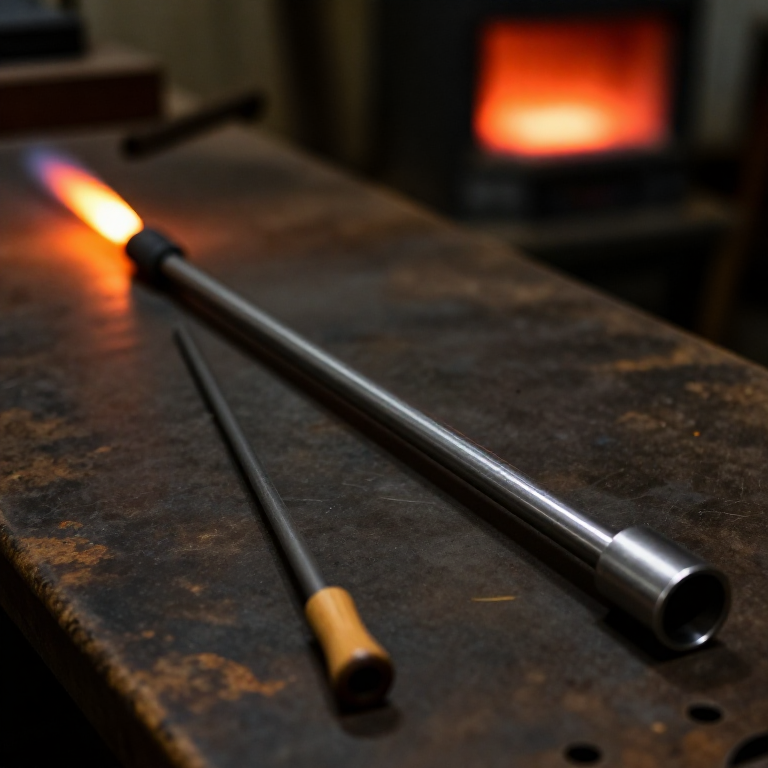


Glassblowing Pipe and Pontil
Some time in the first century BC, on the Syro-Palestinian coast, someone blew down a hollow tube into molten glass. It is one of the largest single jumps in the history of making. Before it, every glass vessel was built around a core or ground from a cast block — days of work for one small bottle. After it, a skilled worker could make a usable vessel in minutes, and glass went from a luxury for the rich to something an ordinary Roman household could own.
The whole revolution rests on two plain steel tools. The blowpipe is a hollow tube: it gathers molten glass on one end and lets you inflate it from the other. The pontil is a solid rod: it takes the piece off the blowpipe by the base so you can open and finish the rim — the one part the blowpipe is physically in the way of.
Both are simple enough to make in an afternoon, and making them teaches you why they are shaped the way they are.
คำแนะนำ
Cut the blowpipe tube
Cut the blowpipe tube
Cut 1300 mm of seamless steel tube, 12 mm outside diameter with a 6 mm bore. That length keeps your face away from a 1100 °C furnace mouth — it is a safety dimension, not a style choice.
วัสดุสำหรับขั้นตอนนี้:
 ท่อเหล็ก 12 มม.1.3 เมตร
เครื่องมือที่ต้องใช้:
 เลื่อยมือ
Deburr both ends
Deburr both ends
File both ends square and clear the bore of every burr. A burr at the gathering end drags in the glass; a burr at the mouth end cuts your lip.
เครื่องมือที่ต้องใช้:
 ชุดตะไบเข็ม
Flare the gathering end
Flare the gathering end
Heat the last 30 mm of the gathering end to red and flare it slightly outward over a tapered punch. The flare gives the first gather something to grip; a plain cut tube sheds the glass.
เครื่องมือที่ต้องใช้:
 หัวพ่นไฟโพรเพน
 อิฐทนไฟ
Fit the wooden mouthpiece
Fit the wooden mouthpiece
Drill a hardwood block to a tight push fit and drive it onto the blowing end. Steel conducts heat far too well to hold in the mouth; wood does not.
วัสดุสำหรับขั้นตอนนี้:
 ท่อนไม้เนื้อแข็ง1 ชิ้น
Wrap the hand grip
Wrap the hand grip
Wrap the middle third with cord or leather. The pipe is rotated constantly during work and a bare steel tube is both slippery and, near the hot end, uncomfortably warm.
วัสดุสำหรับขั้นตอนนี้:
 เชือกมัดของ3 เมตร
Test the bore is clear
Test the bore is clear
Blow through it. Resistance means an obstruction or a partly-closed flare, and you will not discover that comfortably with 900 °C glass on the end.
Cut the pontil rod
Cut the pontil rod
Cut 1200 mm of 10 mm solid steel rod. The pontil is solid — it carries the piece, it does not carry air.
วัสดุสำหรับขั้นตอนนี้:
 แท่งเหล็กกลมคาร์บอนต่ำ1.2 เมตร
เครื่องมือที่ต้องใช้:
เลื่อยมือUpset the pontil tip
Upset the pontil tip
Heat the working end to orange and upset it to a slightly domed pad about 14 mm across. The pad is what a small bit of hot glass sticks to when you transfer the piece.
เครื่องมือที่ต้องใช้:
หัวพ่นไฟโพรเพนอิฐทนไฟFit the pontil handle
Fit the pontil handle
Fit a hardwood handle to the cold end. Both tools are held for long stretches while turning continuously — a handle is the difference between an hour's work and a blister.
วัสดุสำหรับขั้นตอนนี้:
 ไม้เนื้อแข็งสำหรับทำด้าม1 ชิ้น
Season both tools
Season both tools
Heat both to dull red and let them air-cool. This burns off oil and mill scale that would otherwise contaminate the first gathers with dirty streaks.
เครื่องมือที่ต้องใช้:
หัวพ่นไฟโพรเพนTake a test gather
Take a test gather
Warm the pipe end, dip into the melt, and turn continuously as you withdraw. Never stop turning — gravity pulls hot glass off-centre in about two seconds, and rotation is the only thing holding the gather symmetrical.
เครื่องมือที่ต้องใช้:
 เตาเผา
History & Context
History & Context
Before the pipe. Glass vessels existed for roughly 1,500 years before anyone blew one. They were core-formed — molten glass trailed around a shaped core of clay and dung which was scraped out afterwards — or cast and then ground and polished like stone. Both are slow and both limit you to small, thick-walled objects. That is why pre-Roman glass is jewellery-scale.
The jump. Glassblowing was invented by Syrian craftsmen in the first century BC. Workshops around Sidon, Aleppo, Hama and Palmyra produced blown vessels commercially and exported them across the Roman Empire. Early work included blowing into decorative moulds, giving vessels shaped as shells, grape clusters and human heads. Within a century glass had gone from precious to ordinary — the clearest case in antiquity of a tool change causing a price collapse.
Why you need two rods. The blowpipe is attached to the vessel exactly where the opening needs to be. You cannot open a rim while the pipe is in it. The pontil solves this: a blob of hot glass sticks it to the base, the piece is cracked off the blowpipe, and the mouth is now free to be reheated, opened and shaped. Every blown vessel with a finished rim implies this transfer.
The pontil mark. Breaking the finished piece off the pontil leaves a rough scar on the base. That mark is a dating and authentication tool — its presence, shape and whether it was later ground smooth tells a glass historian a great deal about when and how a piece was made. A tool leaves its signature, exactly as with the wheel-cut ends on a carved gem.
Why steel, and why long. The tools must stay rigid and hold their shape at temperatures where the glass is a thick liquid, which rules out anything softer. Length is a heat shield: the working end sits in a furnace mouth while the operator's face does not. Early pipes were sometimes clay rather than metal, which works but is fragile — metal won on durability, and the basic geometry has not changed in two thousand years.
วัสดุ
5- 1.3 เมตรตัวยึดตำแหน่ง
- 1 ชิ้นตัวยึดตำแหน่ง
- 3 เมตรตัวยึดตำแหน่ง
- 1.2 เมตรตัวยึดตำแหน่ง
- 1 ชิ้นตัวยึดตำแหน่ง
พิมพ์เขียวนี้สร้าง


CC0 สาธารณสมบัติ
พิมพ์เขียวนี้เผยแพร่ภายใต้ CC0 คุณสามารถคัดลอก แก้ไข แจกจ่าย และใช้งานผลงานนี้เพื่อวัตถุประสงค์ใดก็ได้ โดยไม่ต้องขออนุญาต
สนับสนุนเมกเกอร์โดยซื้อสินค้าผ่านพิมพ์เขียวของพวกเขา ซึ่งพวกเขาจะได้รับ ค่าคอมมิชชันเมกเกอร์ ที่ผู้ขายกำหนด หรือสร้างเวอร์ชันใหม่ของพิมพ์เขียวนี้และรวมเป็นการเชื่อมต่อในพิมพ์เขียวของคุณเพื่อแบ่งรายได้