ศิลปะ
ความงามและสุขภาพ
งานฝีมือ
วัฒนธรรมและประวัติศาสตร์
ความบันเทิง
สิ่งแวดล้อม
อาหารและเครื่องดื่ม
วิศวกรรมย้อนรอย
วิทยาศาสตร์
กีฬา
เทคโนโลยี
อุปกรณ์สวมใส่
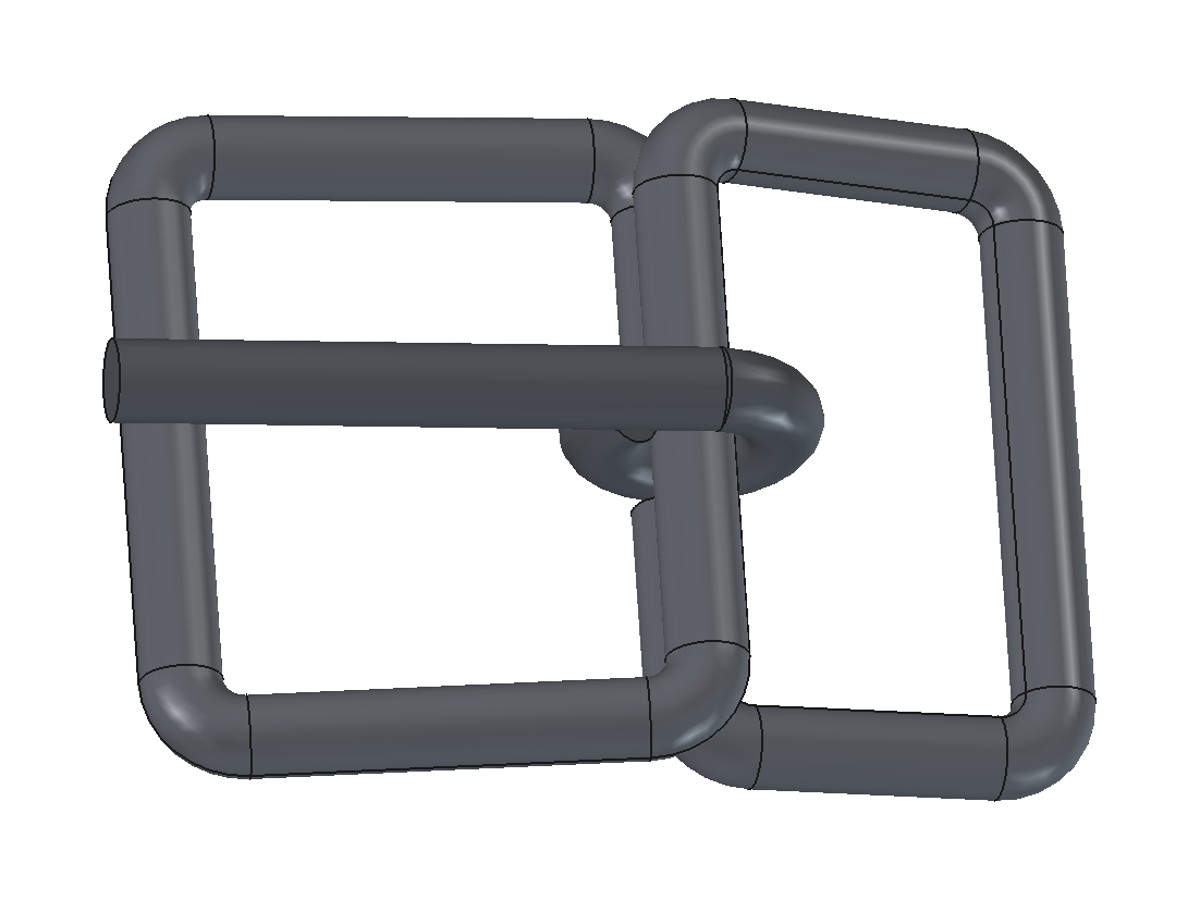


Iron Buckle with Tongue: One Bent Wire Forming Both Loops and the Tongue Bar (after Schleicher, 1907)
A strap buckle for harness and belts made from one piece of iron wire: bent into a tongue loop and a tuck loop that share the middle bar, the two ends tucked under the bar and soldered, and a wire tongue looped round the bar. William Schleicher patented this way of making a buckle in 1907. Sized for a 25 mm strap.
เริ่มต้น
About 1 hour
คำแนะนำ
1
1
A square buckle made at the forge
A square buckle made at the forge
A square buckle for a 1 in. strap made at the forge (Beau Beckett). Ours is bent cold from wire and soldered.
2
2
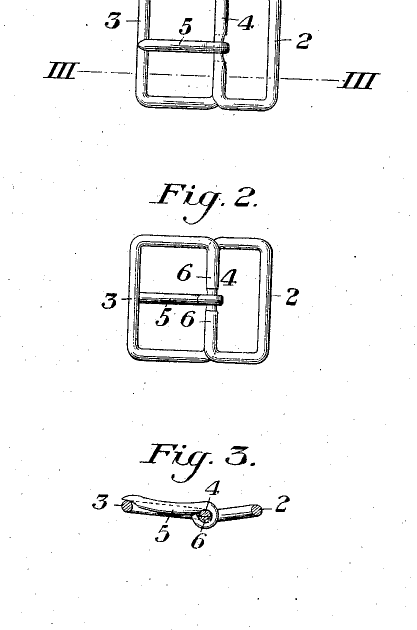
Schleicher's wire buckle, 1907
Schleicher's wire buckle, 1907
US 850,792: one piece of wire bent to form the tuck loop 2 and the tongue loop 3. The middle of the wire is the bar 4 between them, the pin for the tongue 5. The bar's underside is filed a little flat, the free ends 6 run back under it, and the frame is tinned, the ends soldered to the bar and the tongue put on.
3
3
Print the bending plan
Print the bending plan
The buckle at 1:1 with the bend marks A to H and the tongue. Print at 100 % and check the 50 x 10 mm box.
4
4
Cut and mark the wire
Cut and mark the wire
Cut 190 mm of 4 mm iron wire for the frame and 52 mm for the tongue. File the ends square and mark the frame wire at the eight bend marks from the plan.
วัสดุสำหรับขั้นตอนนี้:
 ลวดเหล็กดัด1 piece (4 mm, 250 mm)
เครื่องมือที่ต้องใช้:
 เลื่อยตัดเหล็ก
 ปากกาจับชิ้นงานหน้าโต๊ะ
 ตะไบโลหะ
 เวอร์เนียร์ดิจิทัล 6 นิ้ว
5
5
Bend the frame
Bend the frame
Bend 90 degrees at each mark in order, A to H, all the same way round, checking the shape on the plan after each bend: A to D make the tongue loop and bring the wire back along the bar, E to H make the tuck loop. Bends A and H put the two ends under the bar. Bend each loop about 8 degrees down from the bar.
เครื่องมือที่ต้องใช้:
ปากกาจับชิ้นงานหน้าโต๊ะ คีมปากแบน
 คีมปากกลม
 ค้อนหัวกลม
6
6
Fit the ends under the bar
Fit the ends under the bar
File about 0.6 mm off the underside of the bar so it is flat. Squeeze both ends up tight against it, leaving 6 mm of bare bar in the middle for the tongue.
เครื่องมือที่ต้องใช้:
ตะไบโลหะคีมปากแบนปากกาจับชิ้นงานหน้าโต๊ะ7
7
Tin and solder
Tin and solder
Clean the frame bright with emery and brush on flux for steel. Heat it with the torch and run solder over the whole frame to tin it, and into the joints between the ends and the bar so they are soldered to it. Let it cool, then wash off the flux.
วัสดุสำหรับขั้นตอนนี้:
 ลวดตะกั่วบัดกรี5 ก.
 ฟลักซ์บัดกรี2 ก.
เครื่องมือที่ต้องใช้:
 กระดาษทรายอีเมอรี
 หัวพ่นไฟโพรเพน
 ถุงมือกันความร้อน
 แว่นนิรภัย
8
8
Put on the tongue
Put on the tongue
File one end of the tongue wire to a rounded point. Wrap the other end once round the bare middle of the bar so it turns freely, with the tip resting just past the far side of the tongue loop.
เครื่องมือที่ต้องใช้:
คีมปากกลมตะไบโลหะปากกาจับชิ้นงานหน้าโต๊ะ9
9
Troubleshooting
Troubleshooting
Buckle problems and fixes.
Flow
Loading...
10
10
History and honest limits
History and honest limits
William A. Schleicher, Cleveland, Ohio, for the Eberhard Manufacturing Company: US 850,792, "Wire Buckle", filed 14 June 1906, granted 16 April 1907. He does not give the wire size or loop sizes: ours are for a 25 mm strap. A wire buckle is lighter than a forged one; use a thicker wire and bigger loops for heavy draught harness. Not made by us yet.
วัสดุ
3- 1 piece (4 mm, 250 mm)ตัวยึดตำแหน่ง
- 5 ก.ตัวยึดตำแหน่ง
- 2 ก.ตัวยึดตำแหน่ง
เครื่องมือที่จำเป็น
11- ตัวยึดตำแหน่ง
- ตัวยึดตำแหน่ง
- ตัวยึดตำแหน่ง
- ตัวยึดตำแหน่ง
- ตัวยึดตำแหน่ง
- ตัวยึดตำแหน่ง
- ตัวยึดตำแหน่ง
- ตัวยึดตำแหน่ง
- ตัวยึดตำแหน่ง
- ตัวยึดตำแหน่ง
- ตัวยึดตำแหน่ง
ไฟล์ออกแบบ
1วัสดุจากพิมพ์เขียวที่เชื่อมต่อ
พิมพ์เขียวนี้สร้าง

บลูพริ้นท์ที่เกี่ยวข้อง
บลูพริ้นท์เหล่านี้แบ่งปันความรู้ — เทคนิค วัสดุ หรือหลักการ
CC0 สาธารณสมบัติ
พิมพ์เขียวนี้เผยแพร่ภายใต้ CC0 คุณสามารถคัดลอก แก้ไข แจกจ่าย และใช้งานผลงานนี้เพื่อวัตถุประสงค์ใดก็ได้ โดยไม่ต้องขออนุญาต
สนับสนุนเมกเกอร์โดยซื้อสินค้าผ่านพิมพ์เขียวของพวกเขา ซึ่งพวกเขาจะได้รับ ค่าคอมมิชชันเมกเกอร์ ที่ผู้ขายกำหนด หรือสร้างเวอร์ชันใหม่ของพิมพ์เขียวนี้และรวมเป็นการเชื่อมต่อในพิมพ์เขียวของคุณเพื่อแบ่งรายได้