ศิลปะ
ความงามและสุขภาพ
งานฝีมือ
วัฒนธรรมและประวัติศาสตร์
ความบันเทิง
สิ่งแวดล้อม
อาหารและเครื่องดื่ม
วิศวกรรมย้อนรอย
วิทยาศาสตร์
กีฬา
เทคโนโลยี
อุปกรณ์สวมใส่
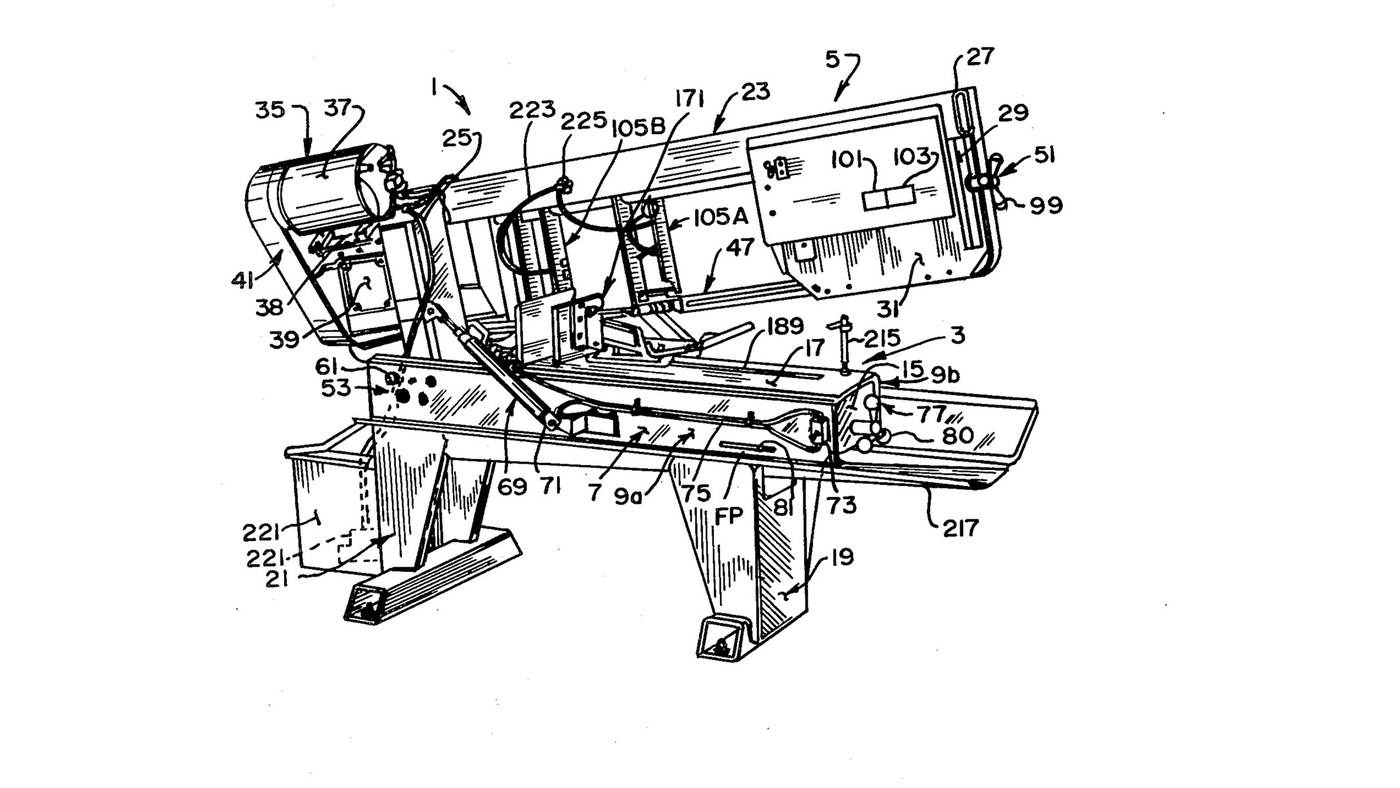


Metal Band Saw: Horizontal Saw on a Welded Steel Frame
Curtis Eccardt's horizontal power band saw (Emerson Electric, US 4,364,294, 1982), built from welded steel channel and tube instead of iron castings to cut its cost. The saw head swings down on trunnions over the bed; a hydraulic cylinder with a valve sets how fast it feeds, a spring counterbalances it, and a spring tensioner shows the blade tension on a scale. Two guides with rollers twist the blade's lower run 90° so its teeth face down into the work, and carbide inserts hold it there.
The patent gives no sizes, speeds or ratings; the welder and wrenches are ours. The picture: the patent's Fig. 1.
ขั้นสูง
4 days
คำแนะนำ
1
1
Weld the bed
Weld the bed
Stand two steel channels (9a, 9b) parallel, webs upright and flanges facing in, and weld gussets (15) between their webs. Bolt a bed plate (17) across the top flanges as the work surface. Ours: MIG welder, drill press for the bolt holes.
วัสดุสำหรับขั้นตอนนี้:
 เหล็กรูปตัวยู2 ชิ้น
 แผ่นเหล็กกล้าละมุน1 ชิ้น
 สลักเกลียวหัวหกเหลี่ยม - เกรด 8.81 ชิ้น
เครื่องมือที่ต้องใช้:
 เครื่องเชื่อม MIG
 สว่านแท่น
 ประแจเลื่อน
2
2
Weld and bolt on the legs
Weld and bolt on the legs
Weld formed sheet-steel legs onto horizontal floor members to make front and rear leg weldments (19, 21), and bolt them under the bed.
วัสดุสำหรับขั้นตอนนี้:
 แผ่นเหล็ก1 ชิ้น
 ท่อเหล็กโครงสร้าง1 ชิ้นสลักเกลียวหัวหกเหลี่ยม - เกรด 8.81 ชิ้น
เครื่องมือที่ต้องใช้:
เครื่องเชื่อม MIGประแจเลื่อน3
3
Weld the head
Weld the head
Weld a head post (25) of square or rectangular steel tube square to a head beam (27) of rectangular tube. Weld a bracket leg (29) down from the beam's outer end, and fix support plates at both ends (31, 33).
วัสดุสำหรับขั้นตอนนี้:
ท่อเหล็กโครงสร้าง1 ชิ้นแผ่นเหล็กกล้าละมุน1 ชิ้นเครื่องมือที่ต้องใช้:
เครื่องเชื่อม MIG4
4
Fit the trunnions and align the pivot
Fit the trunnions and align the pivot
Fix a shaft through the head post with its ends out as trunnions (55a, 55b), in bushings in two bearing blocks (59a, 59b) bolted inside the channel webs. Each block has one close-fit bolt hole and three oversize ones: shift the blocks until the pivot is parallel to the bed plate, then torque the bolts. A set screw (67) takes out end play.
วัสดุสำหรับขั้นตอนนี้:
 เพลาเหล็กกล้า1 ชิ้น
 บูชโลหะ2 ชิ้น
 ตุ๊กตาลูกปืน2 ชิ้นสลักเกลียวหัวหกเหลี่ยม - เกรด 8.88 ชิ้น
 สกรูหนอนปลายเว้า1 ชิ้น
เครื่องมือที่ต้องใช้:
สว่านแท่น ประแจวัดแรงบิด
5
5
Mount motor, belt drive and gearbox
Mount motor, belt drive and gearbox
Mount the electric motor (37) on a plate (38) pivoted on the head beam, and couple it by a multi-speed belt and pulleys (41) to a gearbox (39). Fit the drive wheel (43) on the gearbox output shaft.
วัสดุสำหรับขั้นตอนนี้:
 มอเตอร์ไฟฟ้า1 ชิ้นแผ่นเหล็กกล้าละมุน1 ชิ้น
 สายพานขับ1 ชิ้น
 รอก1 ชิ้น
 กล่องเกียร์1 ชิ้น
 ล้อเลื่อยสายพาน1 ชิ้น
เครื่องมือที่ต้องใช้:
ประแจเลื่อน6
6
Build the idler tensioner
Build the idler tensioner
Weld an idler yoke (87) of rolled steel plate, pivot it on the head beam with a pin (89), and cantilever the idler axle from it with the idler wheel (45) on bearings (85). A threaded rod (91) pulls the yoke through a coil spring (93) held between compression plates and a U-bolt (97); a knob (99) turns the rod. An indicator (101) on the spring reads the tension on a scale (103).
วัสดุสำหรับขั้นตอนนี้:
แผ่นเหล็กกล้าละมุน1 ชิ้น สลักเหล็กกล้า1 ชิ้นเพลาเหล็กกล้า1 ชิ้นล้อเลื่อยสายพาน1 ชิ้น
 ตลับลูกปืน1 ชิ้น
 เพลาเกลียว1 ชิ้น
 Coil Spring1 ชิ้น
 ยูโบลต์1 ชิ้น
 ปุ่มหมุนควบคุม1 ชิ้น
เครื่องมือที่ต้องใช้:
เครื่องเชื่อม MIGประแจเลื่อน7
7
Build the two blade guides
Build the two blade guides
In each guide channel (111) mount two guide rollers (115a, 115b) on ball bearings on eccentric bushings, one fixed and one adjusted to the blade thickness. Add a carbide thrust insert (133) on the blade's back edge and two carbide side inserts (137a fixed, 137b on a sprung swing bracket set by a bolt and knob). Clamp the guides on two bar tracks (107).
วัสดุสำหรับขั้นตอนนี้:
 ลูกกลิ้งนำทาง4 ชิ้นตลับลูกปืน4 ชิ้น
 บุชเยื้องศูนย์4 ชิ้น
 เม็ดคาร์ไบด์6 ชิ้นCoil Spring2 ชิ้นปุ่มหมุนควบคุม2 ชิ้นท่อเหล็กโครงสร้าง1 ชิ้น
เครื่องมือที่ต้องใช้:
ประแจเลื่อน8
8
Fit the blade and set the tension
Fit the blade and set the tension
By hand, run the endless blade (47) round the drive and idler wheels and through both guides; the rollers twist its lower run about 90° so the teeth face down. Turn the tension knob until the scale shows the tension you want.
วัสดุสำหรับขั้นตอนนี้:
 ใบเลื่อยสายพาน1 ชิ้น
9
9
Fit the feed cylinder and counterbalance
Fit the feed cylinder and counterbalance
Connect a hydraulic cylinder (71) between bed channel and head post above the trunnions, filled with oil and piped through tubing (75) to a control valve (73): the valve sets the feed rate and, closed, holds the head. Fit a coil spring (78) on a threaded linkage (79) between an end gusset and the head post below the trunnions, adjusted by a knob (80), to counterbalance the head.
วัสดุสำหรับขั้นตอนนี้:
 กระบอกสูบไฮดรอลิก1 ชิ้น
 น้ำมันไฮดรอลิก1 batch
 ท่อไฮดรอลิก1 ชิ้น
 วาล์วควบคุมอัตราการไหล1 ชิ้นCoil Spring1 ชิ้นเพลาเกลียว1 ชิ้นปุ่มหมุนควบคุม1 ชิ้น
เครื่องมือที่ต้องใช้:
ประแจเลื่อน10
10
Bolt on the vice
Bolt on the vice
Bolt the quick-acting vice to the bed plate to clamp the work square under the blade.
วัสดุสำหรับขั้นตอนนี้:
 ปากกาจับชิ้นงานของเครื่อง1 ชิ้นสลักเกลียวหัวหกเหลี่ยม - เกรด 8.81 ชิ้น
เครื่องมือที่ต้องใช้:
ประแจเลื่อนวัสดุ
29- 2 ชิ้นตัวยึดตำแหน่ง
- 1 ชิ้นตัวยึดตำแหน่ง
- ตัวยึดตำแหน่ง
- 1 ชิ้นตัวยึดตำแหน่ง
- 1 ชิ้นตัวยึดตำแหน่ง
- 1 ชิ้นตัวยึดตำแหน่ง
- 2 ชิ้นตัวยึดตำแหน่ง
- 2 ชิ้นตัวยึดตำแหน่ง
- 1 ชิ้นตัวยึดตำแหน่ง
- 1 ชิ้นตัวยึดตำแหน่ง
- 1 ชิ้นตัวยึดตำแหน่ง
- 1 ชิ้นตัวยึดตำแหน่ง
- 1 ชิ้นตัวยึดตำแหน่ง
- 1 ชิ้นตัวยึดตำแหน่ง
- 1 ชิ้นตัวยึดตำแหน่ง
- ตัวยึดตำแหน่ง
- 1 ชิ้นตัวยึดตำแหน่ง
- 4 ชิ้นตัวยึดตำแหน่ง
- 1 ชิ้นตัวยึดตำแหน่ง
- ตัวยึดตำแหน่ง
- 4 ชิ้นตัวยึดตำแหน่ง
- 4 ชิ้นตัวยึดตำแหน่ง
- 6 ชิ้นตัวยึดตำแหน่ง
- 1 ชิ้นตัวยึดตำแหน่ง
- 1 ชิ้นตัวยึดตำแหน่ง
- 1 batchตัวยึดตำแหน่ง
- 1 ชิ้นตัวยึดตำแหน่ง
- 1 ชิ้นตัวยึดตำแหน่ง
- ตัวยึดตำแหน่ง
พิมพ์เขียวนี้สร้าง
CC0 สาธารณสมบัติ
พิมพ์เขียวนี้เผยแพร่ภายใต้ CC0 คุณสามารถคัดลอก แก้ไข แจกจ่าย และใช้งานผลงานนี้เพื่อวัตถุประสงค์ใดก็ได้ โดยไม่ต้องขออนุญาต
สนับสนุนเมกเกอร์โดยซื้อสินค้าผ่านพิมพ์เขียวของพวกเขา ซึ่งพวกเขาจะได้รับ ค่าคอมมิชชันเมกเกอร์ ที่ผู้ขายกำหนด หรือสร้างเวอร์ชันใหม่ของพิมพ์เขียวนี้และรวมเป็นการเชื่อมต่อในพิมพ์เขียวของคุณเพื่อแบ่งรายได้