ศิลปะ
ความงามและสุขภาพ
งานฝีมือ
วัฒนธรรมและประวัติศาสตร์
ความบันเทิง
สิ่งแวดล้อม
อาหารและเครื่องดื่ม
วิศวกรรมย้อนรอย
วิทยาศาสตร์
กีฬา
เทคโนโลยี
อุปกรณ์สวมใส่
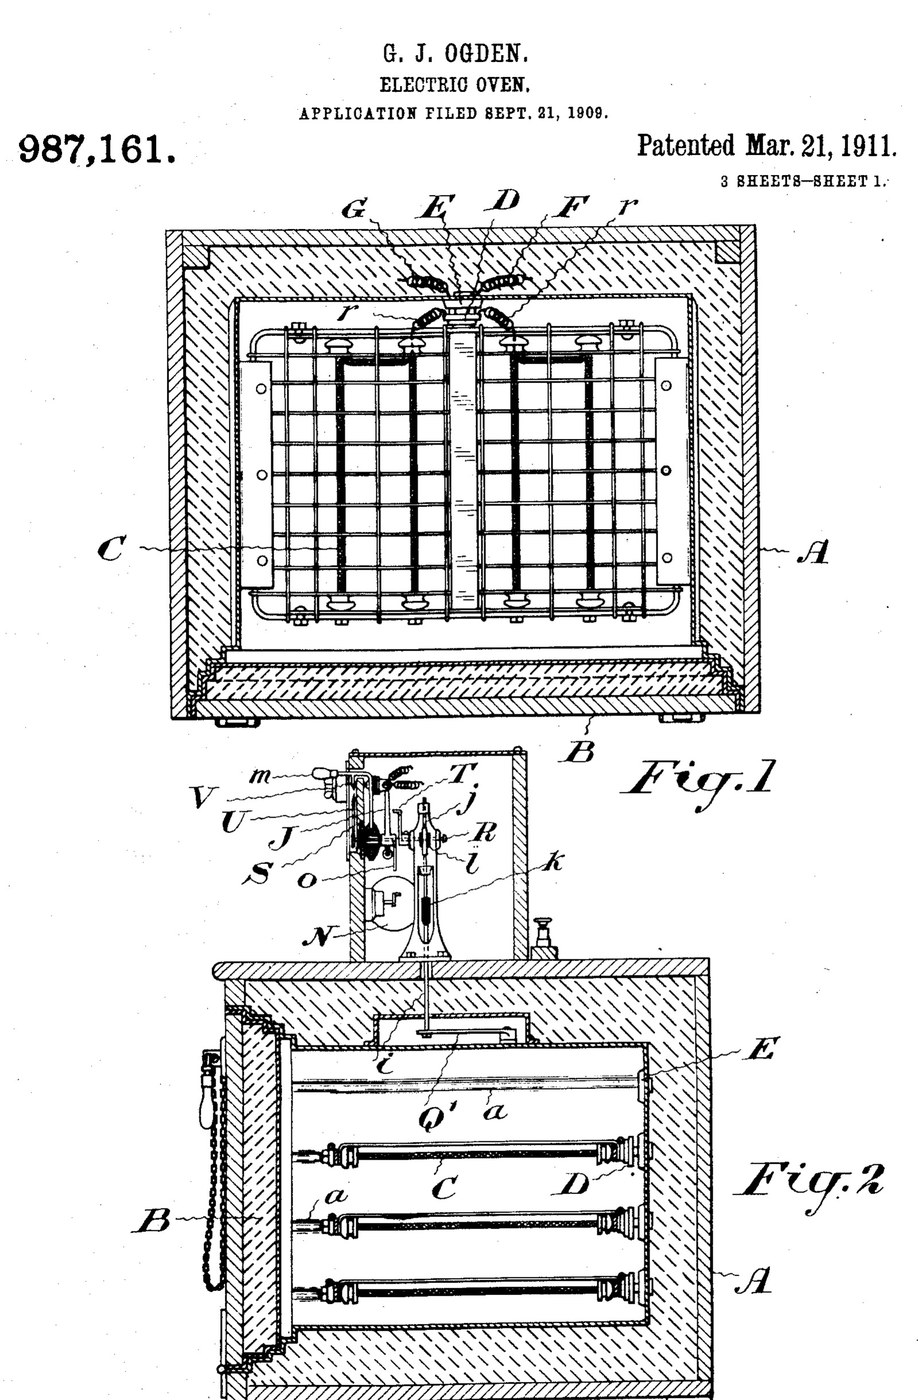


Oven: Insulated Electric Oven with Plug-In Grid Heaters and a Thermostat (Ogden, US 987,161, 1911)
An electric oven built to waste as little heat as possible: a double-walled, packed box with a packed door that seals like a strong-room door. Grid-shaped heating elements slide into grooves in the walls and plug into sockets at the back, and the food rests on them. A thermostat cuts the current when the set temperature is reached and switches it on again as the oven cools.
Result: an oven that bakes, roasts or dries at a set temperature with any number of heating grids.
Source: G. J. Ogden, US 987,161 (1911). Unknown: sizes, metals, packing and temperatures. Picture: the patent drawing.
ขั้นสูง
Unknown
คำแนะนำ
1
1
Build the insulated casing and door
Build the insulated casing and door
Make the oven chamber as a double-walled casing with packing between the walls, and grooves on the inner side walls to take the heating grids. Fit a door that closes like a fire-proof vault door, also packed, so the casing seals closely. Ours: mild steel sheet. Not given: sizes, the packing.
วัสดุสำหรับขั้นตอนนี้:
 แผ่นเหล็กกล้าละมุน1 inner and outer walls, door
 วัสดุฉนวนที่ไม่ทราบ1 packing
เครื่องมือที่ต้องใช้:
 กรรไกรตัดแผ่นโลหะ
 สว่านแท่น
 ขนาดที่ไม่ทราบ
2
2
Make the plug-in heating grids
Make the plug-in heating grids
Make heating elements in the form of grids that slide into the grooves and on which the food can rest. Fix a porcelain plug to each, carrying spring fingers that push into a socket with matching spring fingers in the back wall. Wire the sockets so all the elements are in parallel; use as many as the temperature and amount of food need. Ours: nichrome wire. Not given: the element type.
วัสดุสำหรับขั้นตอนนี้:
 ลวดนิโครม1 heating grids
 วัสดุที่ไม่ทราบ1 porcelain plugs and sockets
 ลวดเหล็กสปริง1 spring fingers
 สายฮุกอัป1 circuit wiring
เครื่องมือที่ต้องใช้:
 หัวแร้งบัดกรี
3
3
Fit the thermostat control
Fit the thermostat control
Put a thermostat that bends with heat inside the oven, working a contact finger that plays between two contacts a few degrees above and below the set temperature. A switch-changing device, a small rotary motor, throws the main switch off and on as the finger touches one contact or the other. Mount a setting arm with a pointer over a scale marked in degrees, and a second pointer driven by the thermostat. Add a hand switch to turn the current on or off independently, and a lamp with its own switch to light the oven. Ours: a bimetal strip, toggle switches. Not given: temperatures.
วัสดุสำหรับขั้นตอนนี้:
 แผ่นโลหะคู่1 thermostat
 มอเตอร์ไฟฟ้า1 switch-changing motor
 สวิตช์โยก3 main, hand and lamp switches
 โลหะที่ไม่ทราบ1 contacts, arm, scaleวัสดุที่ไม่ทราบ1 incandescent oven lamp
เครื่องมือที่ต้องใช้:
หัวแร้งบัดกรี เทอร์โมมิเตอร์
วัสดุ
10- 1 inner and outer walls, doorตัวยึดตำแหน่ง
- 1 packingตัวยึดตำแหน่ง
- 1 heating gridsตัวยึดตำแหน่ง
- 1 incandescent oven lampตัวยึดตำแหน่ง
- 1 spring fingersตัวยึดตำแหน่ง
- ตัวยึดตำแหน่ง
- 1 thermostatตัวยึดตำแหน่ง
- 1 switch-changing motorตัวยึดตำแหน่ง
- ตัวยึดตำแหน่ง
- 1 contacts, arm, scaleตัวยึดตำแหน่ง
เครื่องมือที่จำเป็น
5- ตัวยึดตำแหน่ง
- ตัวยึดตำแหน่ง
- ตัวยึดตำแหน่ง
- 2 vendors sell this, none ship to you yetตัวยึดตำแหน่ง
- ตัวยึดตำแหน่ง
วัสดุจากพิมพ์เขียวที่เชื่อมต่อ

พิมพ์เขียวนี้สร้าง

CC0 สาธารณสมบัติ
พิมพ์เขียวนี้เผยแพร่ภายใต้ CC0 คุณสามารถคัดลอก แก้ไข แจกจ่าย และใช้งานผลงานนี้เพื่อวัตถุประสงค์ใดก็ได้ โดยไม่ต้องขออนุญาต
สนับสนุนเมกเกอร์โดยซื้อสินค้าผ่านพิมพ์เขียวของพวกเขา ซึ่งพวกเขาจะได้รับ ค่าคอมมิชชันเมกเกอร์ ที่ผู้ขายกำหนด หรือสร้างเวอร์ชันใหม่ของพิมพ์เขียวนี้และรวมเป็นการเชื่อมต่อในพิมพ์เขียวของคุณเพื่อแบ่งรายได้